Saving Arduino Sensor Data

We had a need to take the temperature of an environment over a period of time, and record those temperatures for later analysis.
There are a number of options for recording sensor data.
-
If connected to a computer, the data can be saved by reading the serial output and storing that in a file.
-
If there is an SD card connected to the Arduino, the data can be saved directly to the SD card.
In this case, the Arduino needed to function by itself without being connected to a computer, so the sensor data needed to be saved to an SD card. We also needed the temperature sensor to be quite a distance from the Arduino and batteries, to minimize radiant heat affecting the temperature, so I soldered the sensor on to lengths of wire.
A number of extension shields offer SD card readers. We had a WiFi shield with an SD card reader, so that is the one I used.
There are some limitations with this set up. The biggest issue is that this set up does not include a time stamp with the temperatures. In order to get a timestamp, it is best to record the data with the Arduino connected to a computer, or a Raspberry Pi. See here for code to capture the sensor data on a computer (like a Raspberry Pi) using Python: https://github.com/mossiso/arduino-tuts/tree/master/raspberry-pi
Another way is to use a dedicated SD card shield with an RTC (Real Time Clock) built in, such as this one from adafruit: https://www.adafruit.com/products/1141
Hardware
-
Arduino Uno
-
Wifi Shield or other shield with an SD card reader.
-
This sketch uses a Wifi shield with SD card. This one uses the Adafruit CC3000 shield.
-
Instructions for installation here: https://learn.adafruit.com/adafruit-cc3000-wifi/cc3000-shield
-
Tips for installing male headers or stackable headers: https://learn.sparkfun.com/tutorials/arduino-shields#installing-headers-preparation
-
-
SD card
-
Temperature sensor
-
Battery pack
-
This set up works well with an external battery pack.
-
https://www.adafruit.com/products/248?&main_page=product_info&products_id=248
-
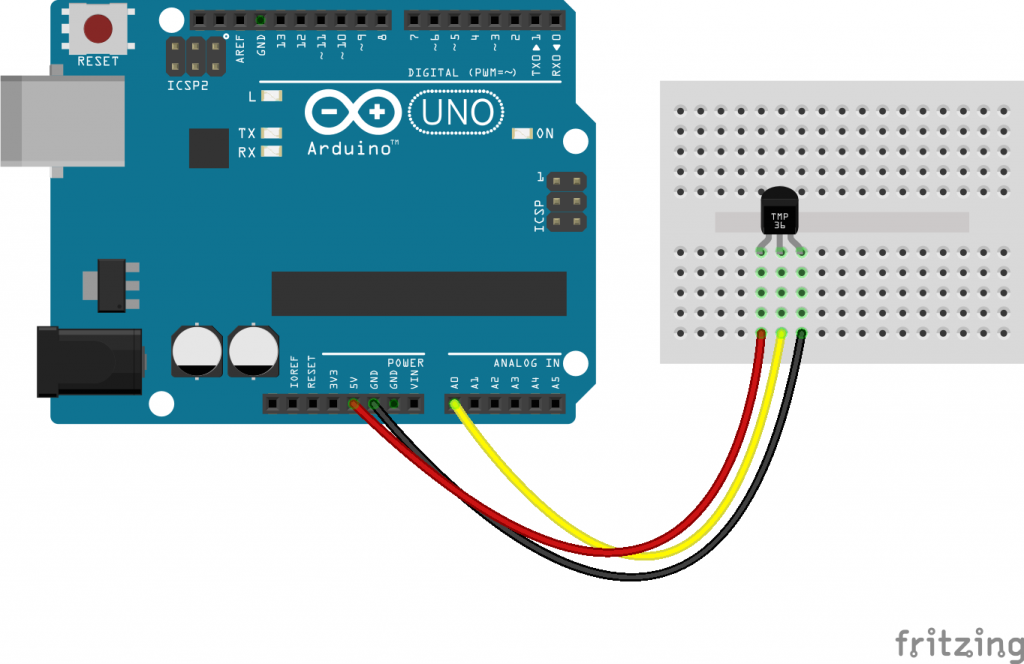
Wiring Diagram

Code
// SPI and SD libraries. SPI for connecting SD card to SPI bus.
#include <SPI.h>
#include <SD.h>
const int sdPin = 4;

// Temperature pin set to analog 0
const int temPin = 0;

// Delay time. How often to take a temperature reading, in miliseconds
// 20 minutes = 1200000 milliseconds
const int delayTime = 1200000;

// File variable
File tempsFile;


void setup() {
  // Serial output for when connected to computer
  Serial.begin(9600);
  while (!Serial) {
    ; // wait for serial port to connect. Needed for native USB port only
  }

  Serial.print("Initializing SD card...");
  if(!SD.begin(sdPin)) {
    Serial.println("initialization failed!");
    return;
  }
  Serial.println("Initialization done.");

  tempsFile = SD.open("temps.txt", FILE_WRITE);

  if (tempsFile) {
    Serial.println("Printing temperatures");
    tempsFile.println("Printing temperatures:");
    tempsFile.close();
    Serial.println("Done.");
  } else {
    Serial.println("Error opening file in setup.");
  }

}

void loop() {
  /********************/
  // Open SD card for writing
  tempsFile = SD.open("temps.txt", FILE_WRITE);

  if (tempsFile) {
    // Temperature readings
    float voltage, degreesC, degreesF;
    voltage = getVoltage(temPin);
    degreesC = (voltage - 0.5) * 100.0;
    degreesF = degreesC * (9.0/5.0) + 32.0;

    // write temps to Serial
    Serial.print("Celsius: ");
    Serial.print(degreesC);
    Serial.print(" Fahrenheit: ");
    Serial.println(degreesF);

    // write temps to SD card
    tempsFile.print("Celsius: ");
    tempsFile.print(degreesC);
    tempsFile.print(" Fahrenheit: ");
    tempsFile.println(degreesF);

    // close the file
    tempsFile.close();
  } else {
    Serial.println("Error opening file in loop.");
  }


  delay(delayTime);

}

float getVoltage(int pin)
{
  return (analogRead(pin) * 0.004882814);
}
