Creating themes for individual Neatline exhibits
tldr: Neatline makes it possible to create separate themes for individual exhibits, which is useful if you want to host a collection of self-contained Neatline projects on a single site. To get started, fork the exhibit starter theme, which abstracts out the style, layout, and UX of the Project Gemini over Baja California exhibit.
One of the coolest but most under-documented features in Neatline is the ability to create separate themes for each individual exhibit. Since Neatline exhibits are just one particular type of “view” inside of Omeka, it’s always been possible to customize the styling and layout at the level of the Omeka theme. Changes the the Omeka theme, though, propagate to all the exhibits on the site. In many cases, this is ideal - if you have a collection of closely-related Neatline projects, all part of the same thematic umbrella, it makes sense that they should all look more or less the same. For examples of this, check out Jeremy’s beautiful Astrolabe and Neatscape themes for Omeka, which were designed with Neatline projects in mind.
In other cases, though, this can be a real hindrance. Sometimes it can make sense to host a number of self-contained Neatline exhibits in the same installation of Omeka. For example, imagine you’re using Neatline in a big lecture course, and you split the class up into 10-15 groups of students, all working on separate exhibits. As the semester draws to an end, some of the groups want to use the NeatlineText plugin, and need a layout that positions the exhibit narrative on the side of the screen, flush with the edge of the window. But other groups are just threading the text content into the record bodies, and don’t want a big, empty container element taking up space on the screen. How to handle both at once? Or, for a concrete example, take a look at the Neatline Labs site, which I use a sandbox for little Neatline-powered experiments and feature demos. By design, these projects are all totally different - different content, different layouts, different Javascript interactions, etc:
It would be annoying to have to spin up a completely new instance of Omeka for each of these projects. To get around this, Neatline implements its own “sub-theming” system, piggybacking on top of the capabilities provided by Omeka, that makes it possible to customize part or all of the appearance, layout, or behavior of each exhibit on an individual basis. This is an opt-in system that can be mixed with the regular, site-wide theming system - if you have 10 Neatline exhibits on your site, you could write exhibit-specific themes for three of them, and leave the other seven unchanged, allowing them to continue to inherit the generic Omeka theme. And, within the three exhibit-specific themes, you have full control over which parts of the theme you override - for one, you could leave the layout unchanged, but modify the CSS; for another, you could leave the CSS the same but change the layout and add some custom Javascript interactions. Exhibit-specific themes are also highly portable - once you’ve built one to your liking, it can be adapted for new exhibits just by copying and renaming the directory.
I’ve held off on documenting this publicly because I wanted to be sure that the file structure and Javacsript APIs used in the themes worked well at scale - but at this point it’s all pretty battle tested, and I’m curious to see what other folks can come up with!
Getting started: Creating the theme directory
Neatline themes are created as directories that sit inside of the Omeka theme. For any given exhibit, Neatline will look for a theme directory that has the same name as the “URL slug” of the exhibit, the unique, plain-text identifier used to form the end of the exhibit’s public-facing URL. So, imagine you’ve got an exhibit called “Test Exhibit,” with a URL slug of test-exhibit. To create a theme for the exhibit, create a directory called test-exhibit at this location relative to the root of your Omeka theme:
[omeka-theme]/neatline/exhibits/themes/test-exhibit
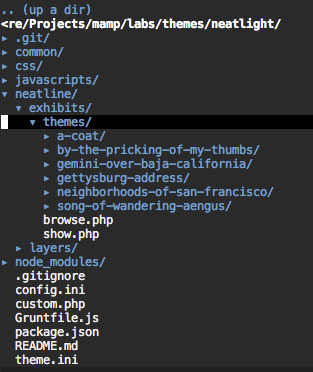
For example, here’s the layout of my fork of the Neatlight theme, with the theme directories for a handful of exhibits at neatline.dclure.org:
Anatomy of a Neatline theme
Neatline themes consist of just four files: style.css, script.js, show.php, and item.php.
style.css
Use style.css to add custom CSS to the exhibit. Neatline loads this as the last stylesheet on the page, after the Omeka CSS and after the CSS provided by the Neatline core (which, if you want, can be omitted from the page by providing a custom show.php template - see below). style.css can be anything from a handful of simple rules to change fonts or colors up to a complete redesign of the page.
script.js
Use script.js to add custom Javascript interactions to the page. Again, these can be as simple or complex as needed. The Neatline front-end application is a big chunk of code, and it’s a bit beyond the scope of this article to really dive into the API in detail. The gist of it, though, is that Neatline is structured as a bunch of little mini-applications, called “modules,” that communicate with one another using a pub-sub messaging system, powered by the superb EventAggregator component in the Marionette framework.
The cool thing about this architecture is that snippets of code in the script.js file can hook directly into this messaging system and interact with Neatline just as if they were included in the core codebase - neatline literally won’t know the difference. There’s really no limit to what you could do here - the entire Neatline editing environment, for instance, is implemented as a single module (containing lots and lots of nested sub-modules), and could theoretically be grafted onto Neatline completely inside of an exhibit theme. This makes it possible to wrap up a Neatline exhibit in pretty much any kind of interface without having to modify the internals.
That said, in most cases you’ll probably just need a few little snippets to add in some visual bells and whistles, or to manage complex layout tasks that are tough to accomplish in CSS. For example, here are a few snippets I used in the Project Gemini over Baja California project:
-
Position the text container on the left side of the screen and fill the height of the window:
-
Add an NProgress-powered loading bar to the page:
-
Implement custom zooming buttons:
-
Add a “Loading Tiles…” spinner that displays when WMS imagery is being loaded from Geoserver:
For an example of a fully-fledged module, which follows the file layout conventions of the Neatline core, take a look at the Lines module in the Gemini theme, which intercepts events broadcast by NeatlineText and draws the little yellow lines between the text and the map.
show.php
By default, all Neatline exhibits are displayed using the show.php that ships with the plugin. If you create a file called show.php in the exhibit theme, though, Neatline will use that file in place of the default. This makes it possible to completely customize the structure of the markup in any way you want. For example, if you look closely at some of the Jacascript examples above, you’ll notice that in a couple of places the code is selecting elements (things like $('#wms-loader') and $('div.narrative')) that aren’t actually templated anywhere in the default show.php, which looks like this:
This works, though, because I’m providing a custom show.php template that provides those elements (e.g., see the #wms-loader element down near the bottom):
item.php
Last but not least, Neatline makes it possible to override the template that’s used to generate the metadata output for items displayed inside Neatline exhibits. By default, Neatline uses a simple template that pretty much just follows the layout of the regular item “show” pages in Omeka:
But, imagine you had an exhibit that was filled with items that represent photographs, and, for the sake of cleanliness and visual economy, you just want to display the item title and the image thumbnail. Just drop in a new item.php template that does exactly what you need:
And Neatline will automatically use that template instead of the default. What if you need different templates for different items, though? For example, imagine that you actually have two types of items in the exhibit - the images, which just need the title and thumbnail, but also a set of letters, which are structured as “Text” type items with the transcriptions of the documents entered into the “Text” field. So, how to display both types of items in the exhibit, without resorting to a weird, Frankenstein template that accommodates both?
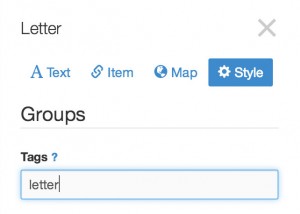
First, add tags to the records in Neatline:
Then, just create two template in the exhibit theme - one called item-image.php (the same as above), the other called item-letter.php. In the letter template, just display the title and text:
Neatline will automatically use the tag-specific templates for any records tagged with image or letter, and fall back to the unadorned item.php template for records that aren’t tagged.
Starter theme
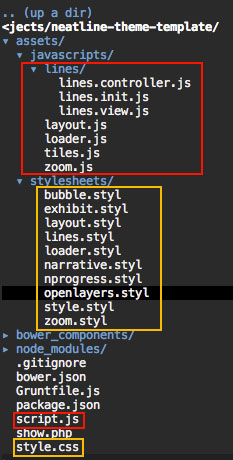
So far, we’ve just been entering all of our custom CSS and Javascript directly into the style.css and script.js and files. This works fine for simple themes, but it can start to get a little clunky as the theme grows more complex - nobody likes to see a big heap of Javascript snippets, all doing different things, crammed into the same file. So, how to decompose style.css and script.js into separate files? One good solution is to use a task runner like Grunt to concatenate multiple source files into the style.css and script.js files, which, instead of being edited directly, become compiled payload files that are updated automatically by the task runner.
To make it easy to get started, I’ve created a little starter theme, based on the theme used for the Project Gemini over Baja California project, with all of the configuration and file structure in place to build out themes for exhibits that use the NeatlineText extension. This includes all of the layout, styling, and UX interactions from the Gemini project, like the little yellow lines that wire up the text with the map.
https://github.com/scholarslab/neatline-theme-template
Just fork the repo, clone it into your Omeka theme, and theme into the sunset!


