Using Neatline with historical maps :: Part 2: Transparency
Update 8/27/12
After posting this last week, a comment by KaCeBe led me to go back and look for a way to get Geoserver to render transparent borders without having to manually add an alpha channel to the file. Although I still can’t find way to make Geoserver do it automatically, I did find this thread on the OSGeo.org forums in which user bovermyer finds a solution that’s much faster than the Photoshop workflow described in this post.
With gdal installed (see below), open up the terminal and run this command:
gdalwarp -srcnodata 0 -dstalpha file1.tif file2.tif
…where file1.tif is the name of the original file generated by ArcMap and file2.tif is the name of the new, transparency-added copy of the file1.tif generated by gdal. Then (re)build the geotiff with this command:
gdal_translate -of GTiff -a_srs EPSG:4326 file2.tif file2_rebuilt.tif
…which we’ve found is necessary to avoid errors during the Geoserver upload process. At this point, file2_rebuilt.tif is ready to be loaded into Geoserver and brought into a Neatline exhibit.
Much faster than pointing-and-clicking in Photoshop!
This is part 2 of a 3-post tutorial that walks through process of georeferencing a historical map and using it in Geoserver and Neatline. Check out part 1, which covers rectification in ArcMap.
In the first part of this series, we brought a static image into ArcMap and converted it onto a georeferenced .tif file. In this article, we’ll post-process the image in Photoshop to get it ready to be loaded into Geoserver.
The problem: Black borders around the image
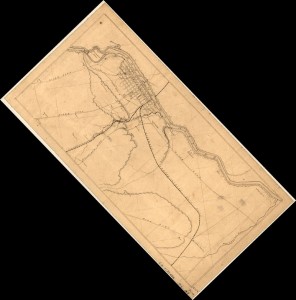
If you open up the newly-generated .tif file in a regular image editing program, you’ll see that ArcMap added in regions of black around the actual map to make it fill the rectangular aspect ratio of the file. This happens almost every time, since the process of rectification usually involves rotating the image away from its original orientation.
In the context of a Neatline exhibit, this is problematic because the black borders will completely occlude the real-geography base layer (or underlying historical maps) immediately surrounding the image. Fortunately, former Scholars’ Lab GIS assistant Dave Richardson figured out how to strip out the borders in Photoshop by converting them into transparencies. This step is a bit of a nuisance, but we’ve found that it dramatically improves the final appearance of the map.
Here’s how to do it:
-
Go to the directory that the file was originally saved to. You’ll notice that ArcMap actually generated four files - the .tif, along with a .tfw, tif.aux.xml, and .tif.ovr. Leave all the files in place, since we’ll need them at the end of the process to rebuild the geospatial header information after we post-process the image. Open up the main .tif file in Photoshop.
-
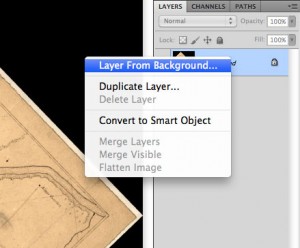
In Photoshop, right click on the starting background layer and click “Layer from Background.” This will delete the locked background and replace it with a regular layer with the same content.
-
Use the “Magic Wand Tool”
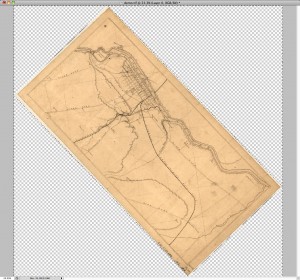
 to select each of the borders by holding down the shift key and clicking inside the black areas. A dotten line will snap to the edges of the borders. If the wand tool is selecting parts of the actual map image, drop down the “Tolerance” setting to 1, which will limit the selection to the exact color value of the clicked location on the image. Once the borders are selected, press the delete key to clear out the selection. At this point, the image should be surrounded by the default, checkered background graphic.
 -
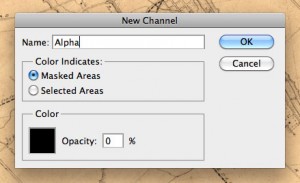
Add an alpha channel to the image by clicking on the “Channels” tab on the top toolbar of the layers window (If the “Channels” tab isn’t available by default, activate it by clicking
Window > Channels). Click the dropdown icon at the right of the toolbar, and click “New Channel.” Check the “Masked Areas” radio button, and set the color to be pure black with 0% opacity. Click “OK” to create the channel. -
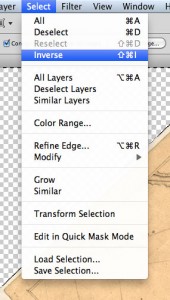
Now, activate the Magic Wand Tool again and select each of the checkered, transparent areas around the image (the regions that were originally filled with the black borders). Then, invert the selection by clicking on
Select > Inverse. At this point, the selection should exactly frame the map itself (the portion of the image that should not be transparent). -
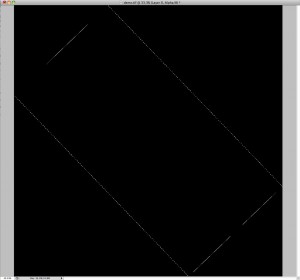
Back over in the Channels tab, click on the listing for the Alpha channel that was created in step 4 and hide the RBG channels by clicking the visibility checkbox next to the top-level RGB listing. This will cause the image to go totally black, with the selection of the map region still active on top of the alpha channel.
-
Activate the Paint Bucket Tool
 and set the foreground color to pure white (If you don’t see the icon for the paint bucket in the Tools column, click and hold the icon for the “Gradient” tool
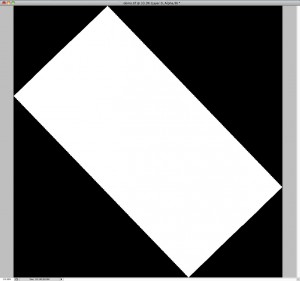
  and a drop-down select will appear with a listing for the Paint Bucket). Then apply the paint bucket on the selected area on the Alpha channel, creating a white area over the region occupied by the map.
 -
Make sure that both the Alpha channel and all of the RGB color channels are marked as visible in the Channels window. Then go to
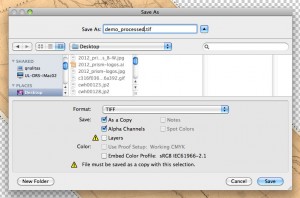
File > Save As. So as not to override the name of the original file, change the name to something like[original filename]_processed. Uncheck “Layers,” check “As a Copy” and “Alpha Channels,” and click “Save.” -
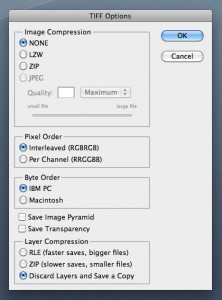
On the “Tiff Options” dialog box, leave “Save Image Pyramid” and “Save Transparency” unchecked and make sure “Discard Layers and Save a Copy” is checked.
Now, we have a second version of the .tiff file with an Alpha channel that converts the black borders into transparent regions. The problem, though, is that the process of re-saving the file strips out the critical geospatial information in the original .tiff - we’ll have to insert this data back into the processed file before it can be used in Geoserver and Neatline.
Rebuilding the geotiff
We’ll take care of this using a utility called gdal, a powerful command line library that can do a wide variety of transformations on geospatial files. Head over to gdal.org for full documentation on how to install the command line utilities. On Mac OSX, using the homebrew package manager, it should be as easy as brew install gdal. If you’re on Windows, a binary distribution of the tool can be found here.
With gdal installed, fire up the terminal and change into the directory with the original .tif, the processed .tif, and the three *.tfw files.
-
First, create a copy the original .tfw file with a name that matches the processed .tif file that was created in step 8 above. So, if the original .tif was called
hotchkiss.tif, and the processed file was saved ashotchkiss_processed.tif, copyhotchkiss.tfwashotchkiss_processed.tfw(this can be done withcp hotchkiss.tfw hotchkiss_processed.tfw). The file names have to match in order for gdal to know where to pull information about the coordinate projection when we rebuild the header. -
Now, still assuming we’re working with files named hotchkiss_processed.tif and hotchkiss_processed.tfw, rebuild the header with this command:
gdal_translate -of GTiff -a_srs EPSG:4326 hotchkiss_processed.tif hotchkiss_processed_rebuilt.tif.
(Note: It doesn’t actually matter what you call the derivative files at the various steps of the process. All that matters is that the .tfw file matches the name of the processed .tif file.)
This will create a new file called hotchkiss_processed_rebuilt.tif that contains the transparency channel and the reconstructed geospatial information. At this point, the file is ready to be uploaded to Geoserver and brought into a Neatline exhibit.

