
Automate Downloading PDF Files
Don’t you hate it when a website offers a PDF of their content (scanned archival files, for example) but on a page per page basis? And the process for downloading is several mouse clicks for each download.
Shouldn’t computers be able to solve this problem?
Well, yes, they can.
[Updated Dec 11, 2020 to show the updated Kantu icon and link to documentation.]
PDFs for free
Here are the steps to set up your web browser (Chrome or Firefox) to automate the process of downloading PDF files (or to do whatever you want, filling out a form, testing links, etc).
[Disclaimer: Be good. Respect website owners wishes. Don’t use this for doing bad, morally wrong, or illegal things. If you do, and you get caught, don’t blame me. :) ]
Set up
To get this process working, you’ll need to install a browser plugin called Kantu, made by a9t9 and available at https://ui.vision/kantu .
After installing the browser plugin, you’ll also need to install some XModules. You can get those here: https://ui.vision/kantu/x/download
And that’s all you need for the set up.
Create the workflow
The next step is to notice all of the steps to down load the files you want. For example:
- open the correct webpage in the browser
- click on the ‘Download’ link
- click on the ‘Entire page’ button
- click on the ‘pdf’ button
- click on the ‘next’ arrow to bring up the next page for downloading
In the download steps, notice the parts that can be repeated without any human interaction. For the above example, I don’t want to enter in the next page each time, so I can leave the first step out of the steps that are repeated.
So now my steps look like this:
- Initial step
- open the correct webpage in the browser
- Repeated steps
- click on the ‘Download’ link
- click on the ‘Entire page’ button
- click on the ‘pdf’ button
- click on the ‘next’ arrow to bring up the next page for downloading
Code the Workflow
Now that we have our workflow sorted out, we can create the code to do the work for us.
Open the Kantu extension in your browser (the icon for it looks like this:
![]()
You’ll see a window like the one below. Click on the section marked with a red square to activate that step. You’ll type in the command (or what the automation robot should do) in the green section, and other information in the blue and purple sections.
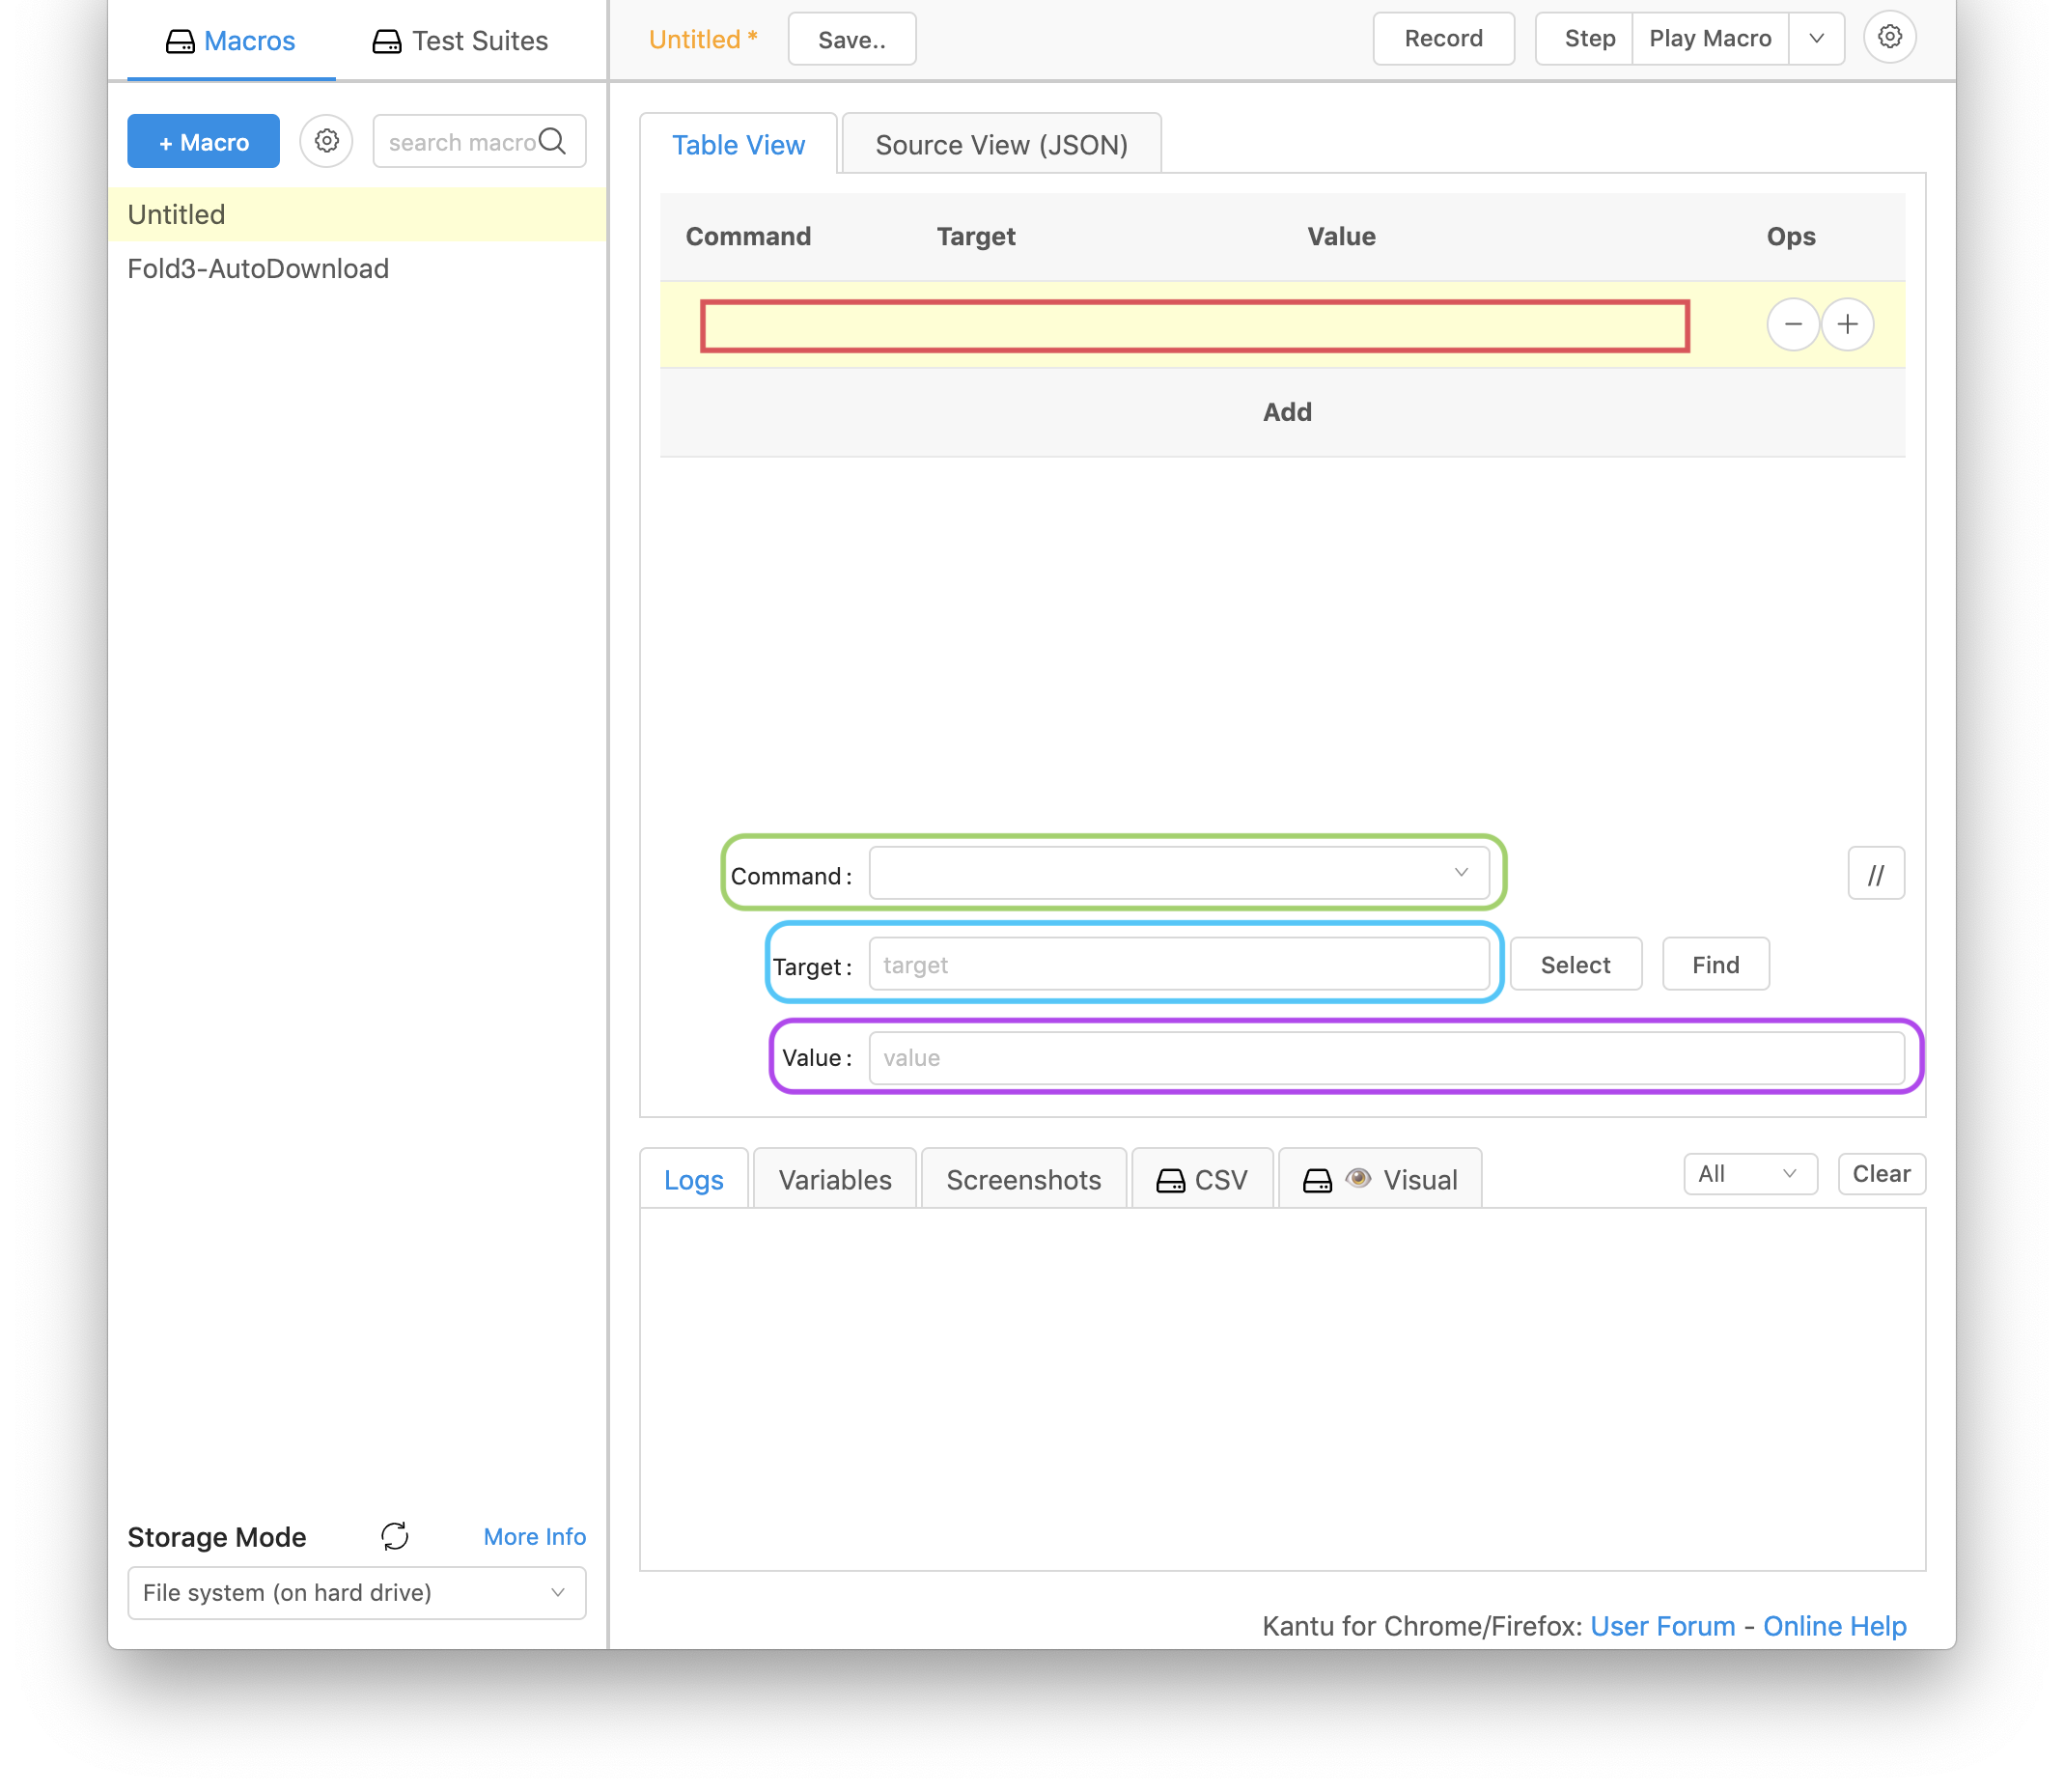
Documentation
The Kantu interface has a link to find out more information about each of the commands available, but if you don’t know what the commands are first, it’s hard to know which command to use! So here is the list of commands that are available. Kantu Commands (based on the Selenium automation software): https://ui.vision/rpa/docs/selenium-ide
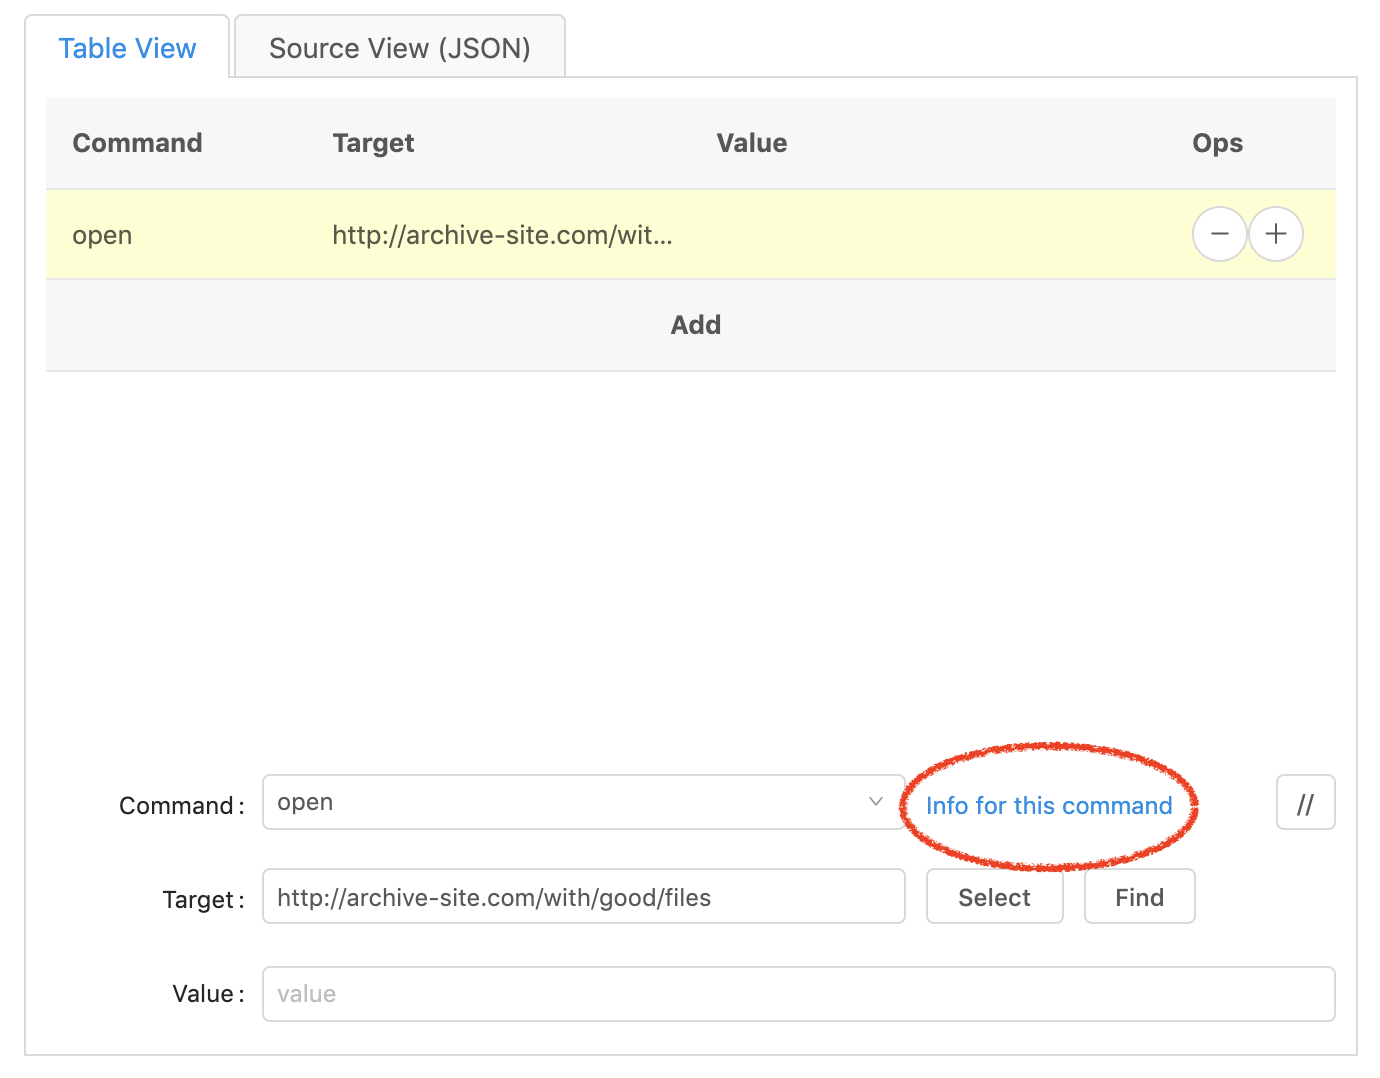
Open the page
The first step is to have the browser open the correct page. In the green box,
or the ‘command’ section, type in open, and in the blue box, or the ‘target’
section’ type in the URL of the web page.
While Loop
Next we’ll start the repeatable section. In coding we call that a loop. The computer loops through a section of code for a specified number of times. We’ll use a ‘while’ loop. This means we’ll set up a condition to test, and while the result of that test is true, the computer will run the code within it’s section. Every time it finishes running the code, it tests the condition again, if it is still true, it will run the code again.
We’ll set up a counter, so that each time the code is run, the counter will increment by one. The condition will test if the counter is less than or equal to a certain number While the counter is less than or equal to the number, the code will run. In pseudo-code that would look something like this:
counter = 1
while counter <= 55
    increment the counter (counter + 1)
    click the Download link
    click the 'Entire Page' button
    click the 'PDF' button
    click the 'Next Page' button
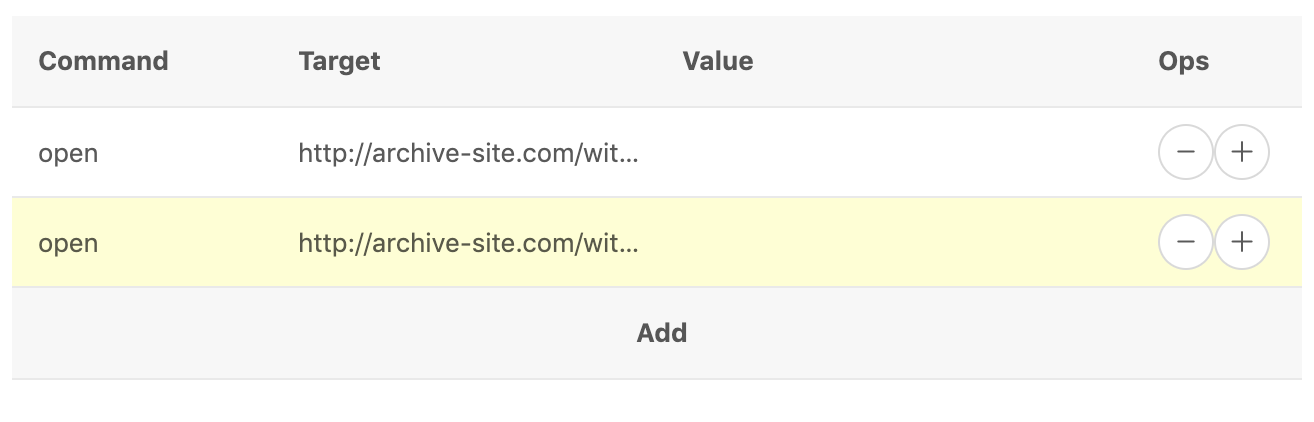
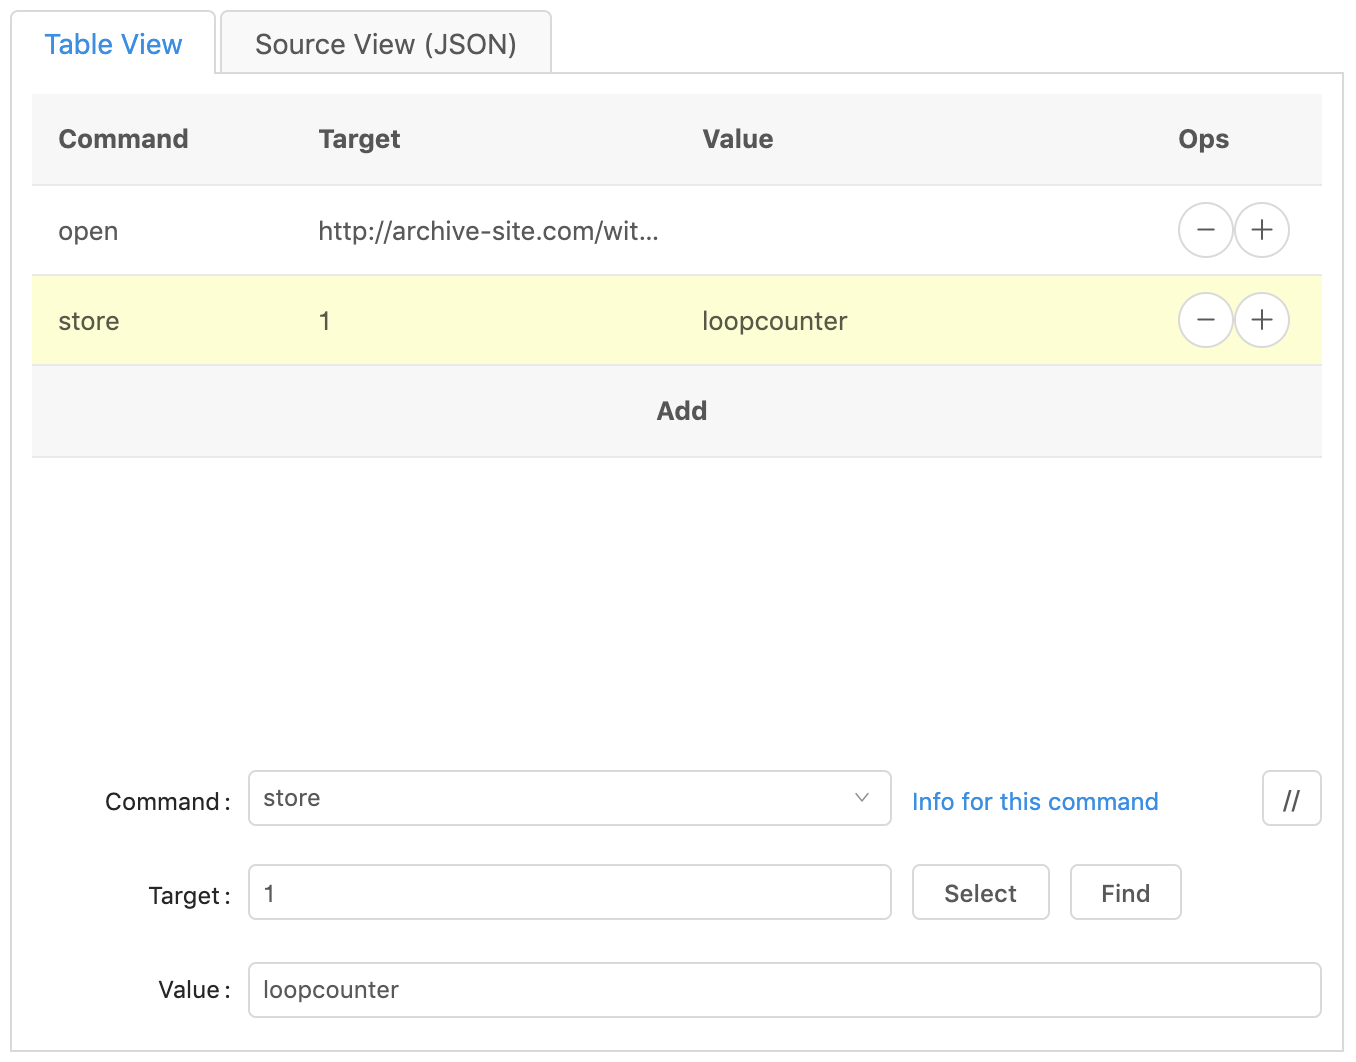
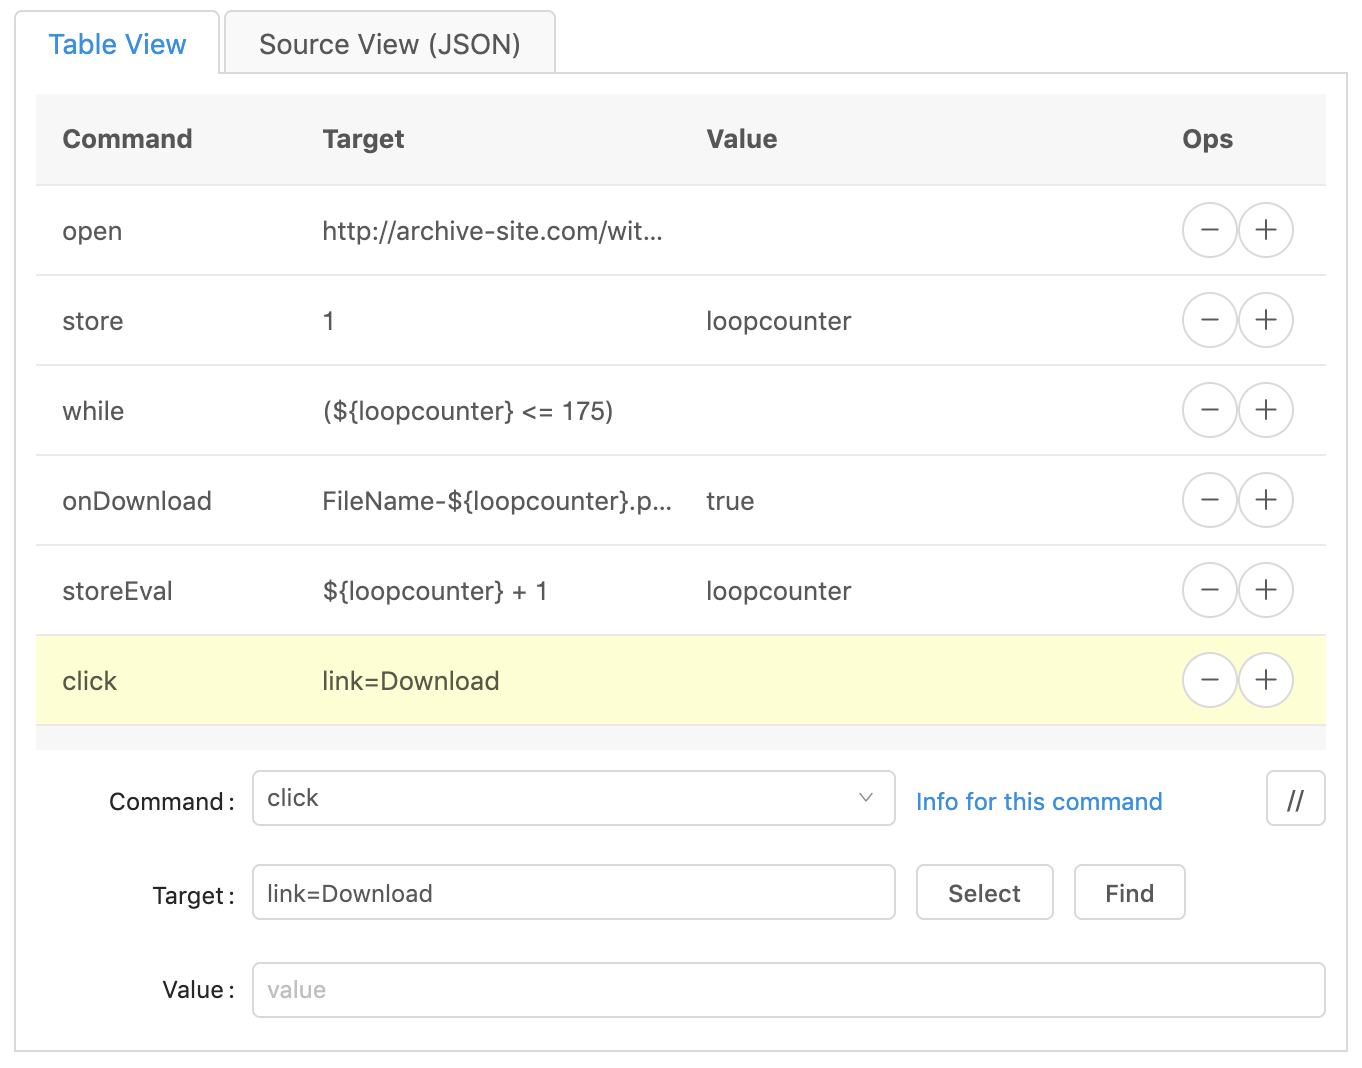
So the next component we need to create is the counter. Create a new line, by clicking on the plus sign.

This will duplicate the ‘open’ command.
Type in store in the ‘command’ section, 1 in the ‘target’ section, and
loopcounter in the ‘value’ section.
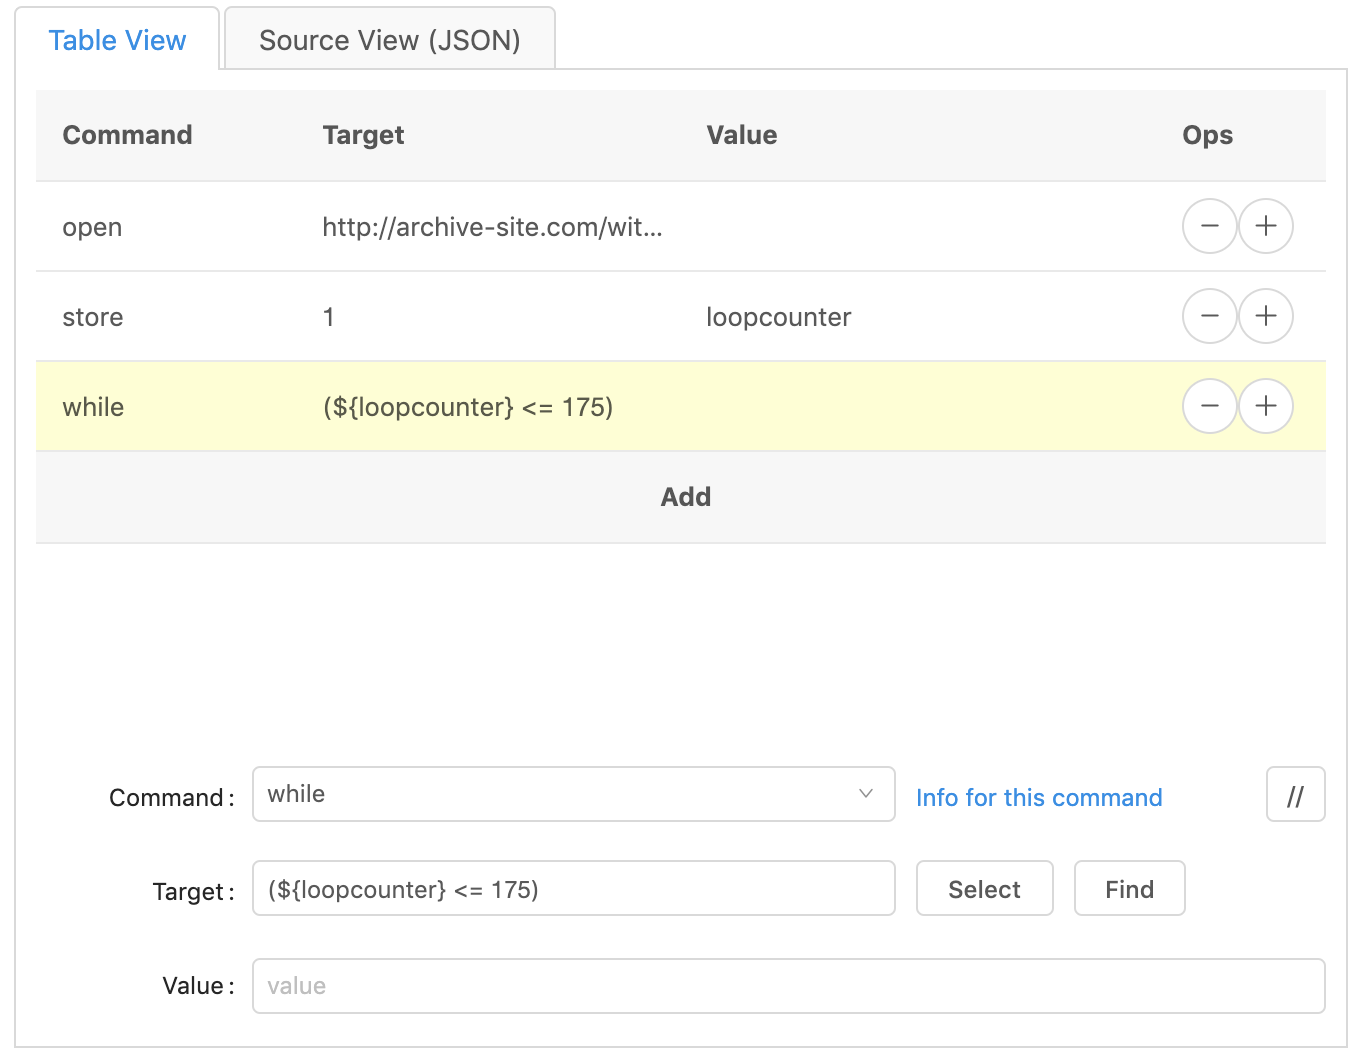
Next we’ll set up the condition for the while loop. Create a new line, and
change the ‘command’ to while and the ‘target’ to (${loopcounter} <= 175).
The parentheses work similar to writing math equations. They group stuff together.
${loopcounter} is the counter that we set up on the previous line. This is a
variable named ‘loopcounter’. The ‘$’ and ‘{‘ and ‘}’ tell the system that
‘loopcounter’ is acting as a variable and not regular words.
A variable is like a bucket. We can put a label on the bucket so we know what’s inside. In this case we label the bucket ‘loopcounter’. The content of the bucket is the number 1 to start with. Later in the code, we’ll take the content of the bucket and add 1 to it. So it will increment from 1 to 2, to 3, etc. each time it goes through the code in the while loop.
The <= is the test and it tests if the number on the left side is less than
or equal to the value on the right side.
175 is the number we want to test our ‘loopcounter’ variable against. You’ll
change this number depending on how many times you want the code inside the
while loop to run. In my case, it ends up being the total number of pages in
the PDF I want to download.
You should now have three lines, open, store, and while.
Looped Code
Now we start the code that gets repeated, the code ‘inside’ the while loop. In the example from above, it will take three mouse clicks to download the file, then another mouse click to get to the next page.
There are a number of ways to get the information needed to find the right place for the mouse to click. Kantu has some documentation for many of these, but we’ll focus on just two ways that are just about foolproof.
The first two lines in this repeated code actually have nothing to do with the mouse clicks, but they are important to the while loop, and offer more functionality.
File Name
First we’ll add a line to tell the program to wait until a file is downloaded before proceeding with the next steps. This also provides us a way to offer a custom name to the files that we download.
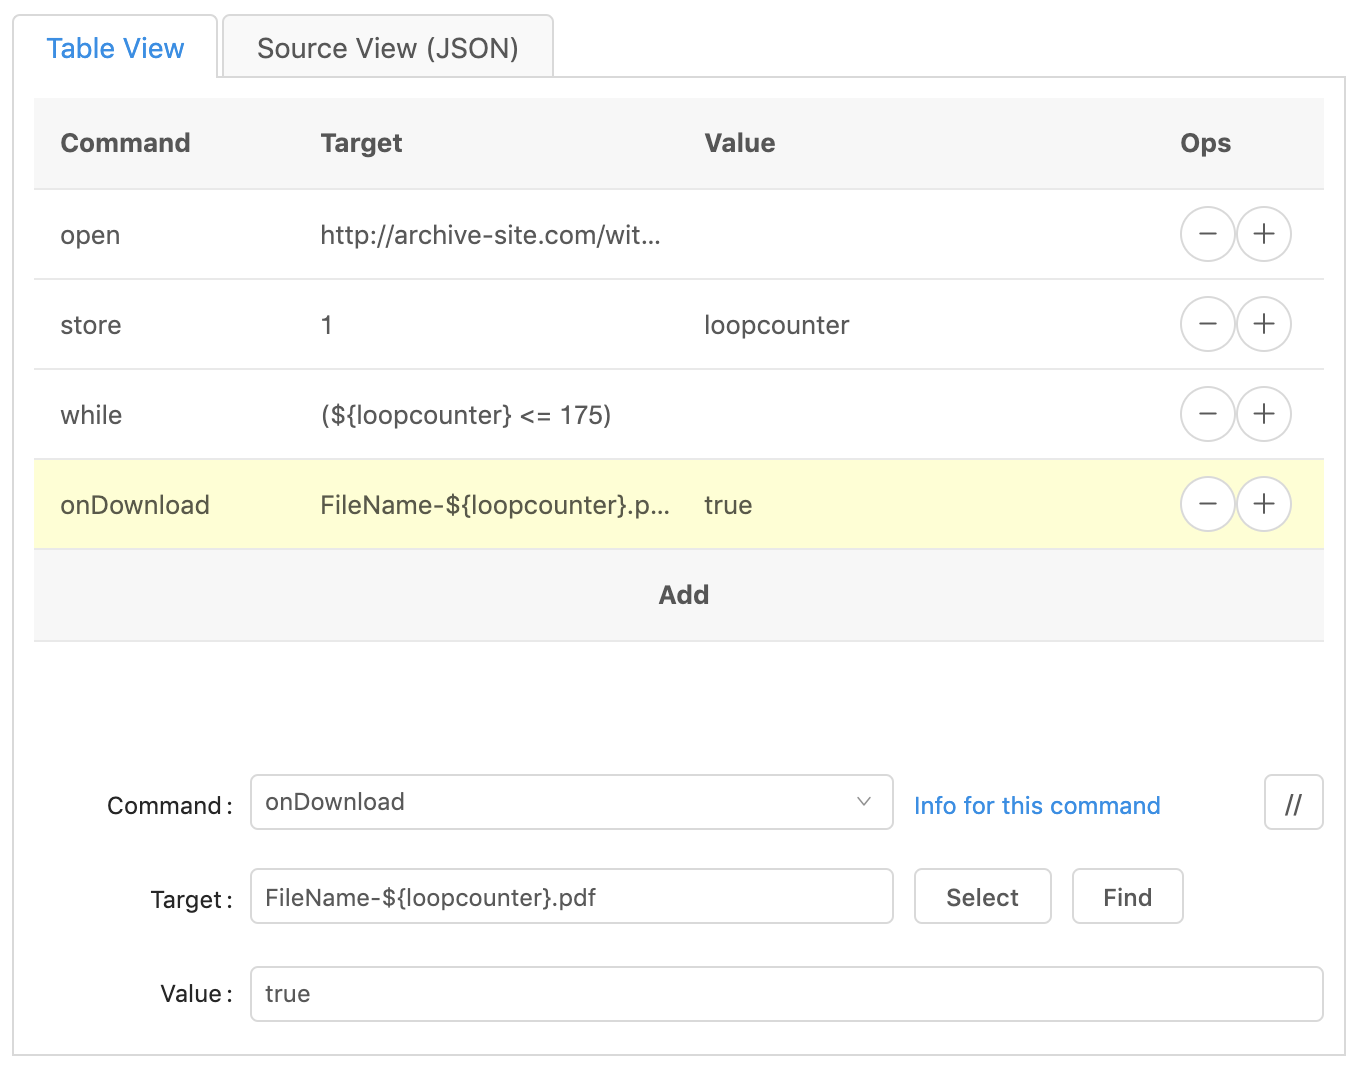
Click on the plus sign of the ‘while’ loop line to duplicate it. Then change
the ‘command’ to onDownload, change the ‘target’ to
FileName-${loopcounter}.pdf, and the ‘value’ to true.
The ‘target’ section is the cool part. It allows us to use a custom naming scheme for the files that are downloaded. We start it with a generic name, ‘FileName-‘. You can change this to whatever you want. Then we use that variable bucket, ${loopcounter}, which holds the number representing how many times the code has looped through the while loop. So the first time through ‘loopcounter’ holds the number 1, then 2, then 3, etc.
Incrementor
The next line will increment the counter by one. I like to put this as close to the ‘while’ line as possible, to make sure it is not forgotten. If we forget to add the increment, then the value of the loopcounter bucket remains at 1. And when we check the condition after running all the code, then the while condition will be checking if ‘1’ is less than or equal to ‘175’. This will always remain true, and since our code doesn’t change the value of loopcounter the code will run forever. They call this an infinite loop in computer programming. Sometimes you want an infinite loop, sometimes you don’t. Usually you don’t. And in this case we don’t. So we add this line.
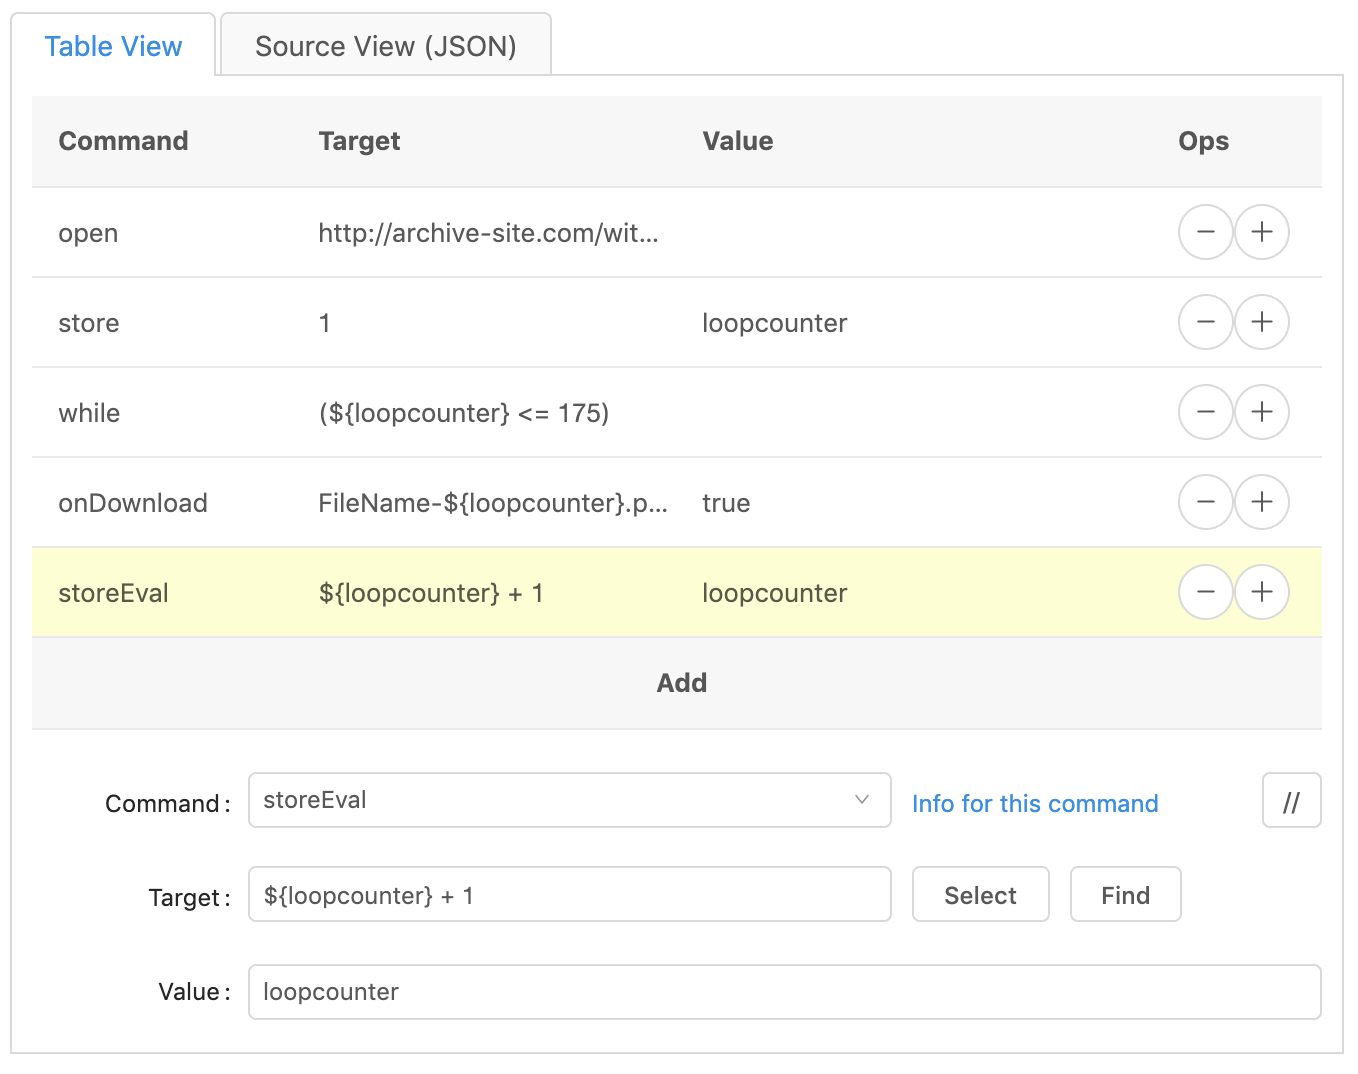
Click the plus sign on the ‘onDownload’ line to duplicate it. Then change the
‘command’ to storeEval, the ‘target’ to ${loopcounter} + 1, and the ‘value’
to loopcounter.
‘storeEval’ is similar to ‘store’ but evaluates a condition instead of just storing a value in a variable bucket. The condition we evaluate is adding one to the variable ‘loopcounter’. And the new value is stored in the same bucket labeled ‘loopcounter’
It seems a little backwards to put the label of the variable in the ‘value’ section and put the value of the variable in the ‘target’ section, but that’s the way it is.
Click Version 1
This first way of clicking is the best. It looks for an anchor tag (<a href="url">Click here</a>) in the HTML and looks for the text in between the
opening and closing tag. This is great, as long as you don’t have multiple
links with the same text on the page.
Click on the plus sign on the ‘storeEval’ line to duplicate it. Change the
‘command’ to click, and the ‘target’ to link=Download. Change the
‘Download’ part to whatever the text is between your anchor tags (the name of
the link).
Click Version 2
This second way is a bit trickier, but works very well, too. You’ll need to use
the developer tools that come with your browser. For this option, we’ll use the
XPath of the link for the program to know what to click on. No need to get into
what the XPath is here. It’s basically a way to find an exact ‘path’ to the
HTML element on a web page. You can learn more about XPath
here or
here. This method is also
super helpful if you need to click on a button or other element that is not an
anchor tag (<a>).
Fortunately, we don’t have to figure out the XPath ourselves. To get the XPath of the element, bring up the web page to show that element on the screen. In my case, I hover the mouse over a section that shows a thumbnail image with some text underneath it. Right-mouse-clicking on this section opens a browser menu. Look for the ‘Inspect’ option, and click on it.
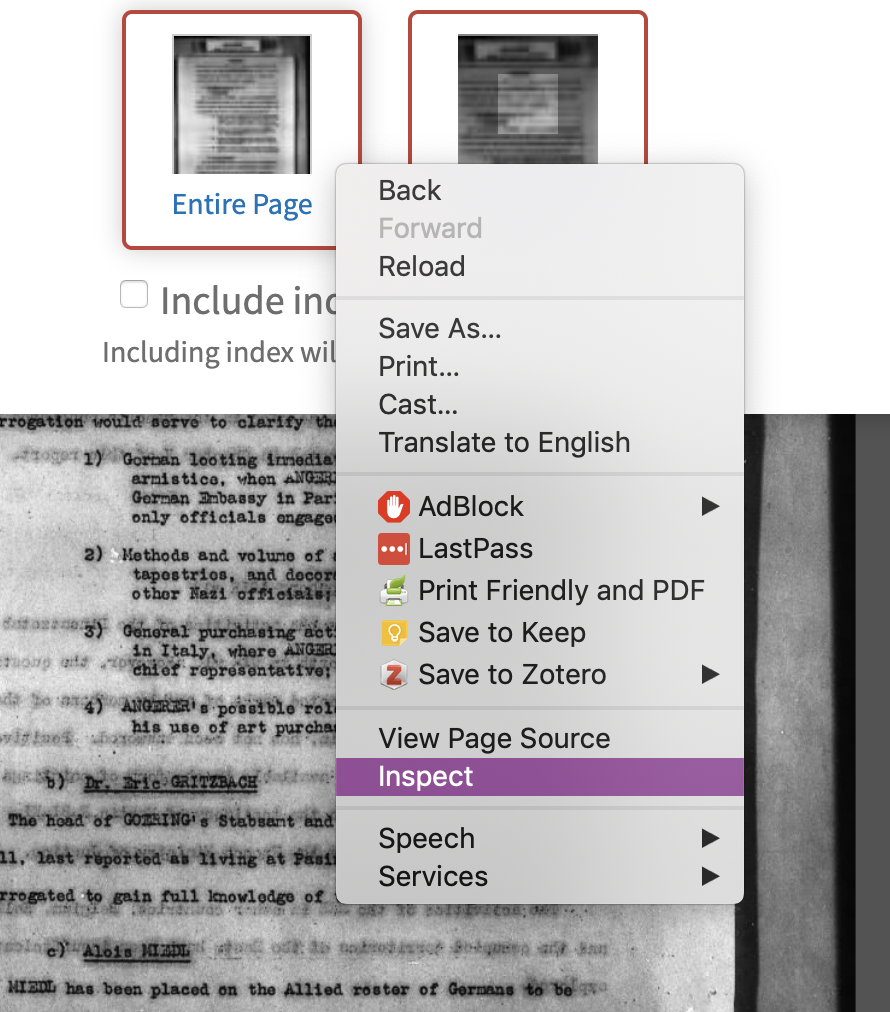
This will open a new section of your web browser, with many fascinating and wonderful tools. What we are looking at now is the HTML code that makes up the webpage you are on. Depending on your settings, the inspection window may be on the side of your webpage, underneath it, or in a separate window altogether.

The HTML code that makes up the section of the webpage that we did the right-mouse-click on will be highlighted. That part of the web page will highlight if you mouse over the HTML code.
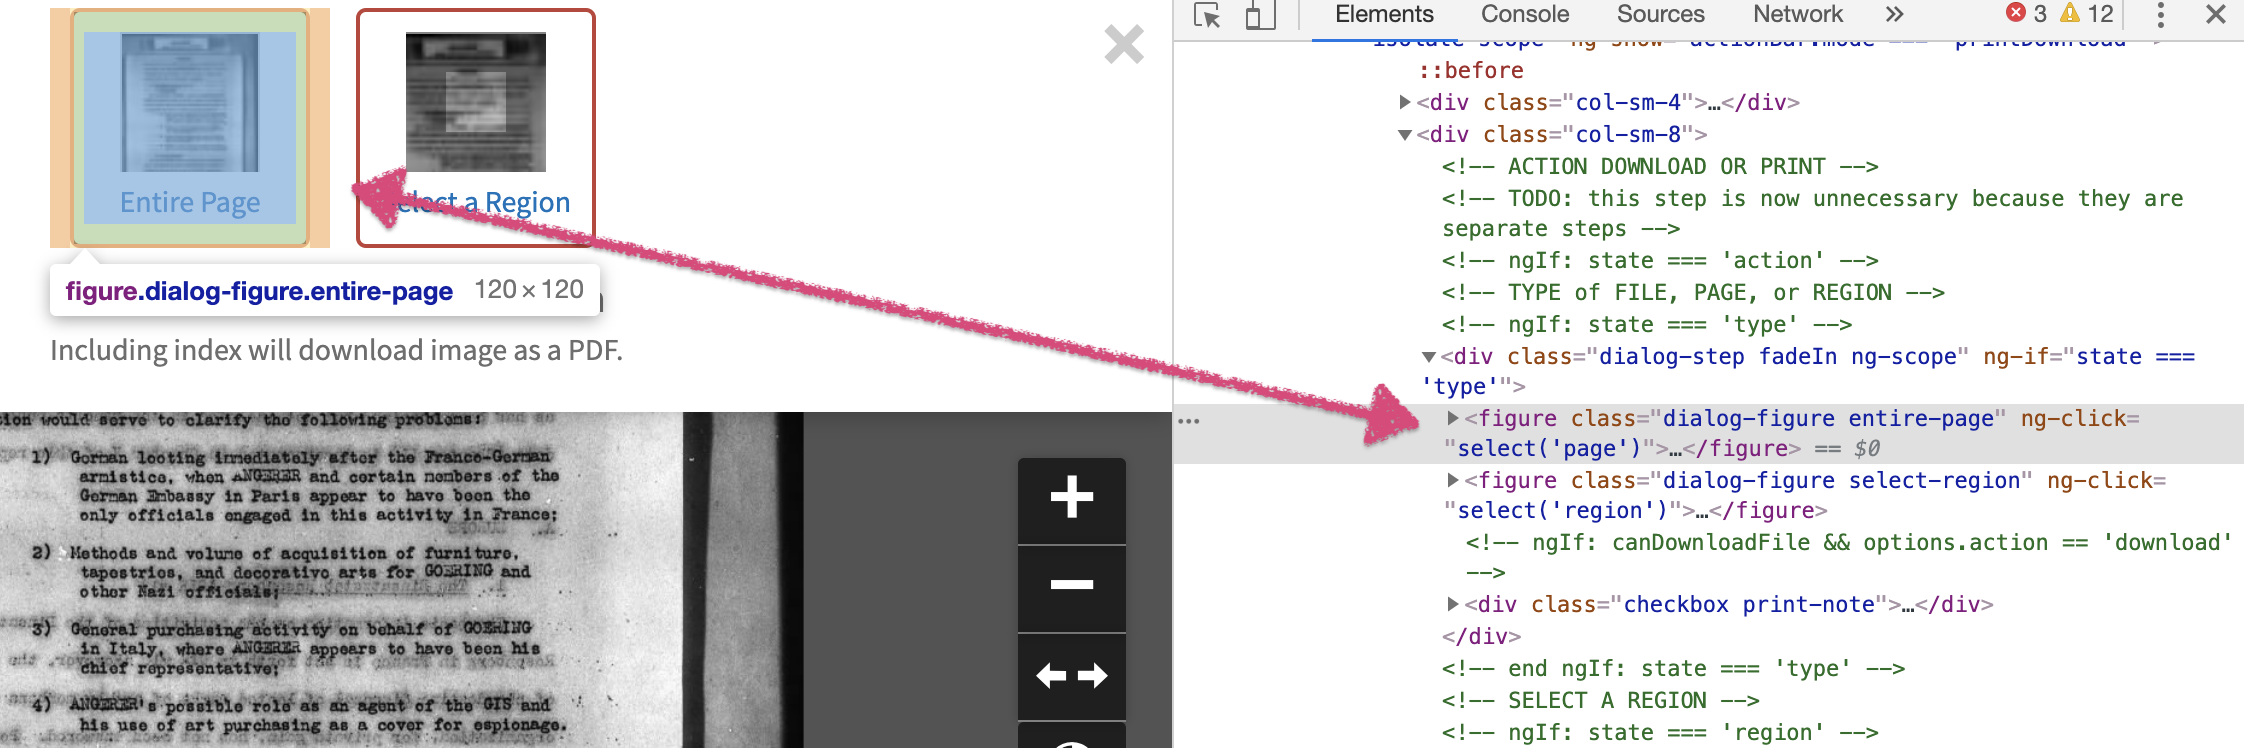
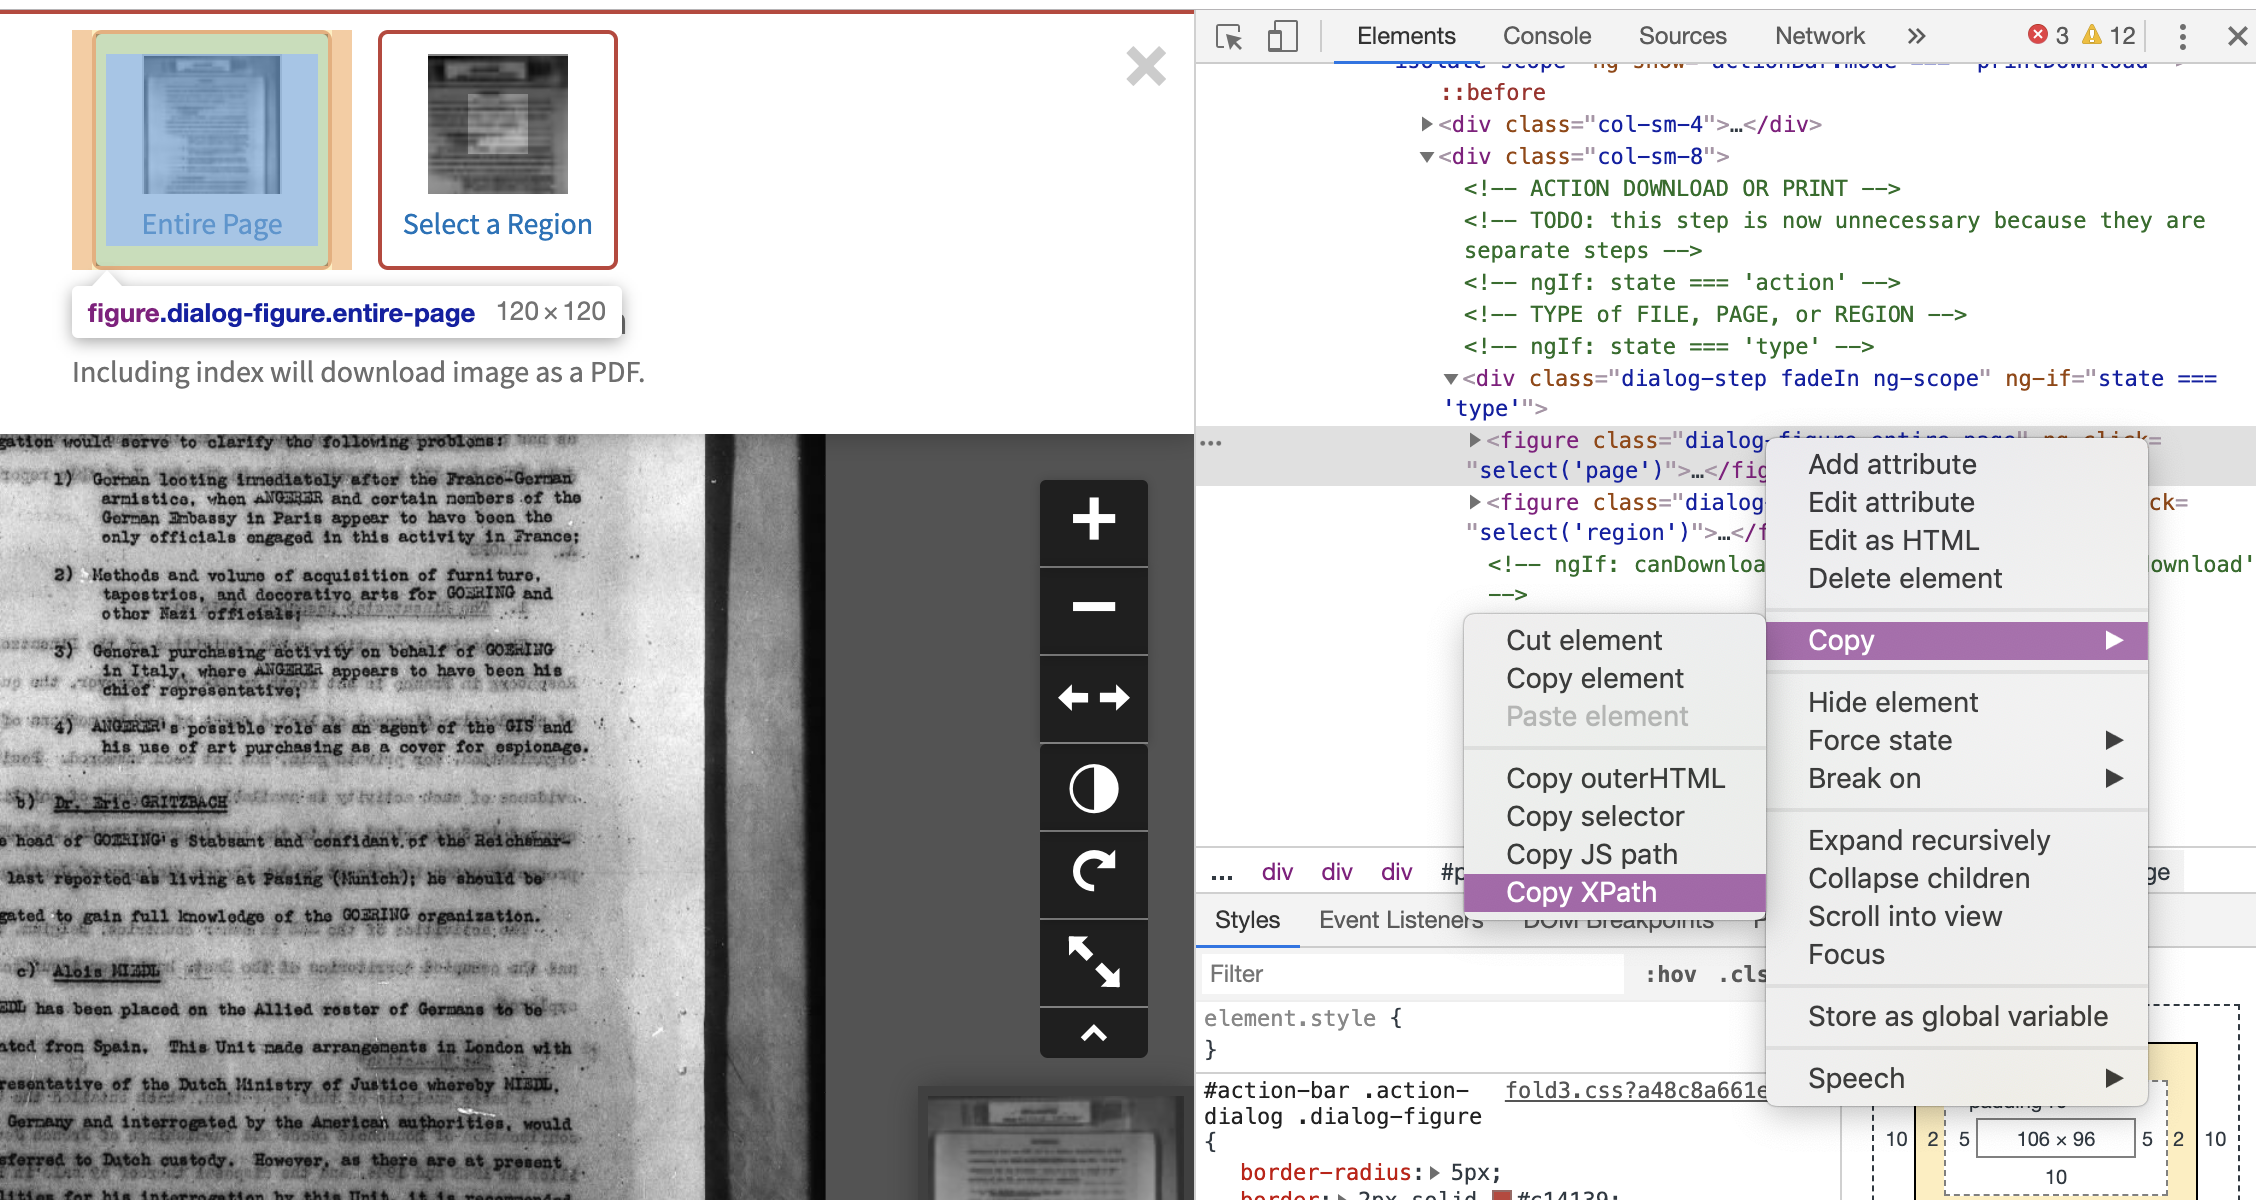
Now we do a right-mouse-click on the HTML code matching the part of the webpage where we want the ‘click’ to happen. This opens another browser menu with many options. We’ll select the ‘Copy’ option, and the sub-option of ‘Copy Xpath’. There. Easy! That copies the XPath to our clipboard.
Next, back in the Kantu editing window, click on the plus sign on the ‘click’
line to duplicate it. Leave the ‘command’ as click. In the ‘target’ section,
paste in the XPath we copied above.
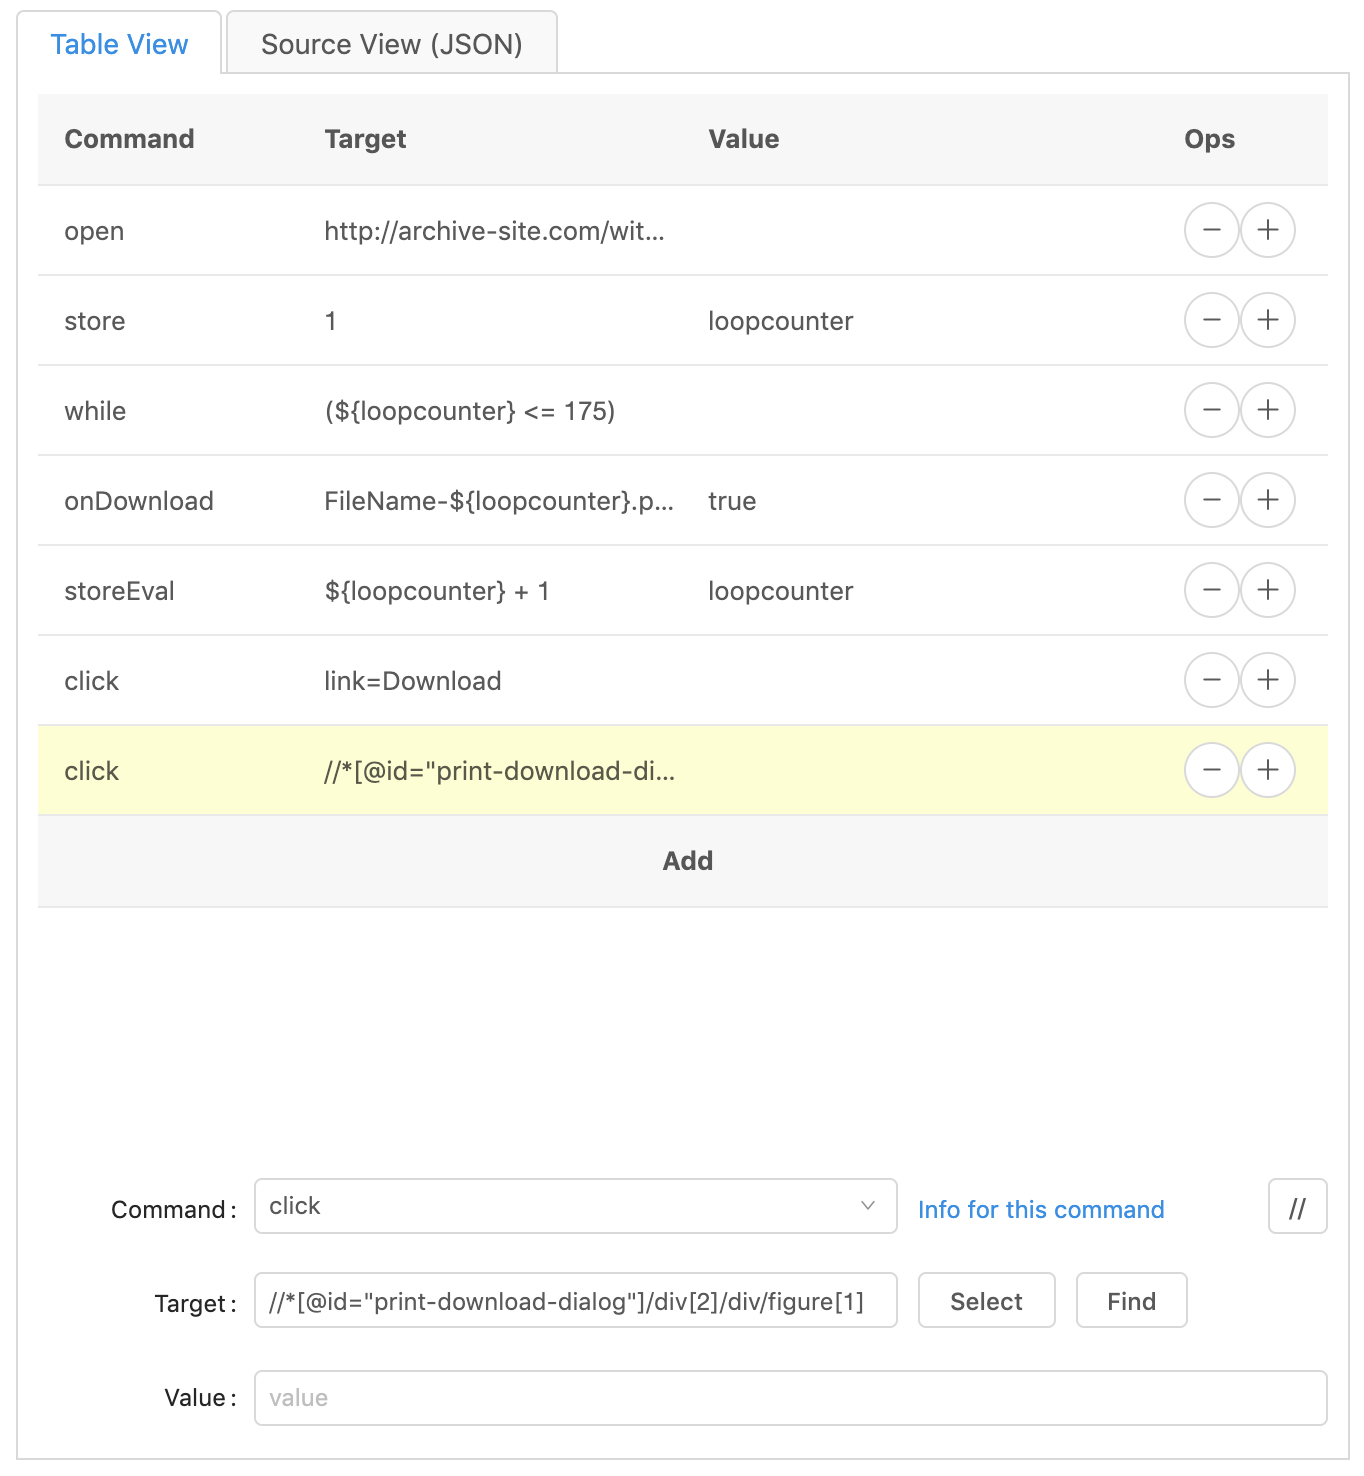
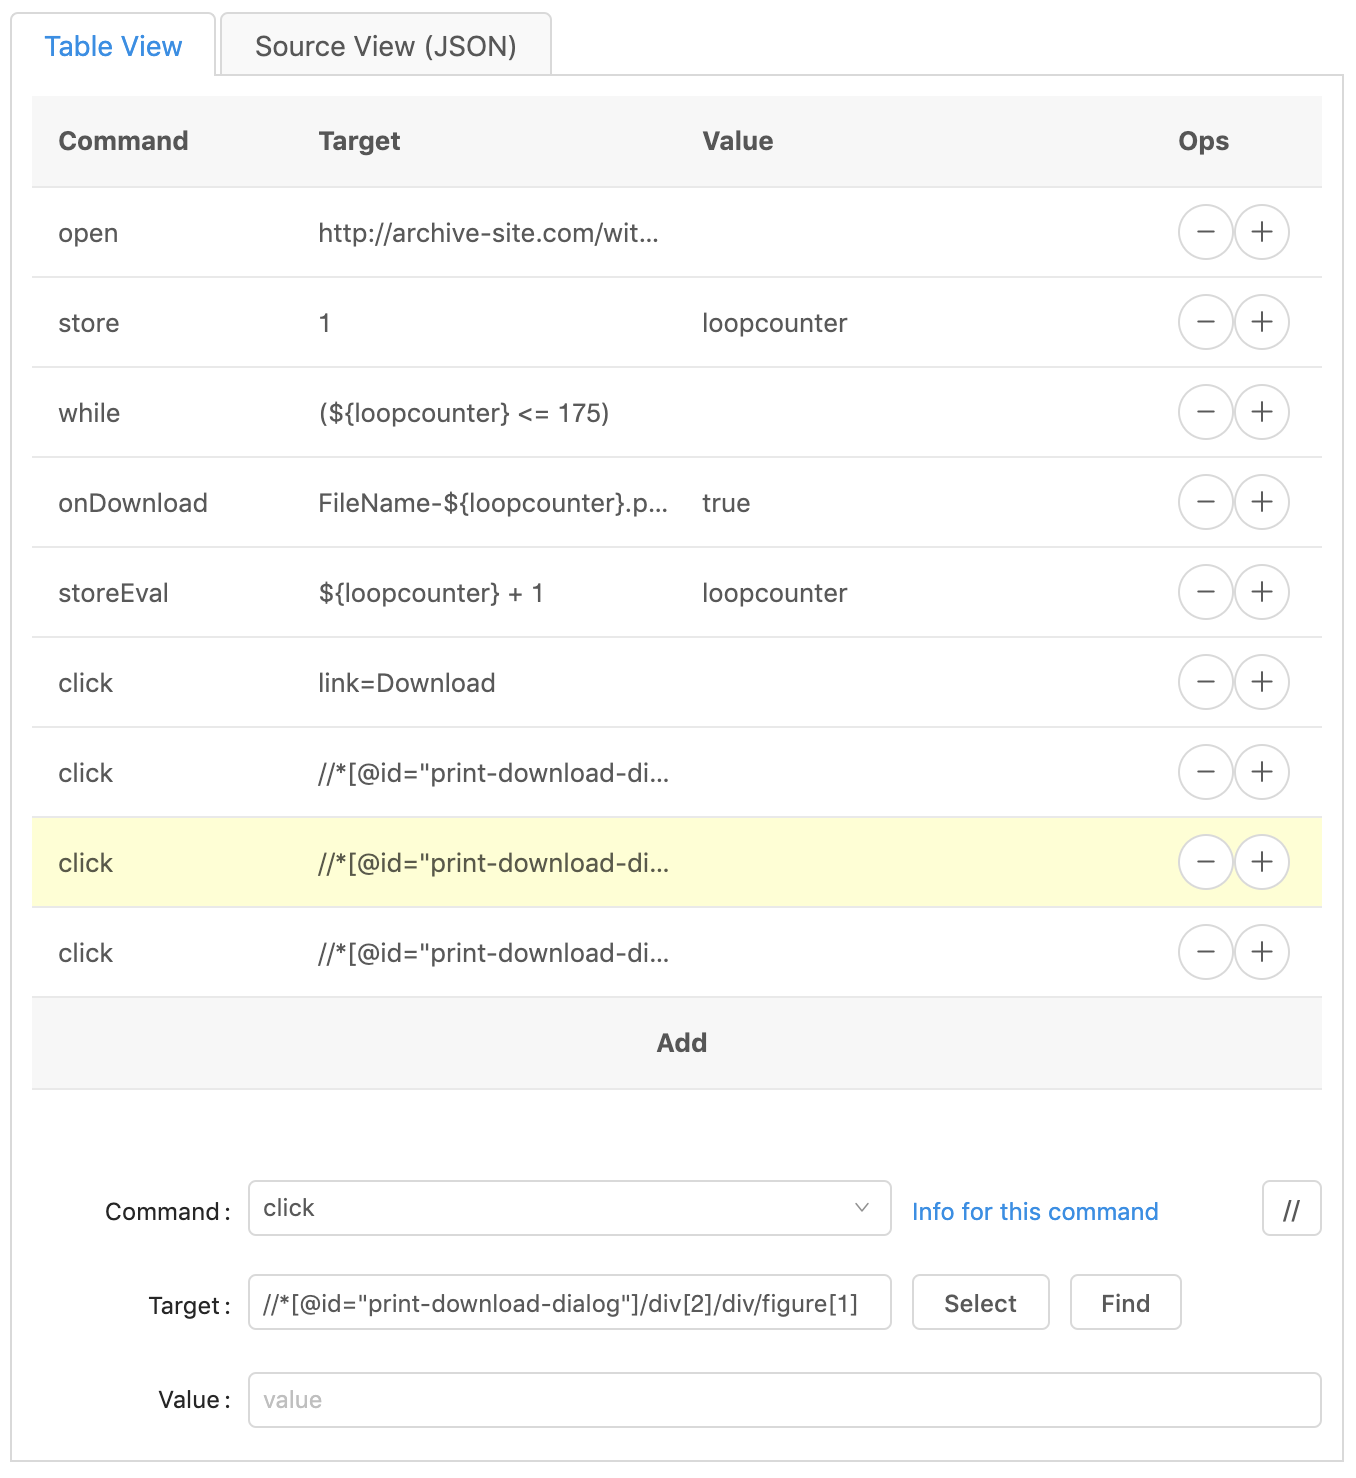
Repeat this step for as many clicks as you need, including the click to the next page.
The End of a While
The final line of our program is to end the while loop.
Click on the plus sign of the last ‘click’ line to duplicate it. Then change
the ‘command’ to endWhile. The ‘target’ and ‘value’ should be empty.
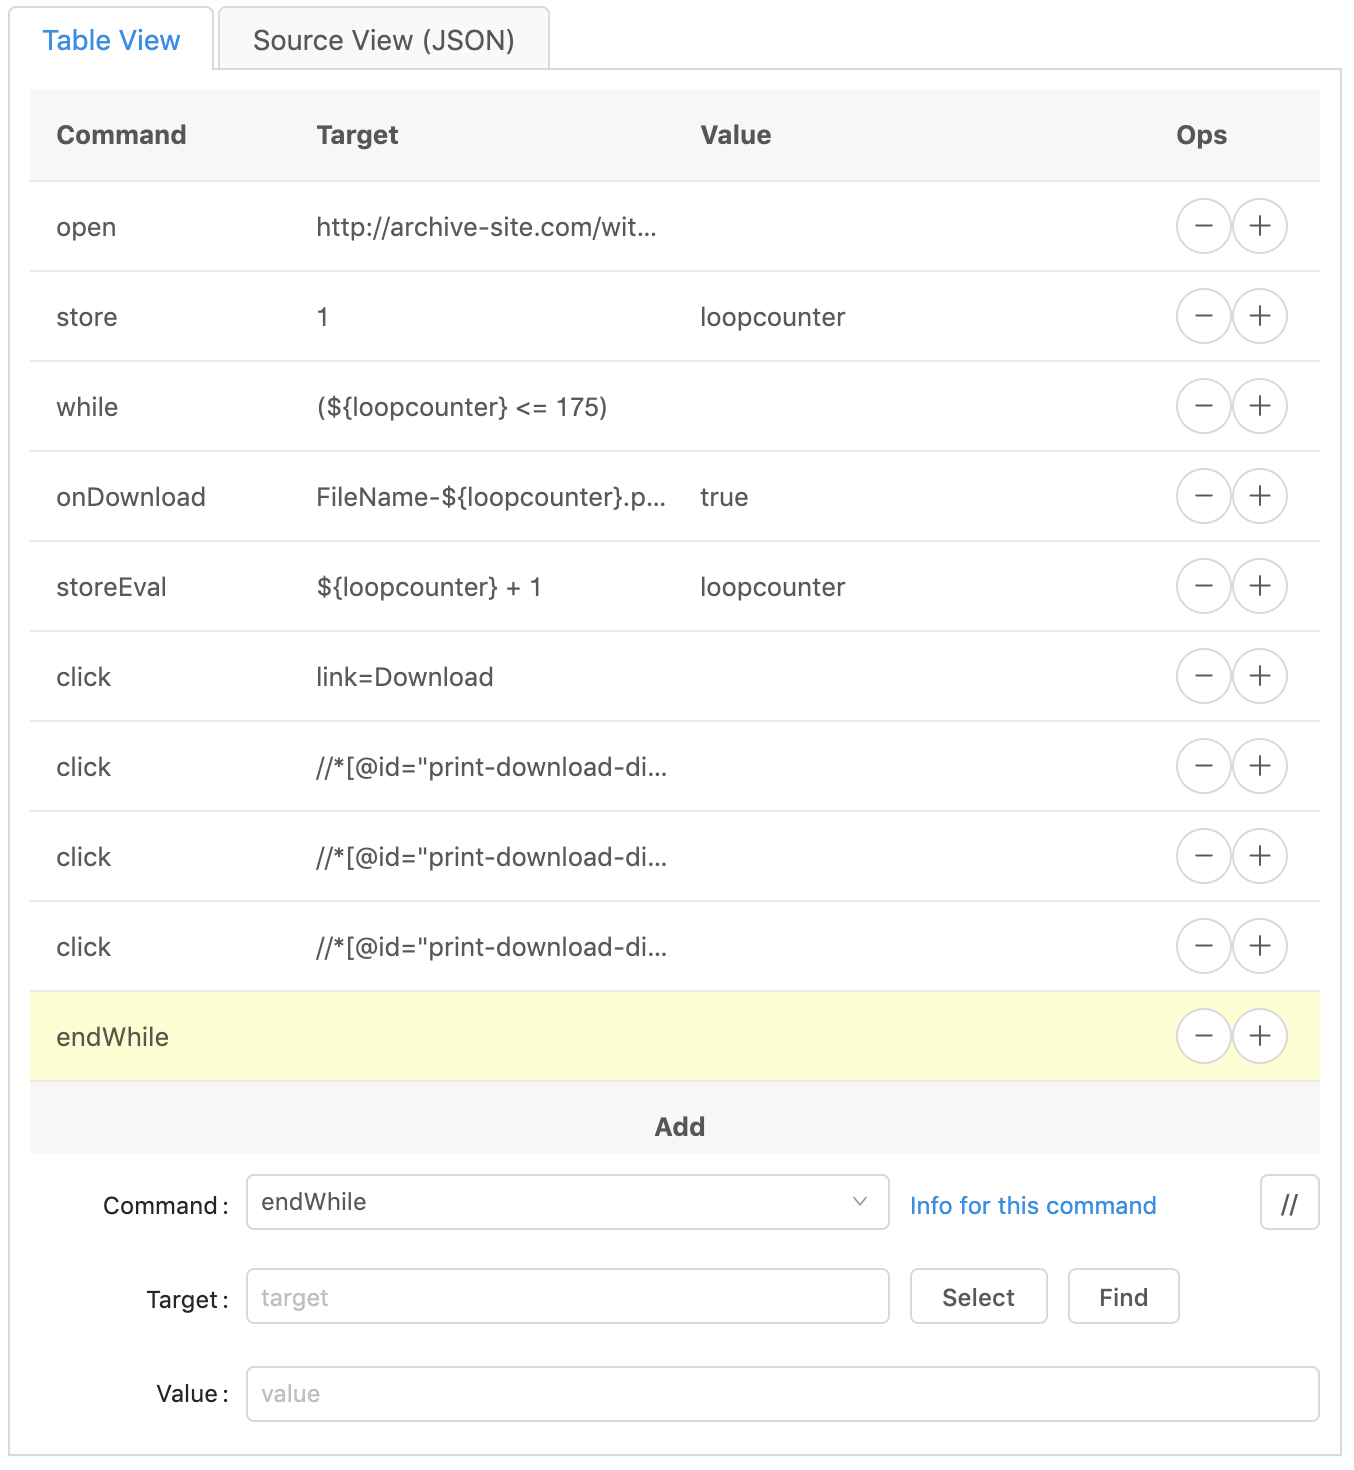
And that’s it! The automation of downloading may commence to begin.
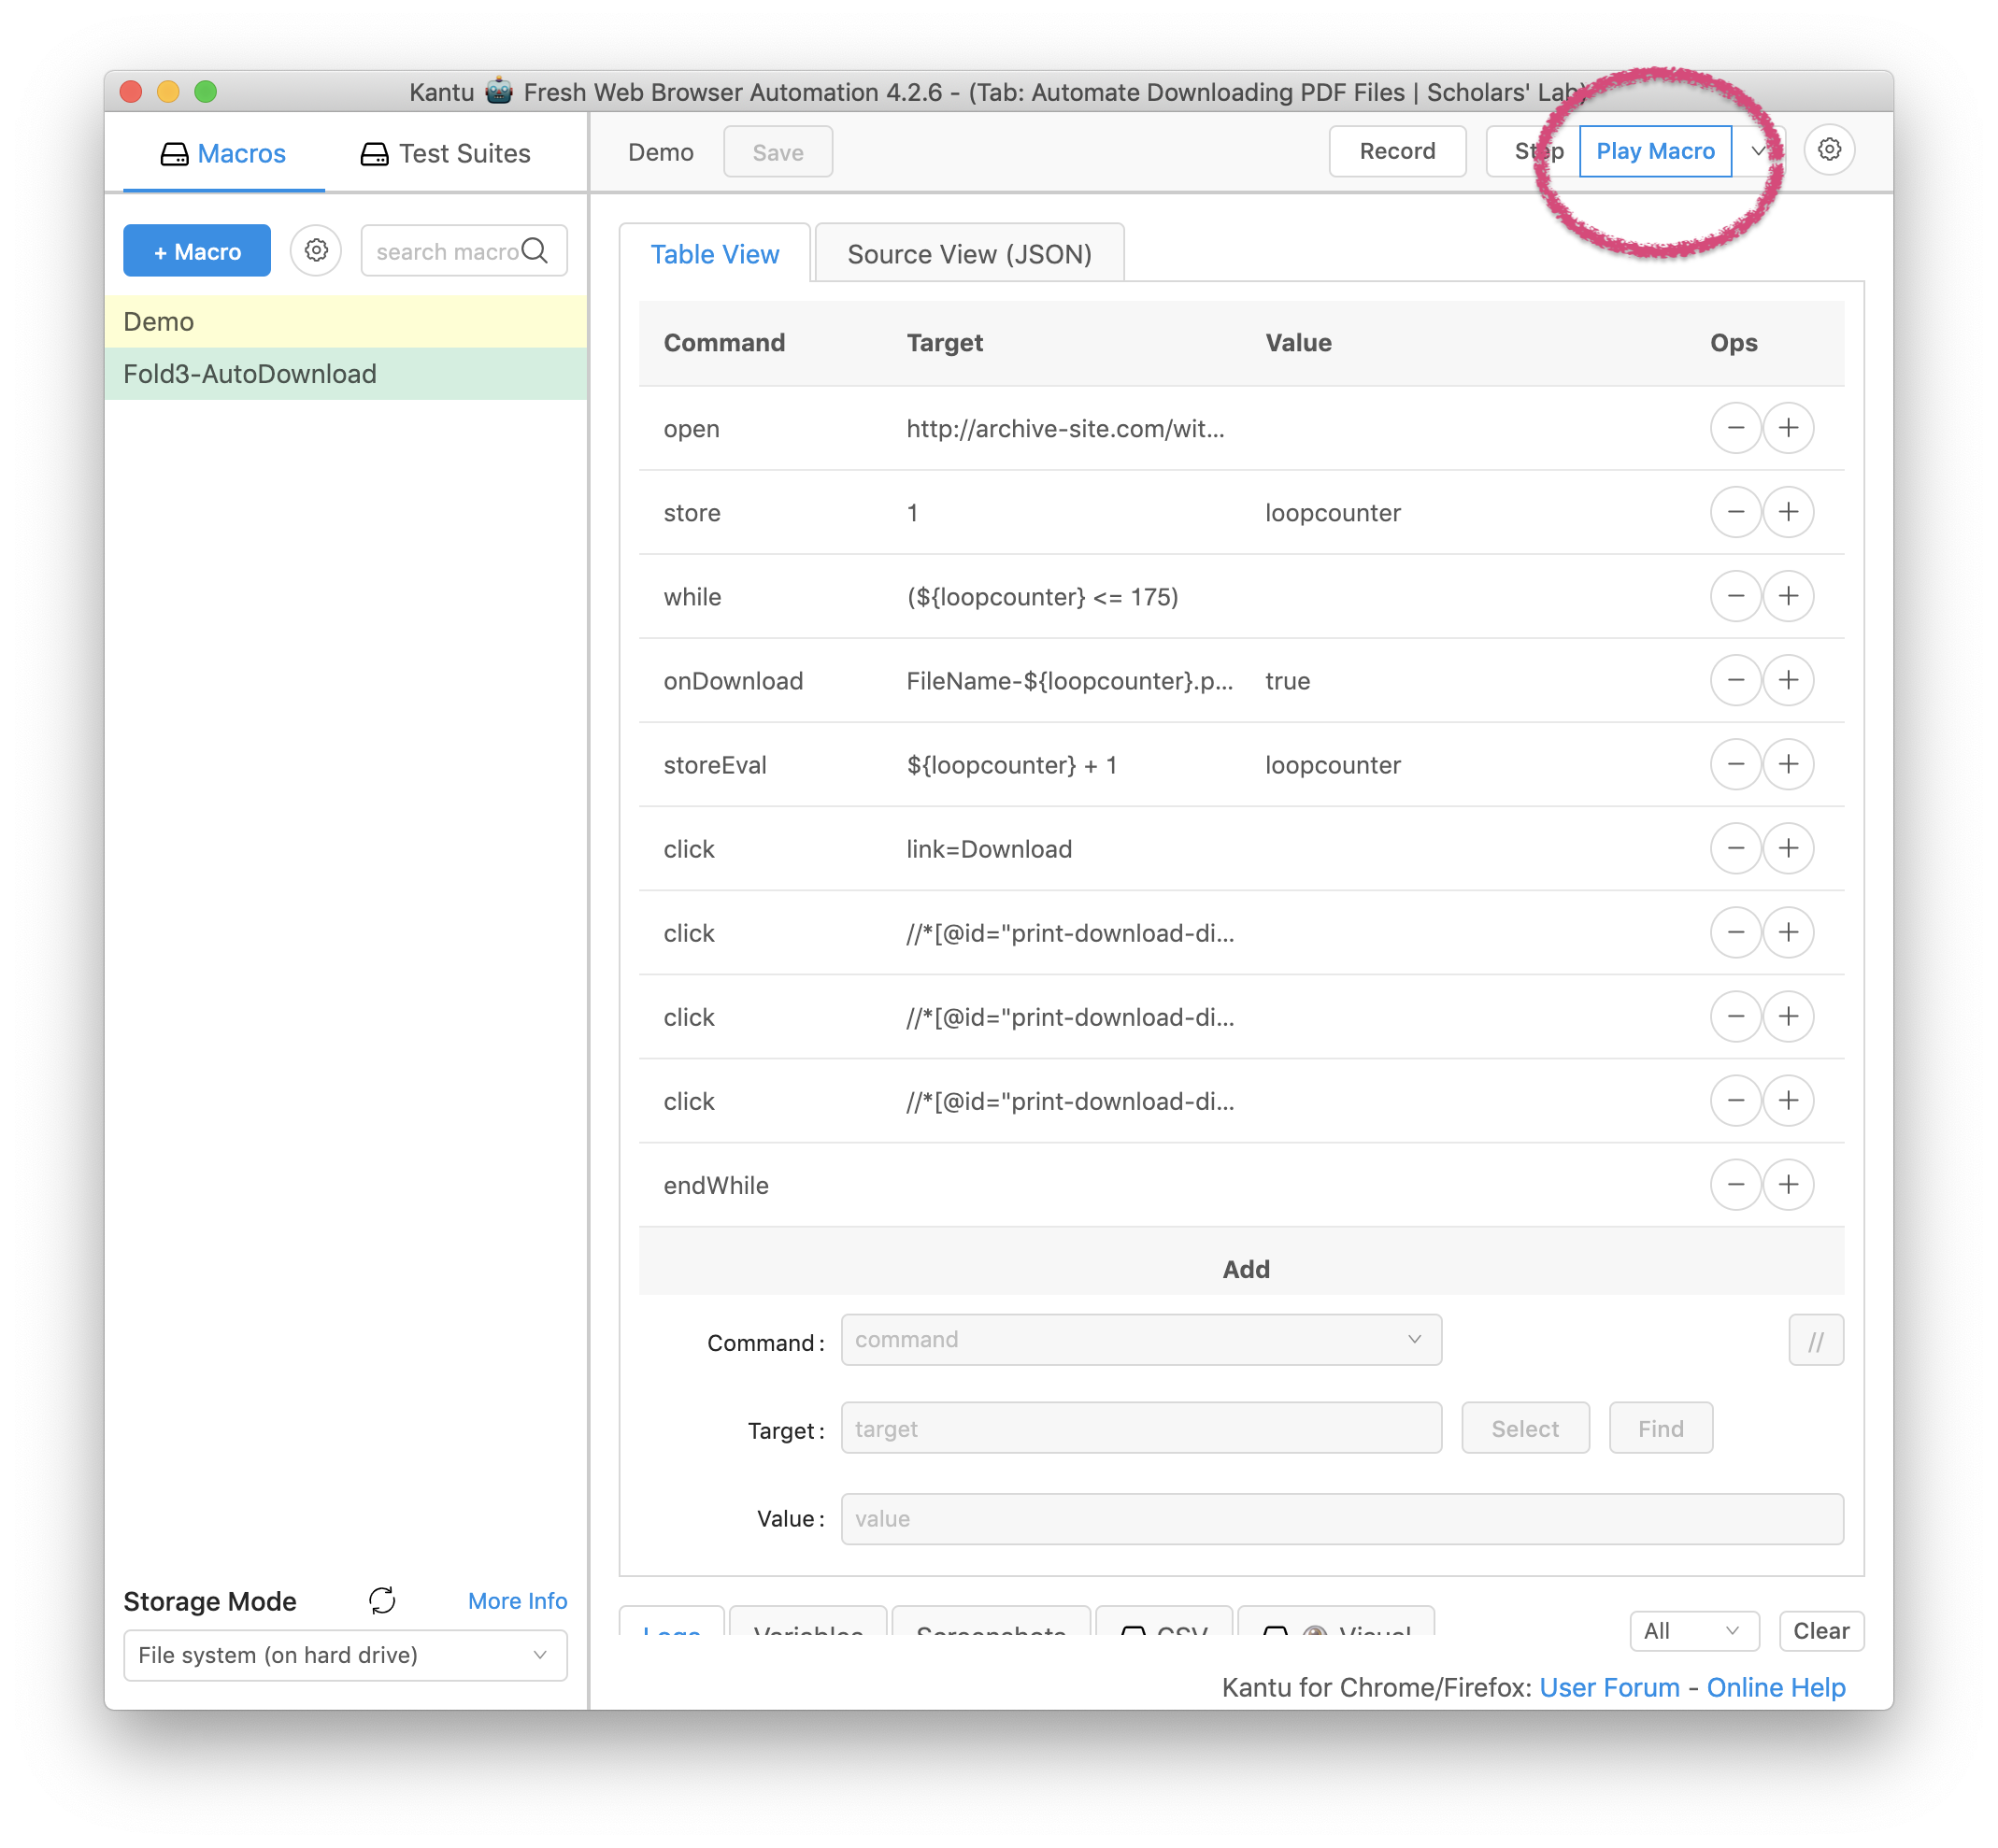
Run the program
Kantu calls this program we just created a ‘macro’, so to run this macro, we just click the ‘Play Macro’ button.
Now you can adapt this macro other collections of pdf files on the same site, or to other websites altogether. Just change the first line, the URL of the website to start on, and the number of times to loop through the code, and any specific places to click.
Errors
Like all computer programs, this macro will not run perfectly every time. I found that sometimes it would download 30 or 100 pages in a row just fine, but then suddenly stop. Sometimes it would download just 4 and then stop. If this happens, I found that two things can fix it.
- Sometimes you just need to refresh the page and the macro starts again from where it left off.
- Sometimes you need to restart the process at the current page. To do this, just change the URL in the first line to the URL of the page you need downloaded next, and change the number in the while condition to how many PDFs are left.
Good luck, and happy scripting!
All the PDFs
But wait! What about all of those PDF files of single pages! Isn’t there a way to combine them all into one single PDF?
I’m glad you asked. There is a way. Many different ways. I wrote a Python script to do it for me. I call it, PDF Combiner! It is available on my GitHub page, https://github.com/ammonshepherd/pdfCombiner . I’ll describe the process of using this script in a forthcoming post.