
Lessons Learned from Project North Star
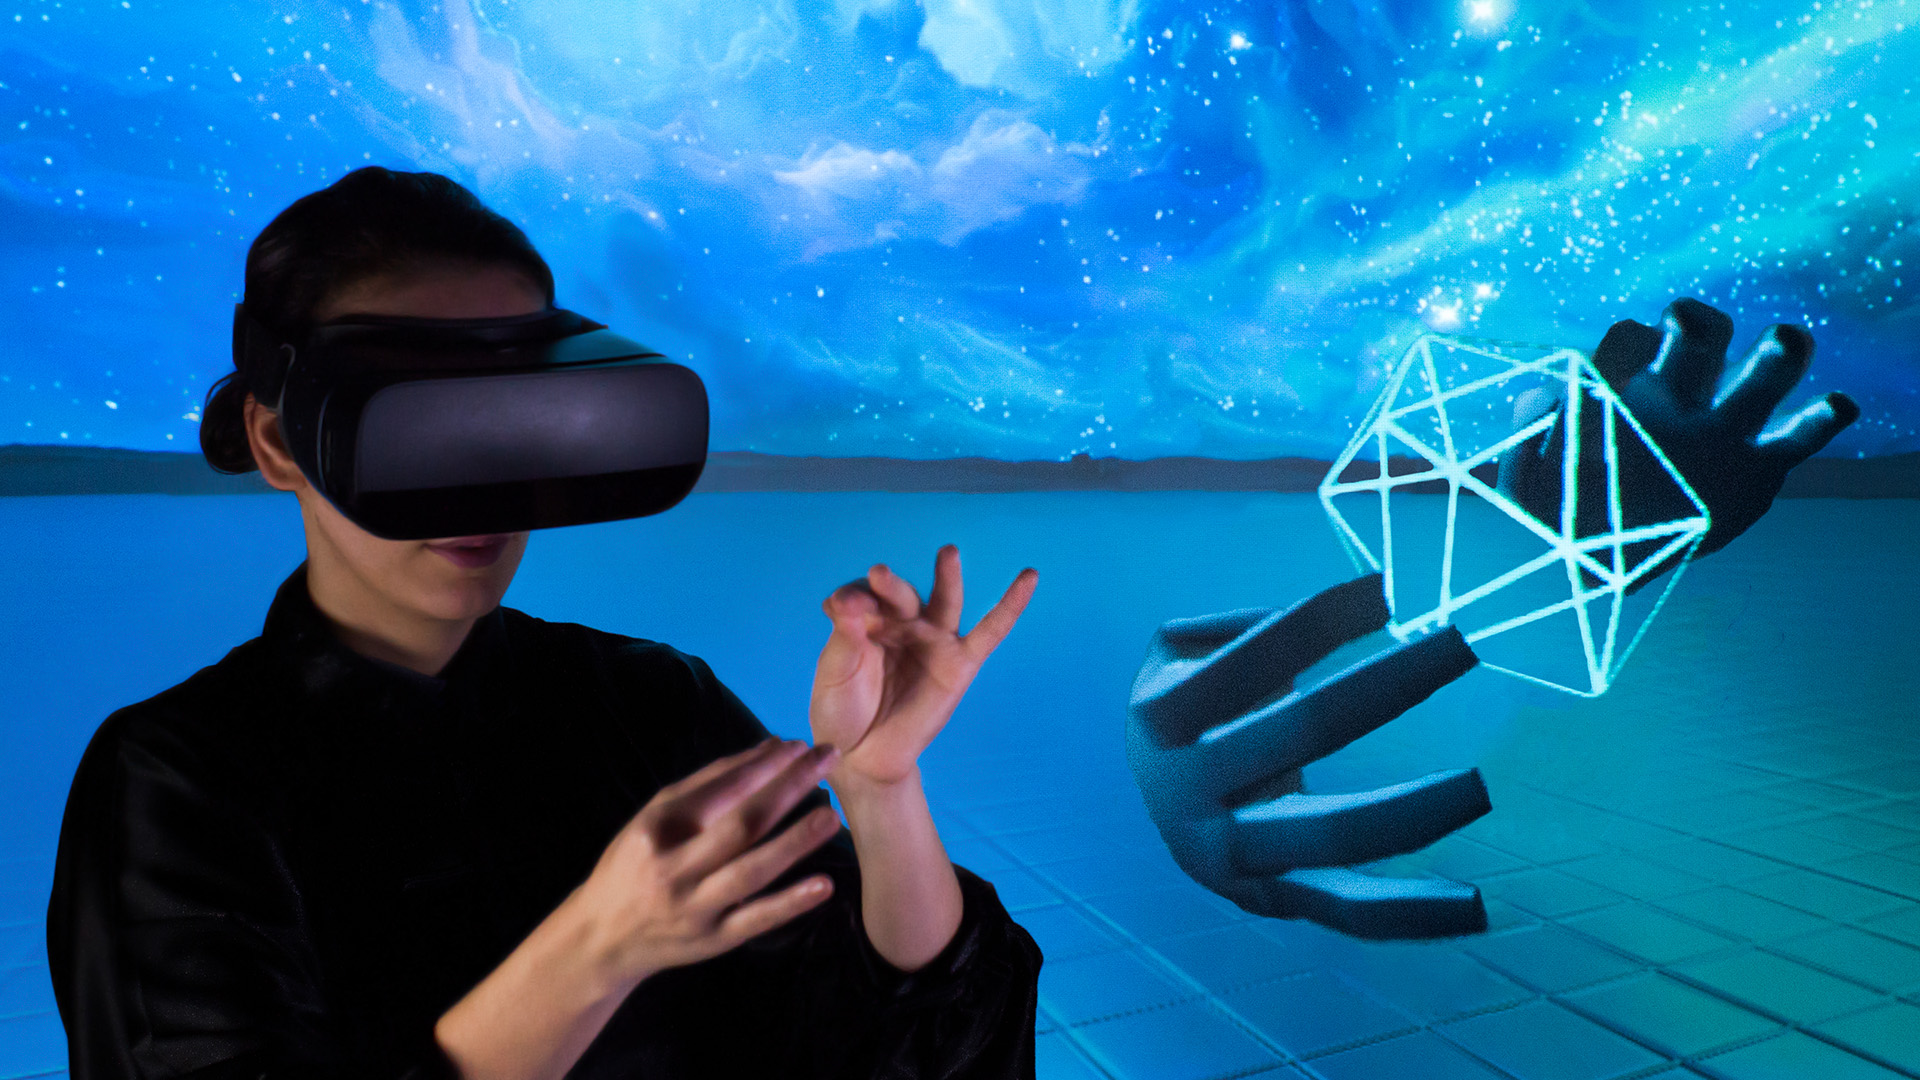
Over the course of the spring semester of 2019, the Immersive Club at UVA built its own Project North Star headset. Project North Star, for those unfamiliar with it, is an open-source augmented reality (AR) headset based on the Leap Motion technology generally used for virtual reality (VR). Leap Motion is a company focused on finger tracking for VR and AR applications, and the device released from the company can be mounted onto the HTC Vive or Oculus Rift headsets without a complicated setup process. It can even be used as a standalone device connected to a computer, as shown below.

Some inspiration for starting this project came after experiencing the Microsoft Hololens. Though it was a great first glimpse of an AR headset, the experience left much to be desired, including a larger screen area, wider field of view, and more responsive finger-tracking. From this, the club decided to take on the task of building an AR headset after reading about Project North Star. The North Star headset is a great improvement upon currently-available AR technology due to its open-source nature, larger screen area, wider field of view, and increased finger-tracking fidelity. In fact, the total costs for the entire project are approximately $300, while the Hololens costs an order of magnitude higher at $3000. The open-source aspect of it is noteworthy due to the high engagement of the community for providing feedback, support, and improvements.
Unveiling North Star and North Star is Open-Source
However, despite the low material cost, this project is heavily dependent upon access to 3D printers, along with other such makerspace facilities. Fortunately, the Immersive Club was able to utilize the 3D Printing Studio at Robertson Media Center in Clemons Library for fabricating the complex parts necessary for construction. More specifically, the Ultimaker printers with dual-extruder heads were particularly useful due to their ability to print with water-soluble support material. This allowed components with highly intricate geometries to be printed very easily. Additionally, the TAZ 6 printer at the 3D printing facility was used to bend a flat piece during assembly. This was done by heating up the build plate to 70 degrees Celsius, which is warmer than the traditional build plate temperature for 3D printing of approximately 60 degrees Celsius. Heating the plate to this temperature allowed us to put the flat piece on the heated plate, wait for some time, and then bend it to the desired specifications while the print was still hot and malleable. After the print cooled, the formerly-flat piece would now stick to its new curved shape that we altered it to. This technique was quite helpful in reducing filament used to create support structures and time spent printing the part, even if we weren’t confident in its effectiveness initially.

Other university facilities that were involved in North Star’s production included Lacy Hall, the Mechanical Engineering building, the Makerspace at Scholars’ Lab in Alderman library, and the VR Space at Robertson Media Center in Clemons library. At Lacy Hall, we needed to cut two short pieces from a long metal bar, so the staff there helped us use the waterjet cutter to get our shorter metal bars. After cutting them at Lacy, it turns out that they didn’t have a tap size small enough to drill the screw holes through the bars. However, we reached out to the machinists at the Mechanical Engineering building, and we were able to get the bars tapped for our desired screw hole size and threaded for our screw type. We also needed to modify a special power-carrying USB cable by adding jumper pins to the stripped wire, which would then fit the slots on our circuit board. This was important because previous cables we tried didn’t have the capacity to carry the higher current needed for both of the displays together. Using the equipment at the Makerspace, we modified the cable and successfully fit it on the circuit board. Finally, the VR Space is where the club members met to assemble the headset and work through the calibration procedure. The PCs are already VR-capable, and we loaded the North Star demonstration in Unity so that all club members could work on it in a public facility.

There were several aspects of the project that either could have gone better or went wrong entirely. Starting from the beginning, the 3D printing process seemed to be unnecessarily complicated, particularly when it instructed us to use Simplified3D, which is a paid software. We substituted Cura in place of that, which is a free software present on all PCs in the 3D Printing Studio. We also had a lot of combined experience with Cura, and thus we were confident that we could resolve issues faster if we used Cura rather than a software that none of us were familiar with. Additionally, the full assembly process was not documented as well as it could have been. Sometimes previously unknown part numbers would show up in the assembly documentation and it would be up to us to work backwards and determine how they fit into the overall assembly. There was also an issue where we put in a part upside down that then led to inverted and incorrect functionality. However, in hindsight, most of the parts fit together very intuitively, and there weren’t too many ways that we could have messed up the process. Regardless, Leap Motion should still make sure to update its documentation to resolve any ambiguities.

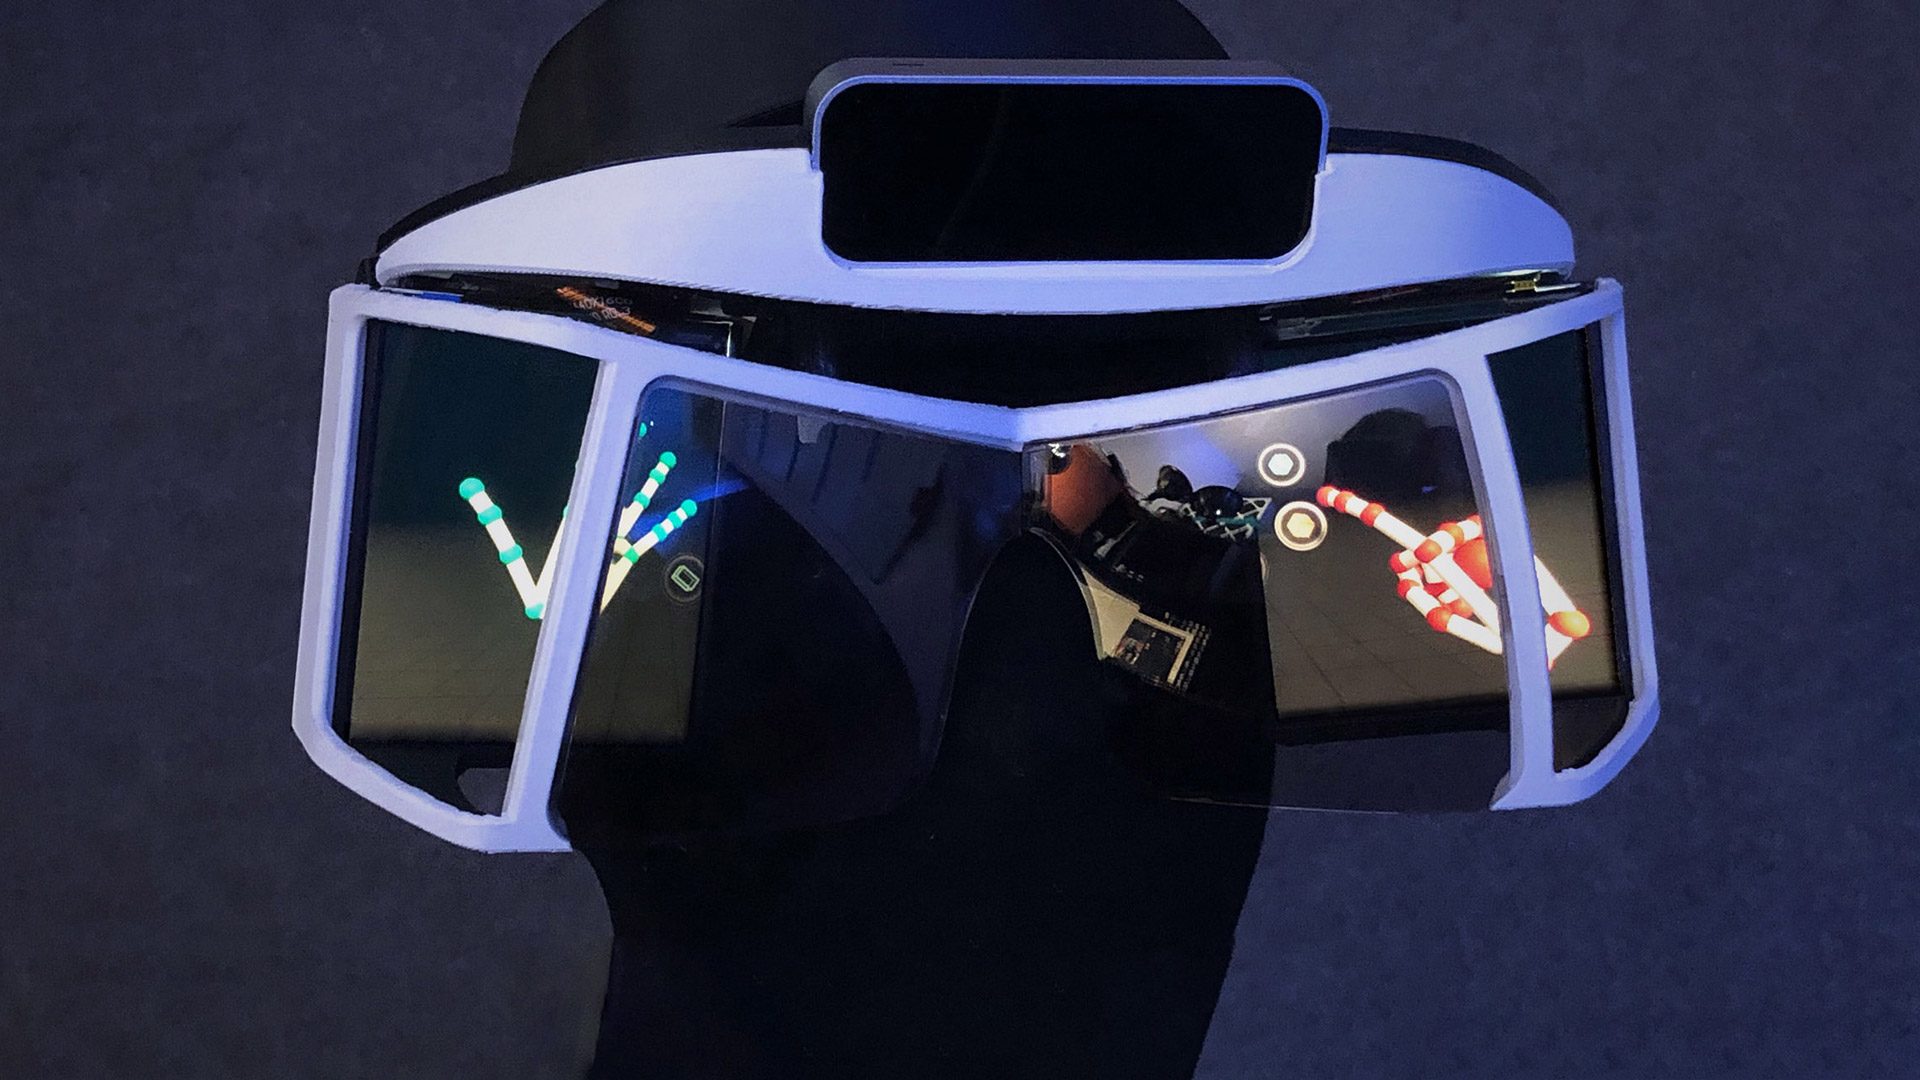
Another issue with the assembly process is the placement of the ribbon cables for the screens on each side of the eyes. The screens are exactly alike, with the ribbon cable bending one way after it extends a little bit from the base. Unfortunately, this means one side of the headset has an awkward and potentially fragile placement of the ribbon cable. As seen in the image below, the ribbon cable on the left side of the headset folds in an unusual manner before it connects to the circuit board. Contrasted with the right side, the left side’s cable could be torn off the monitor very easily and is not tucked away neatly. Finally, after we finished the entire assembly process and tested out the demonstration software, the hand positions were way off, so we researched some calibration procedures. Though this seems to be the last major obstacle to a fully-functional North Star headset, it is a significantly difficult one to overcome. We are currently working through the manual calibration process, but so far it seems like a very complicated process for which exists little to no documentation.

All in all, this project has been moderately successful for us, but there are a few things that we would have done differently. For people looking to do this themselves, it is definitely worth reading about all the resources that exist about construction, assembly, calibration, and development before proceeding with this project. This was a semester-long project for Immersive Club, but we could have also finished in half the time if we planned better schedules for purchases, 3D prints, and assembly. That said, anyone looking to use this for a class project should be able to get to this point even faster. To help with this, we could have split the work into two groups, where one worked on the electronics and the other on the headset assembly. Since the two are joined only at the end, there was no need for us to wait until the headset was finished before starting on the head mounting apparatus. Lastly, it would have been interesting to build the headset with the integrated Leap Motion sensor at the front, and for the next headset, the Immersive Club may consider that route to help organize components a little better.
Overall, embarking on this journey has been extremely valuable for all club members involved, and we are glad that we found this North Star to guide us through our AR experience.
UVA Resources
- 3D Printing Studio at Robertson Media Center in Clemons Library: The 3D Printing Studio is a facility for students to use 3D printers free-of-charge for academic projects or personal purposes. It has Makerbots (simple printers with equally simple interface), TAZ printers (higher-end printers that can print with flexible material), and Ultimakers (higher-end printers with dual extruders that can print with water-soluble support material).
- Student Experiential Center at Lacy Hall: Lacy Hall is a facility that helps students with experiential projects by providing the equipment and machinery needed to produce large mechanical components.
- Machine Shop at Mechanical Engineering building on Engineers’ Way: The Machine Shop also helps students with production of mechanical elements, but they work on smaller parts due to space constraints in the lab area.
- Makerspace at Scholars’ Lab in Alderman library: The Scholars’ Lab is a digital humanities and cultural heritage center at the UVA Alderman Library. The Makerspace is located within that area, and specializes in experimentation with technologies like 3D printing, sewing, physical computing, and augmented reality.
- VR Space at Robertson Media Center in Clemons library (image): The VR Space has two HTC Vive headsets, each with their own dedicated walkable area and VR-capable PC to create an immersive experience in virtual reality.