
Raspberry Pi Traffic Light Project
Project Idea
Let me take you back 6 years ago. When a certain 12 year old son of mine was just 6 years old.
6-year-olds are great. They want to sleep in on school days (and nearly miss the bus every day), but on Saturdays they automatically wake up an hour before they would for school and want to watch cartoons!
Six-year-olds don’t quite get time, either. You can’t just tell them, “Stay in bed until 7:30am.” Not that they would do it anyway. How, then, can you help kids learn to stay in bed until 7:30am on a Saturday morning? Turn it into a game!
Grandpa had just given this grandson a new Raspberry Pi with the objective of using it to create a project. Well, we had the Pi, now we had a need for a project. Could we use the Raspberry Pi to help him know if it was too early to get out of bed? Kids learn from an early age that red means stop and green means go. How about using the Raspberry Pi to make a traffic light. Push a button and the Pi checks the day and time, and if it’s after 7:30am on a Saturday, it’s OK to get out of bed - GREEN LIGHT. But if it’s before 7:30am, RED LIGHT - stay in bed. This could also work for at night time. After 8pm? RED LIGHT - stay in bed. Before 8pm? GREEN LIGHT, not time for bed yet.
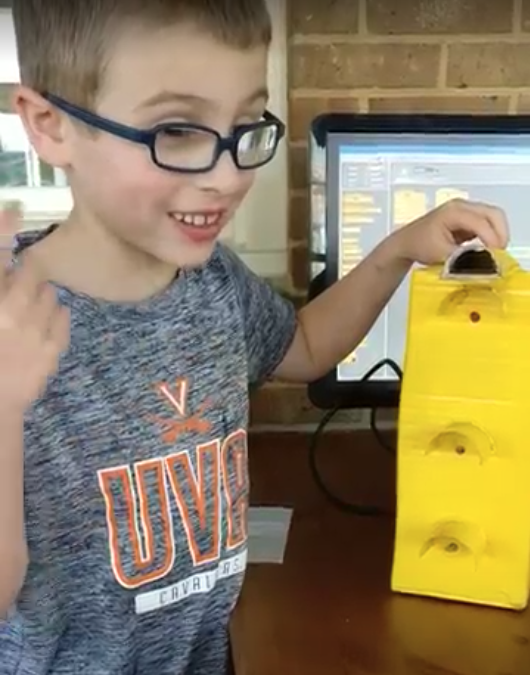
So I set to work with my son to build a traffic light out of cardboard, and with a button and three LEDs, we made the traffic light pictured above.
The Build
Parts List:
- Raspberry Pi
- wires
- Red, Green, Yellow LED
- tape
- yellow spray paint
- breadboard
- button
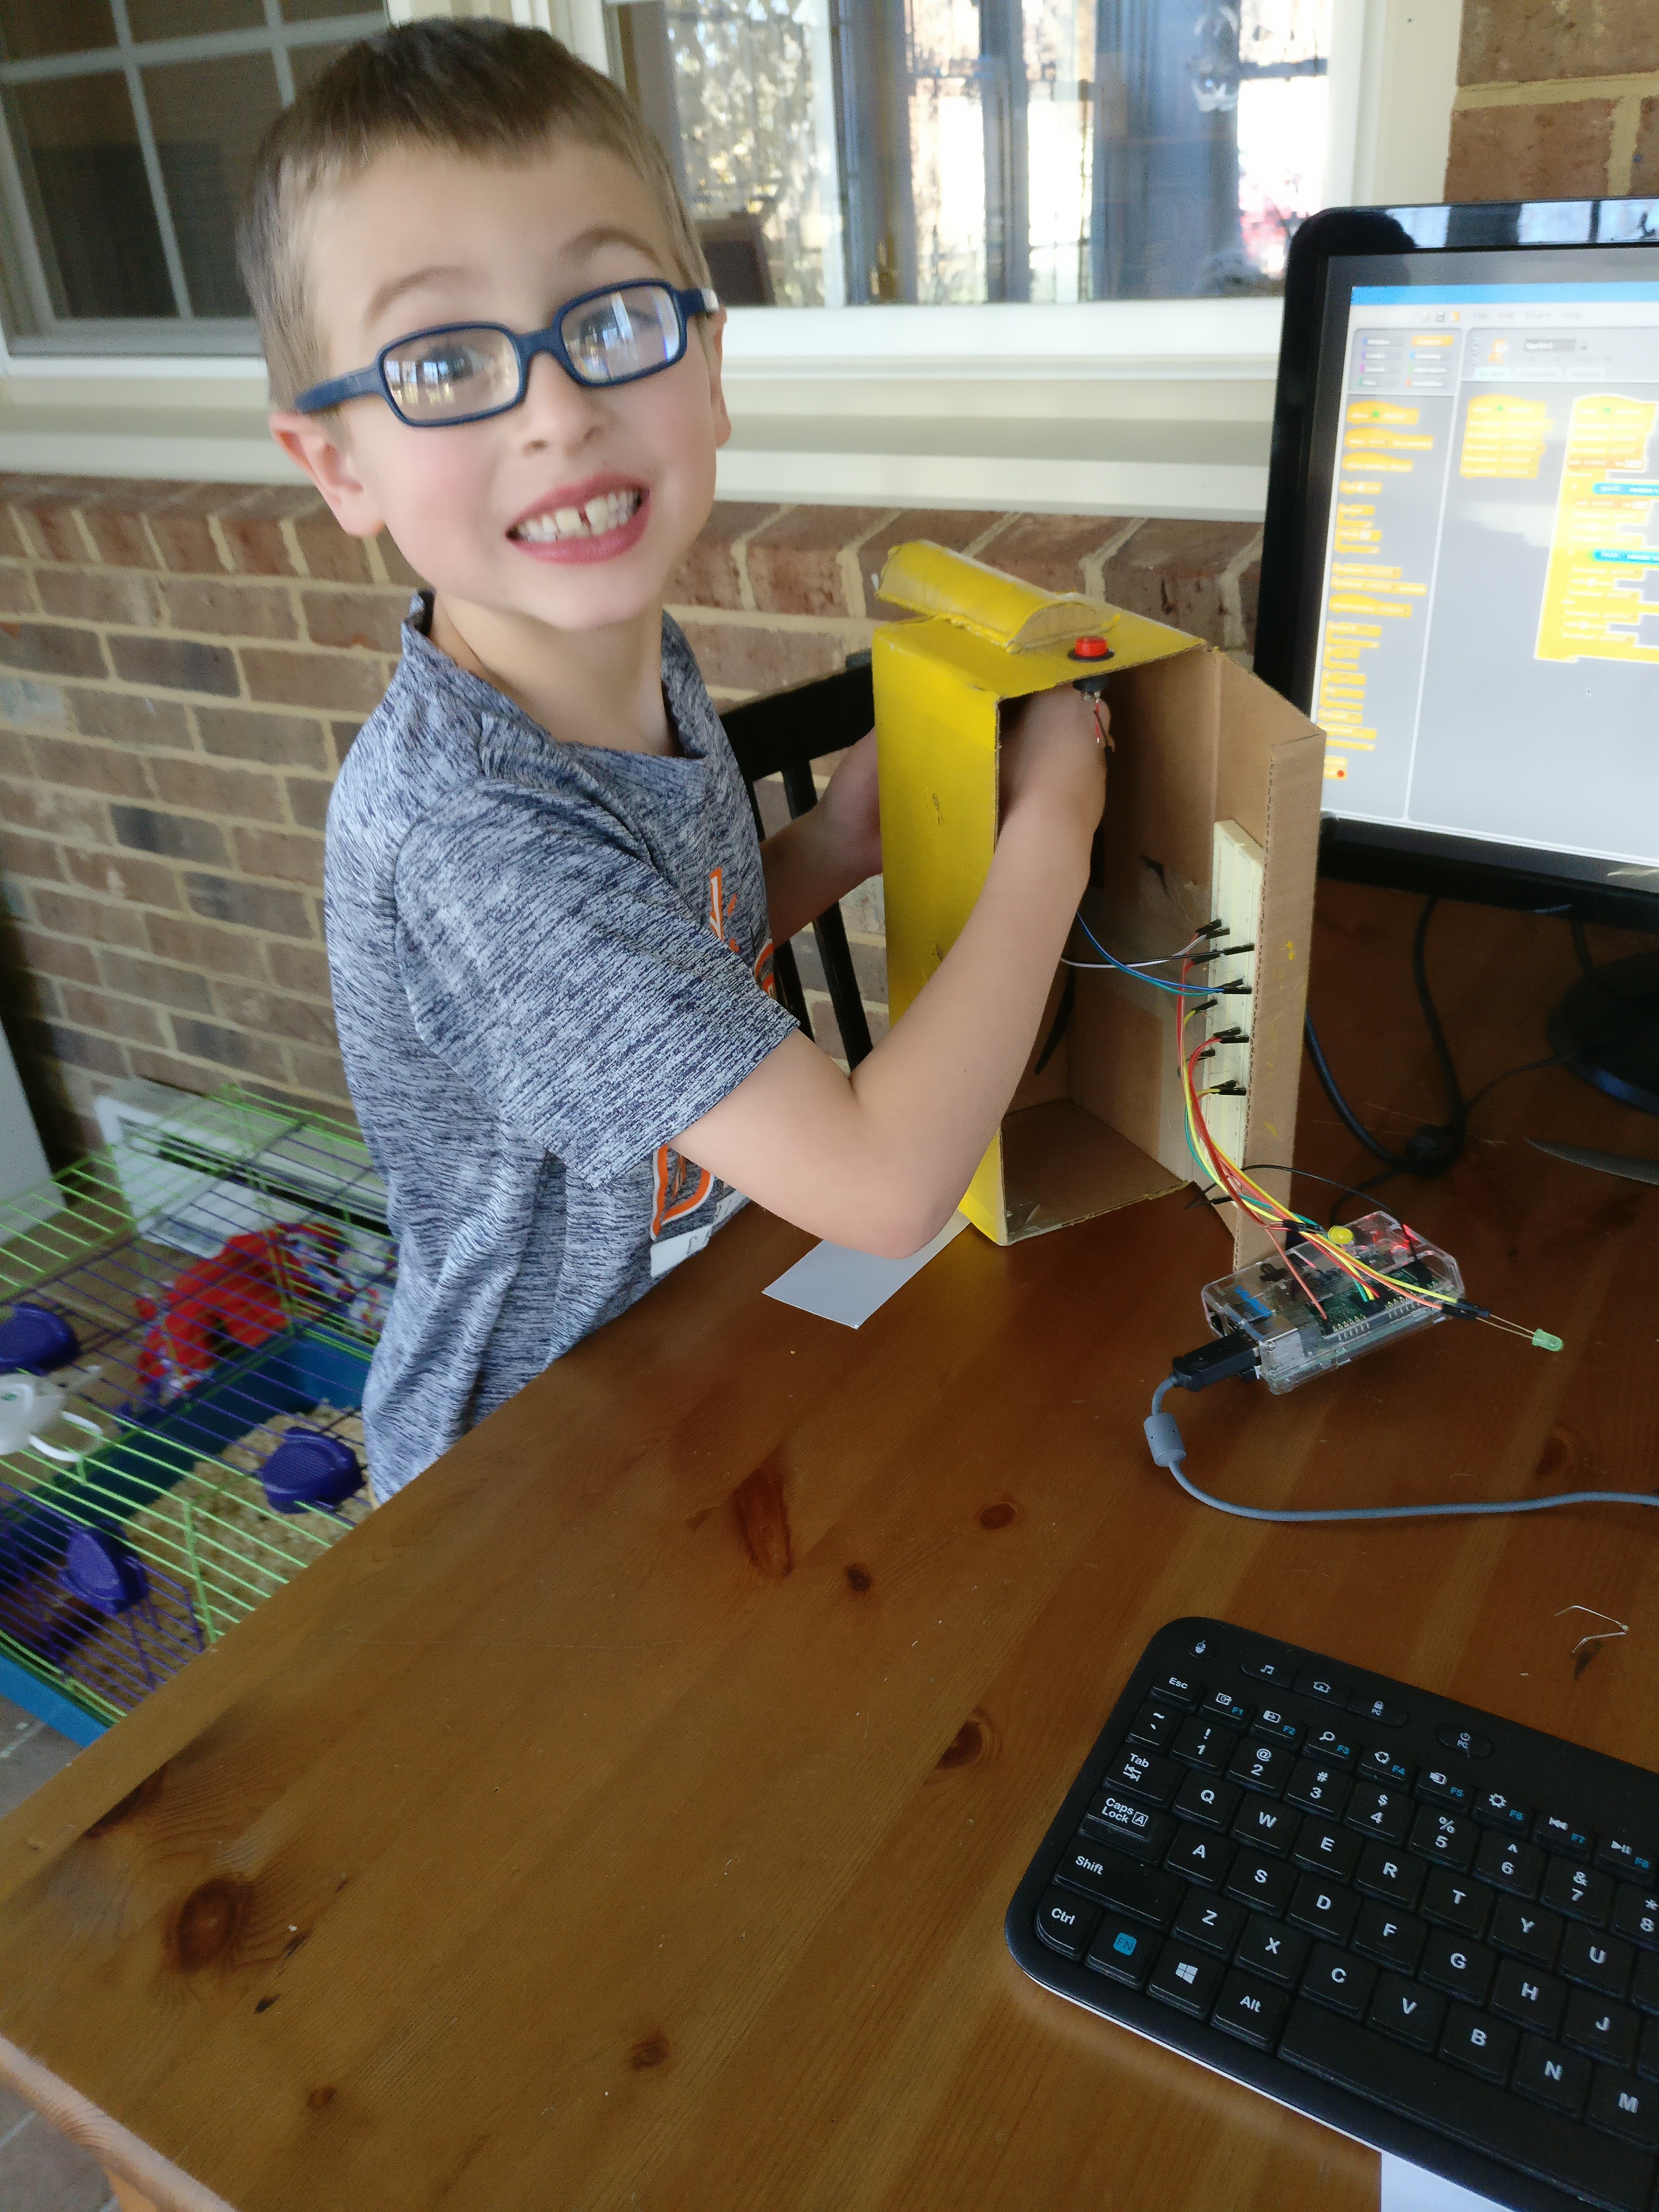
We used cardboard, tape and yellow spray paint to make a traffic light. Red, yellow and Green LEDs make the light come to life. A small push button on the top of the light turns the system on and displays the correct light for the time. A Raspberry Pi is the brains of the unit, and everything is connected with wires and a breadboard.
Wiring Diagram
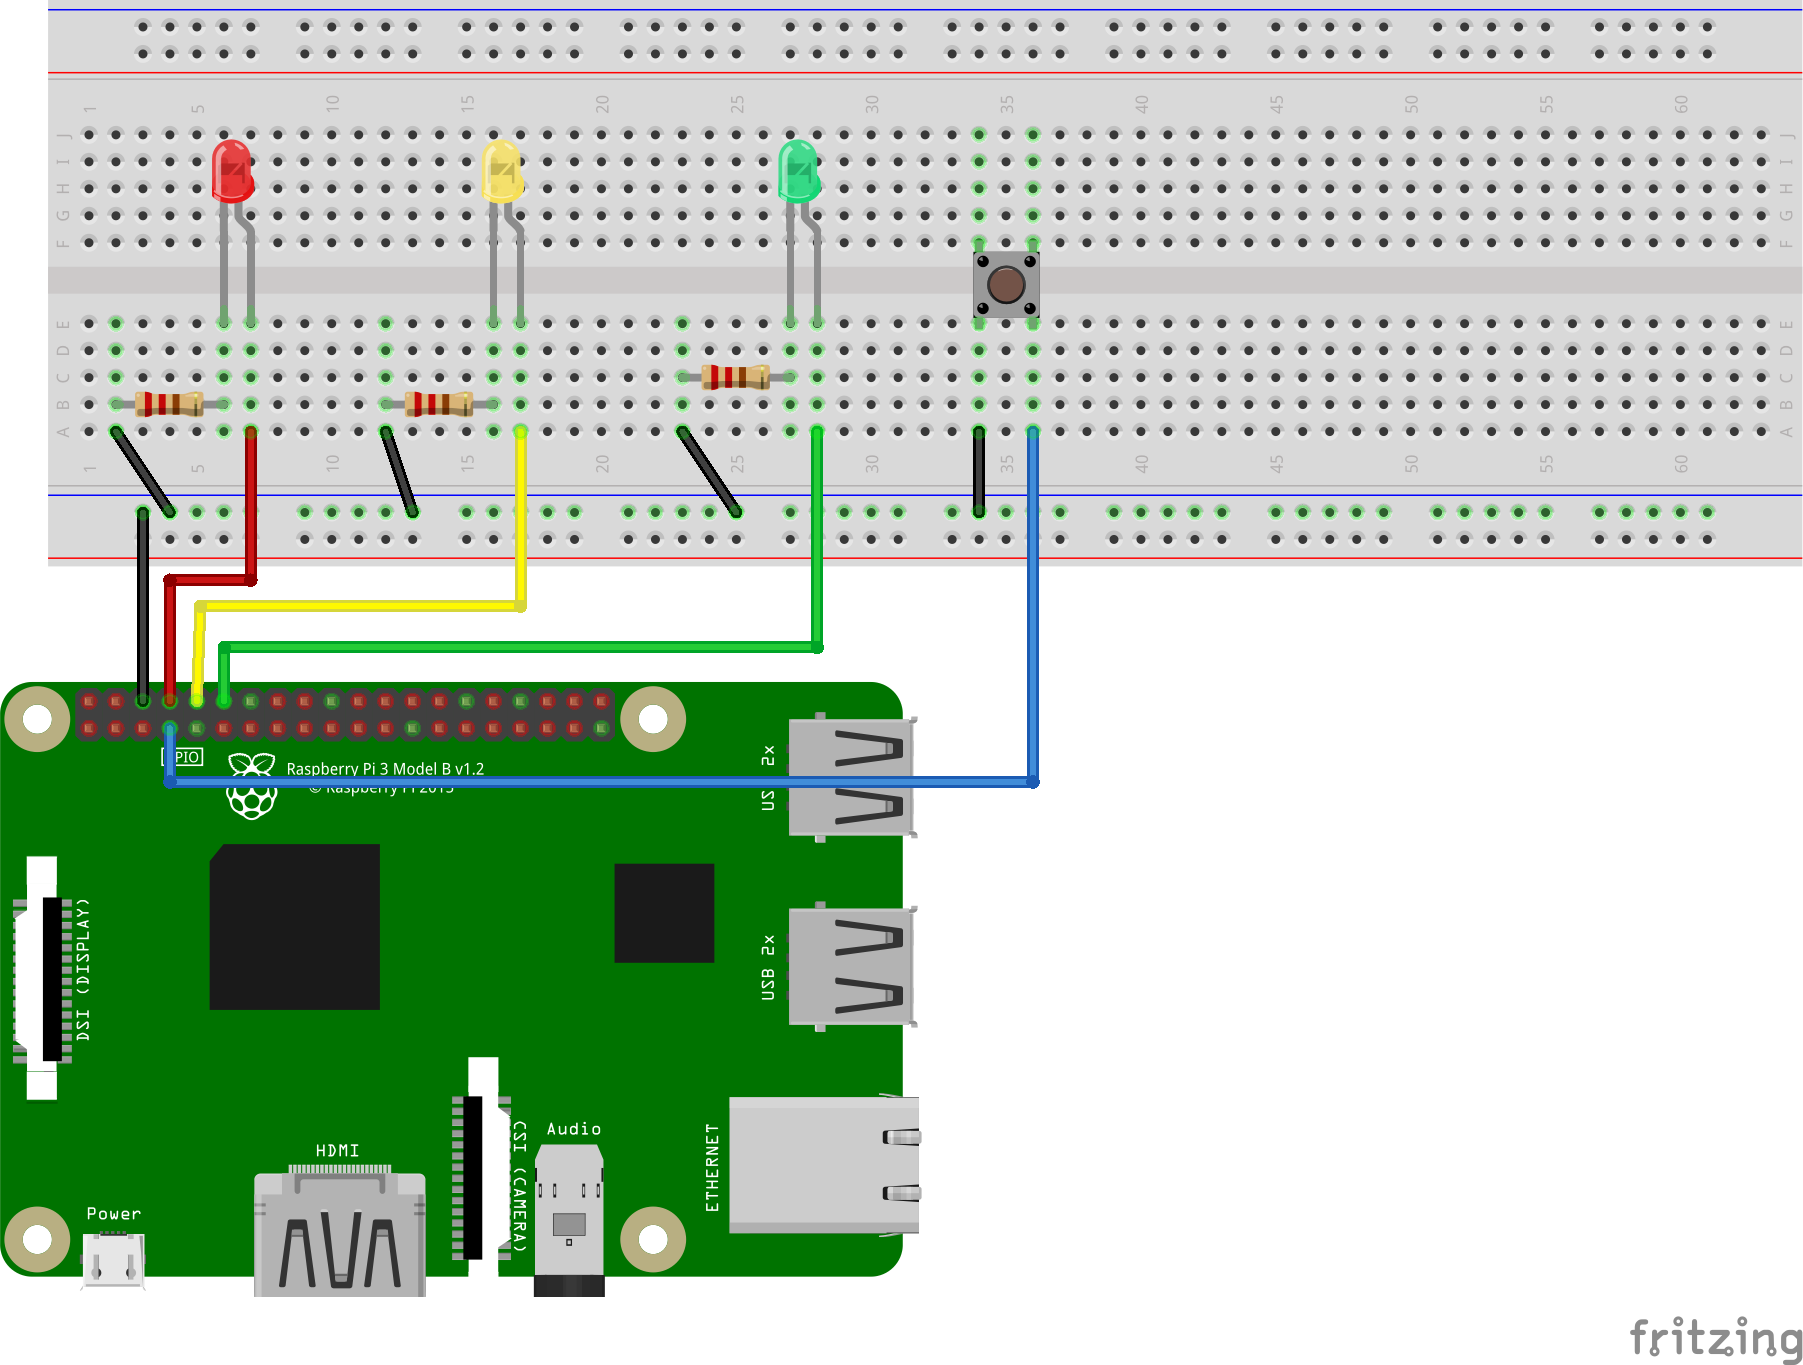
Three LEDs are connected to the Raspberry Pi.
- red = pin 18 and ground through a 100 ohm resistor
- yellow = pin 14 and ground through a 100 ohm resistor
- green = pin 15 and ground through a 100 ohm resistor
The button is connected to pin 4 and ground.
Test Code
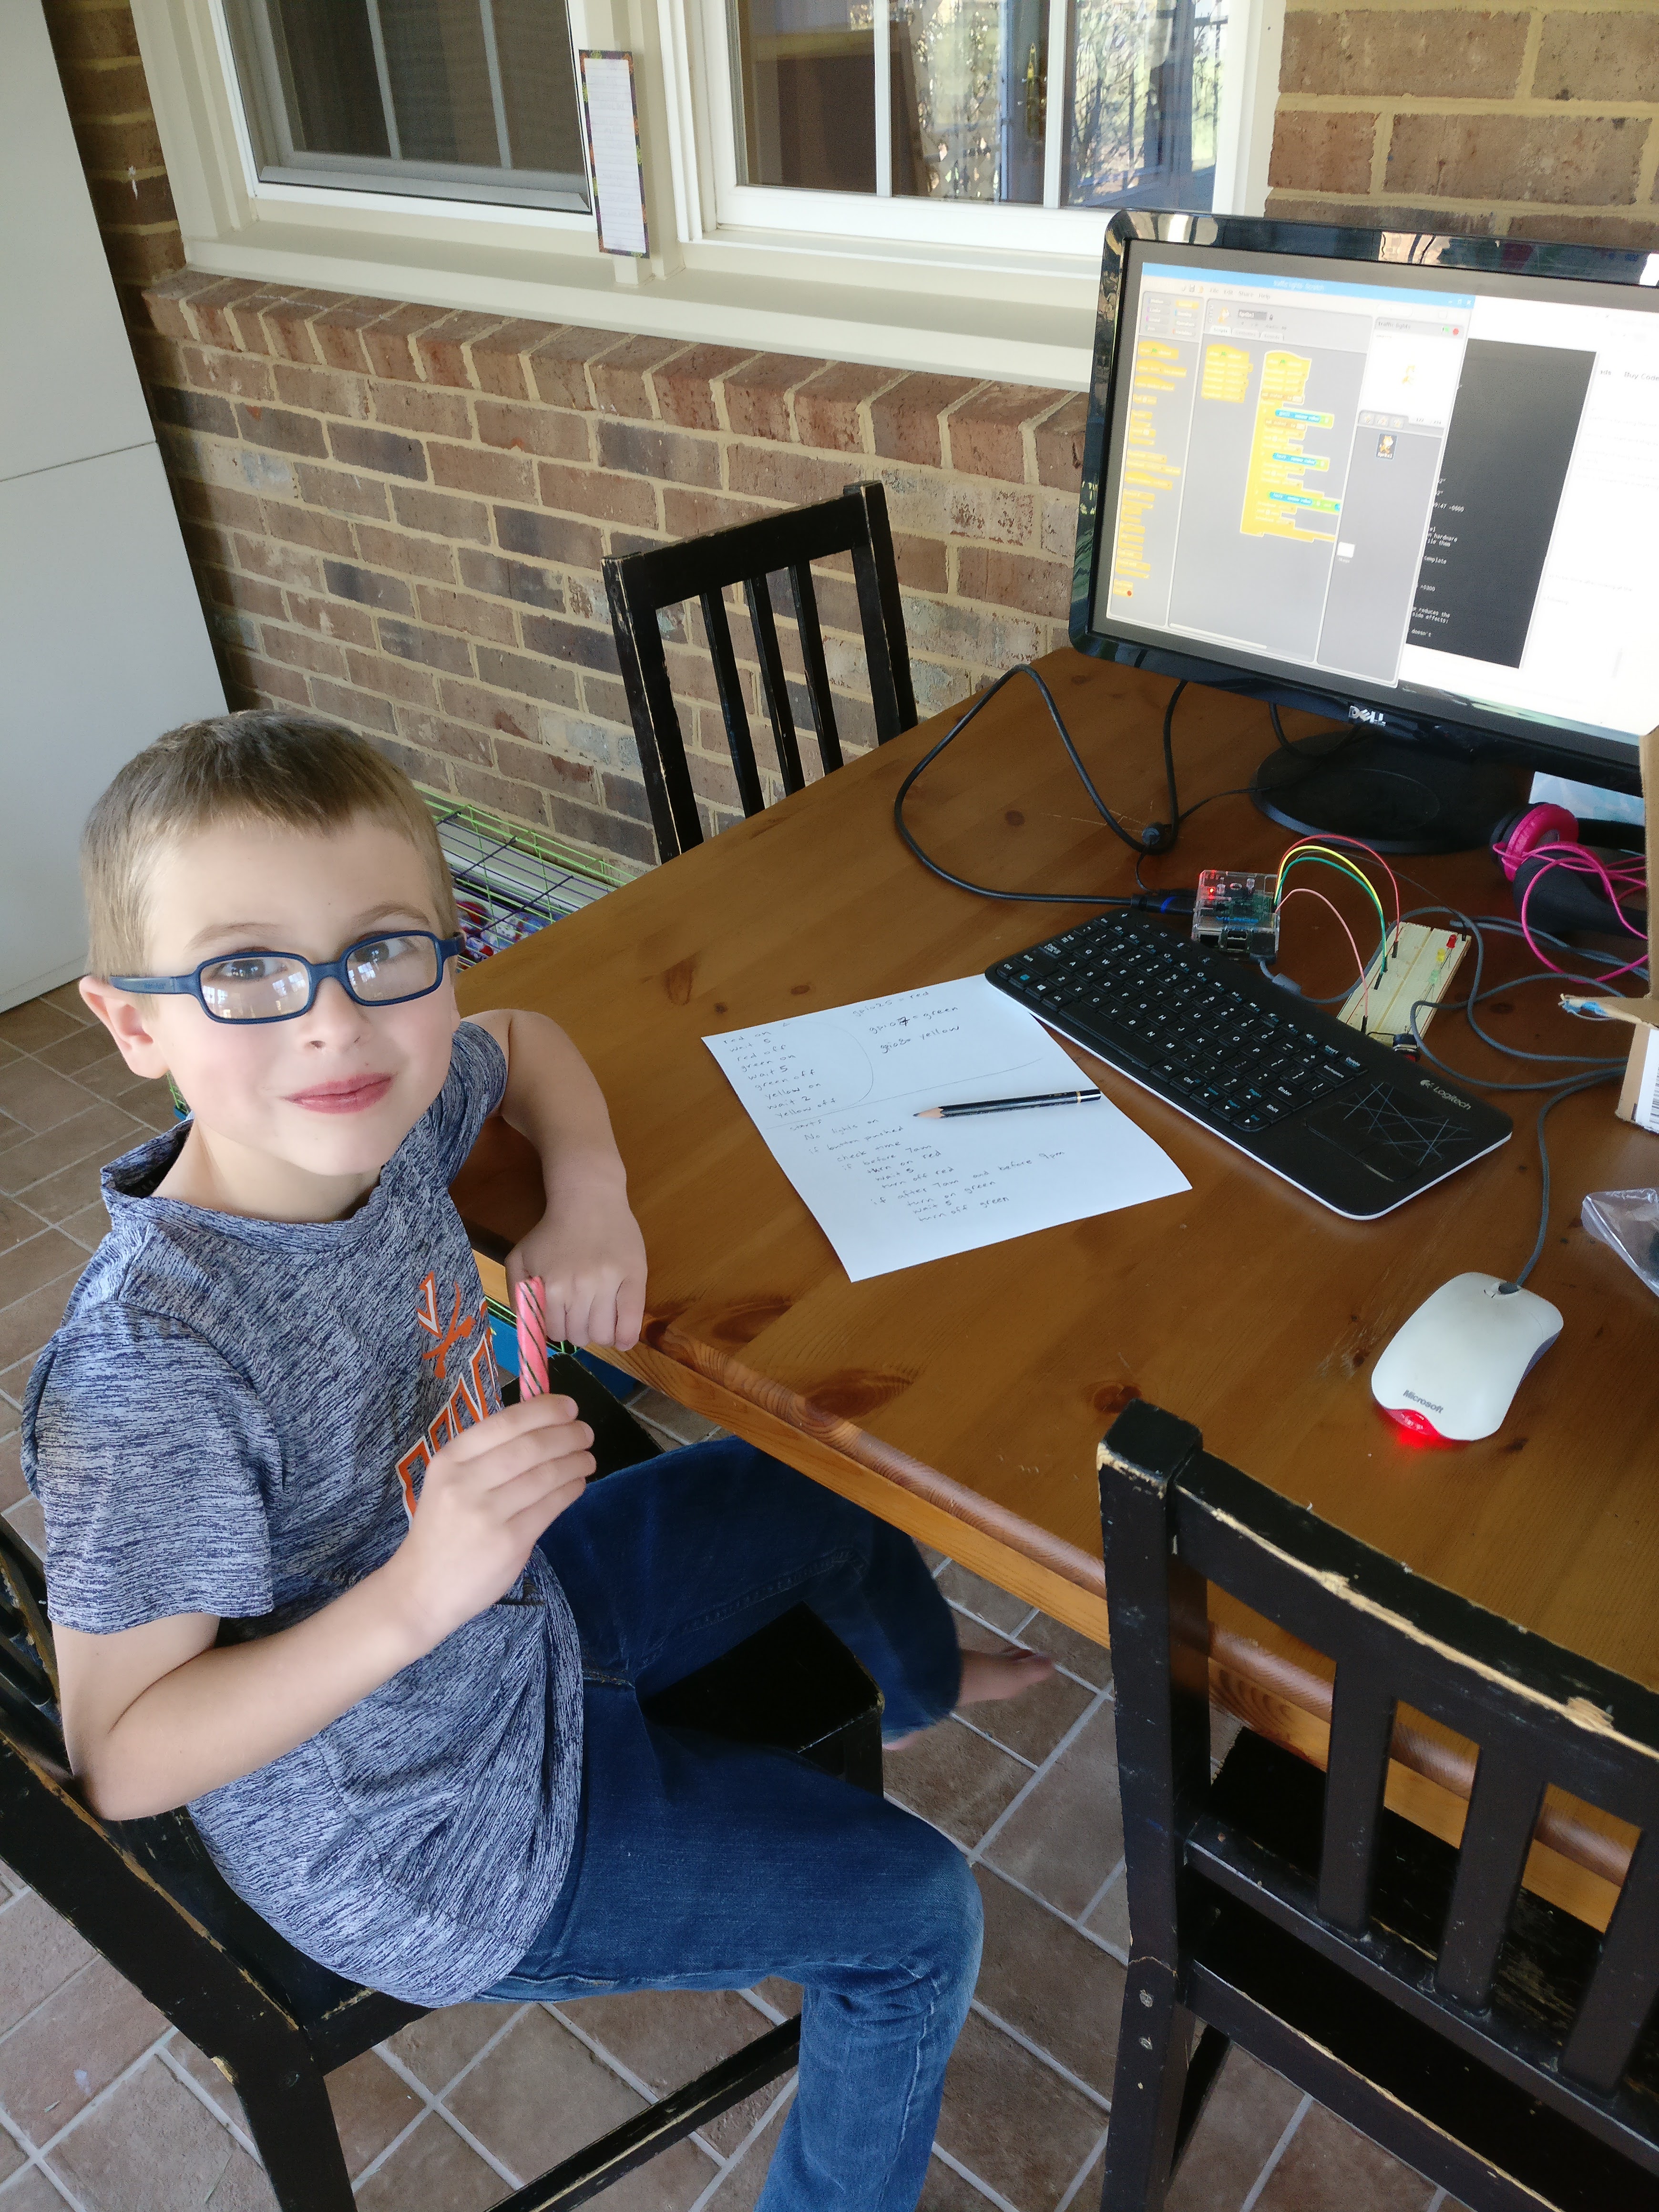
One thing really cool about this project, was that my 7-year-old was able to design and code the traffic light himself (with a bit of help). We wrote down the logic we wanted the traffic light to follow on a piece of paper. Then with a little bit of instruction, he was able to use Scratch on the Raspberry Pi to create the code.
The code is “written” in a program called Scratch. Scratch is a graphical coding program that allows you to use color coded blocks to represent coding structures. What I like about Scratch, is that it makes it visually understandable what parts of code belong to which control structures. It is very easy to see that a certain part of the code only works within an ‘if’ statement, for example.
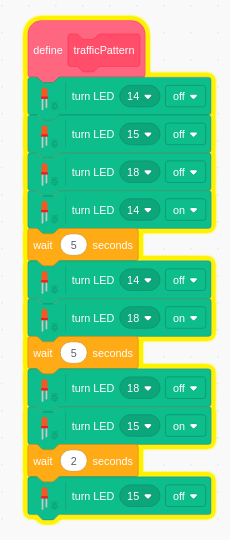
Here is the code for a basic traffic signal that includes a ‘walk’ button. This is the basics needed for making the traffic light for my son’s project.
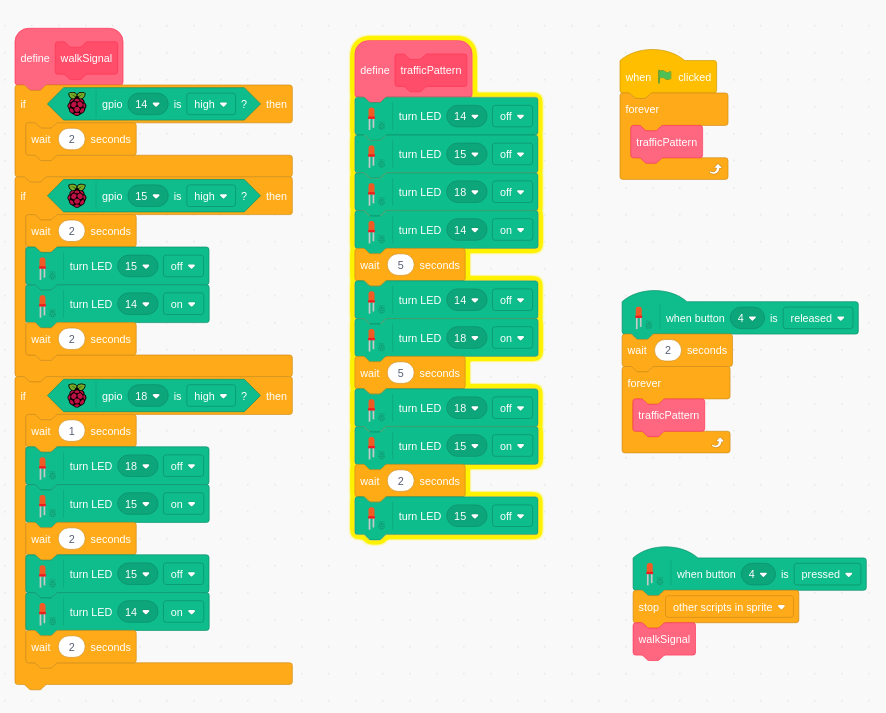
Here’s the code explained:

The block with the green flag is the code that starts when the green flag in Scratch is clicked. This is how a program is run. This starts the traffic pattern code.
This code turns all of the LEDs off, and the yellow LED on all at once. After a 5 second pause, the yellow LED is turned off and the red LED is turned on. After another 5 second pause, the red LED is turned off and the green LED is turned on for two seconds, and then turned off.
The green LED is turned off at the end of this code sequence so that it flows into the next code block.
The walk signal code has three if conditional statements. Each statement checks for the state of each of the LEDs.
Fist, if the yellow light is on (pin 14) when the button is pressed, then keep it on for 2 more seconds. After which, the traffic pattern resumes.
Second, if the green light is on (pin 15) when the button is pressed, then wait 2 seconds before turning off the green LED and turning on the yellow LED at the same time. Wait for 2 seconds with the yellow light on, then resume the traffic pattern function.
If the red LED (pin 18) is on when the button is pressed, Wait for a second, then turn the red LED off and green LED on at the same time. Wait for two seconds while the green LED is on, then turn off the green LED and the yellow LED on and wait for 2 more seconds.
In retrospect, I’m not sure why I have the green light go on after the button is pushed and the red LED is on. It should perhaps just stay red for a while longer?
Python Code
While this worked for testing, there was a bit more required to get this to actually work in real life.
For instance, at the time, Scratch code didn’t allow for checking the current computer time. I would need a different programming language for this. Enter Python!
Here is the Python code used for the real deal, with an explanation to follow.
from gpiozero import LED
from gpiozero import Button
from gpiozero import TrafficLights
import time

# TrafficLights(red, amber, green)
lights = TrafficLights(25, 8, 7)
button = Button(21)


def traffic(hour):
  t = time.localtime()
  h = t.tm_hour
  lights.amber.on()
  time.sleep(2)
  lights.amber.off()
  if (21 > h and 6 < h):
    lights.green.on()
    time.sleep(5)
    lights.green.off()
  else:
    lights.red.on()
    time.sleep(5)
    lights.red.off()

def wakey(hour, min):
  cnt = 0
  while cnt < 10:
    if (hour == 6 and min == 40):
      lights.green.on()
      lights.red.on()
      lights.amber.on()
      time.sleep(1)
      lights.green.off()
      lights.red.off()
      lights.amber.off()
      time.sleep(1)
    cnt+=1

while True:
  w = time.localtime()
  wakey(w.tm_hour, w.tm_min)
  button.when_pressed = traffic
Code explanation
Here I will try to reinterpret the code I wrote over 6 years ago…
from gpiozero import LED
from gpiozero import Button
from gpiozero import TrafficLights
import time

# TrafficLights(red, amber, green)
lights = TrafficLights(25, 8, 7)
button = Button(21)
These first 4 lines import the libraries needed for Python to talk with the Raspberry Pi. And, oh, look, GPIOZero has already written a traffic lights library. Might as well use that!
Lines 7 and 8 set up the LEDs and buttons, establishing what pin number is associated with which color LED.
def traffic(hour):
  t = time.localtime()
  h = t.tm_hour
  lights.amber.on()
  time.sleep(2)
  lights.amber.off()
  if (21 > h and 6 < h):
    lights.green.on()
    time.sleep(5)
    lights.green.off()
  else:
    lights.red.on()
    time.sleep(5)
    lights.red.off()
This function gets the current time, flashes the yellow light for two seconds to let you know it’s working, then checks if the current hour is earlier than 9pm and after 6am. If so, it turns on the gree light for 5 seconds. If not, it turns on the red light for 5 seconds.
def wakey(hour, min):
  cnt = 0
  while cnt < 10:
    if (hour == 6 and min == 40):
      lights.green.on()
      lights.red.on()
      lights.amber.on()
      time.sleep(1)
      lights.green.off()
      lights.red.off()
      lights.amber.off()
      time.sleep(1)
    cnt+=1
This function is a little added bonus I threw in there. The boy is supposed to start waking up at 6:40am to get ready for school. Why not have the traffic light serve as an alarm clock! This code block will flash all of the lights for 10 seconds.
while True:
  w = time.localtime()
  wakey(w.tm_hour, w.tm_min)
  button.when_pressed = traffic
Finally, the code that puts it into action. The while loop runs forever, because True is always true. It will get the current time, run the wakey function, and if it detects the button being pressed, will run the traffic function.
Review
This was a great project for learning some Python and basic electronics, for me and my son. If memory serves correctly, this worked for a few weeks, then lost its alure and probably broke.
Even if it didn’t solve the Saturday morning problem, it was a good bonding opportunity!
If you have any questions about this project, feel free to drop me a note: ammon@virginia.edu