
Webhook for Scholars’ Lab Website
Webhook for scholarslab.org
Last year we switched our Scholars’ Lab website from WordPress to Jekyll. This means our website is static HTML, CSS and some JavaScript. It loads fast, but the process of adding content became a little bit more complex. This was all part of the plan, though.
The details of how the site works are available on the GitHub repo (thanks to Amanda and Ronda and Brandon and Laura and others for making that awesome documentation!), so this post will show the technical steps on how we get the files from our GitHub repo onto our server and turned into the static files you view in the browser.
The Workflow (high level overview)
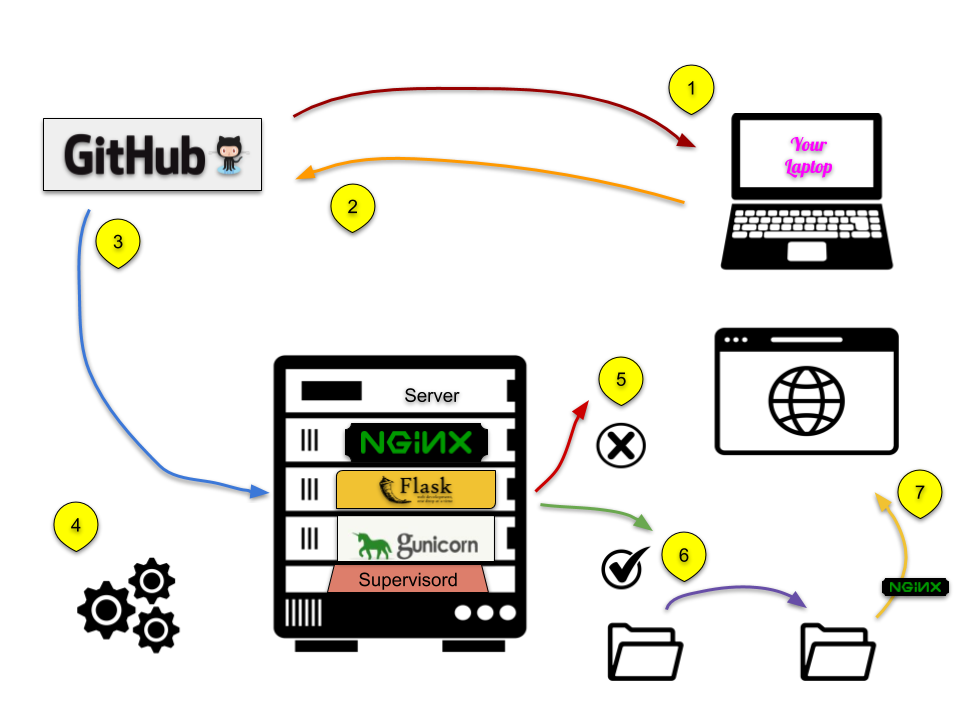
When changes need to be made,
- a user clones the repo to their local machine, makes the changes, merges those changes into the master branch (or initiates a pull request for the changes to be approved).
- Once those changes are made and committed into the master branch on GitHub,
- then GitHub initiates a post-commit hook (basically, it runs a command every time a commit is made). The post-commit hook simply sends some data about the commit to a specified URL, the server where the live website lives.
- There is a very small Python Flask application running on the server which listens for this specific request.
- Once a request is received, the application checks if the data is sent as a commit to the master branch. If not then it ignores the data.
- If it is a commit to the master branch, then it runs a script to clone the repository and then syncs the changes to the website directory.
- Nginx, the web server, serves up the static website to the world.
The rest of this post looks at those steps, with the exception of the first two steps, in more detail.
1-2. The Change
This process is pretty well layed out in the documentation already, and not so relevant to this post, so see the documentation on how this part is done.
3. The GitHub
Once a change has been made on a person’s local computer, they will submit that change to the GitHub repo, either as a commit or a pull request (basically a commit that needs to be approved first). If GitHub is set up beforehand, then whenever such a commit is made, GitHub will send some data to a URL of your choosing.
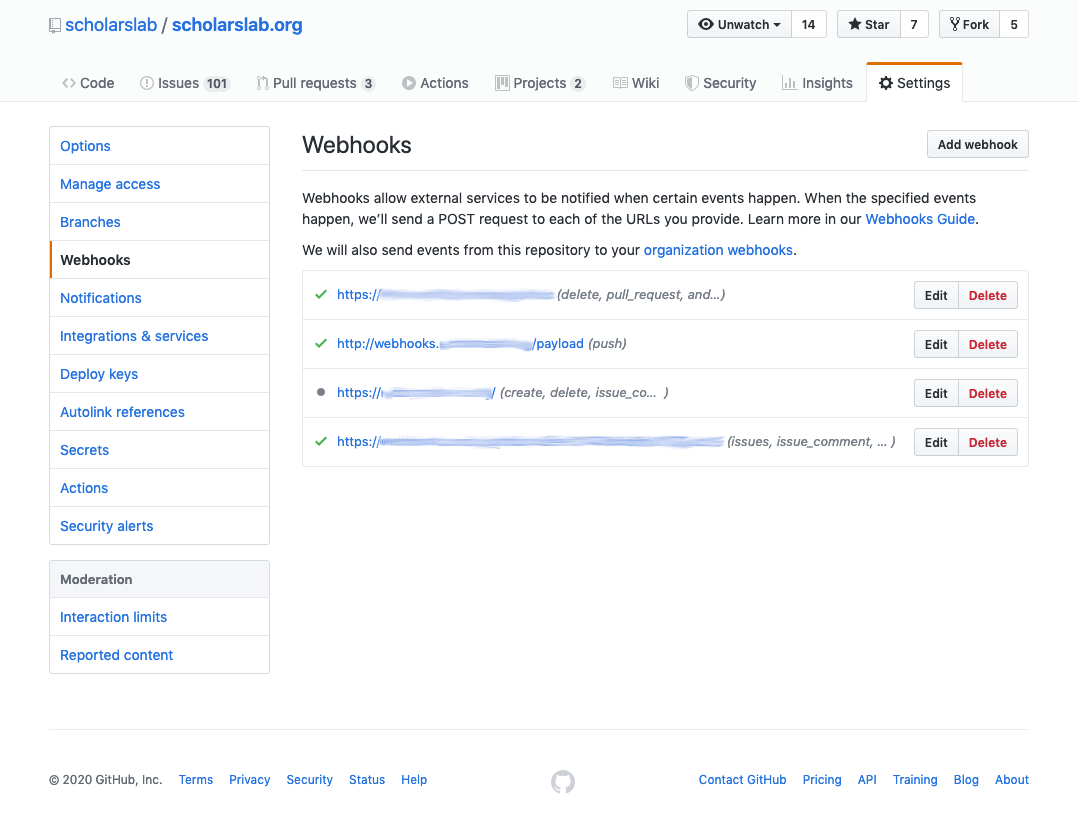 To set up GitHub to use a webhook, go to the GitHub ‘Settings’ page for the repo. Click the ‘Add webhook’ button and enter the URL to which GitHub should send the data. We’re using the JSON data format.
Here is where we specify what the URL is. In this case, something like http://webhook.domainname.com/payload. The domain name is arbitrary, use what you have. Then we just add on the ‘payload’ directory for fun. If you browse to the domain name, http://webhook.domainname.com, you would only see some text (as explained later in the Flask App section), and if you browsed to the full webhook domain, http://webhook.domainname.com/payload, you would see nothing at all. The Flask app would give you an error stating that the page is not allowed with that method (it’s looking for a POST method, not a GET).
 So now, every time a commit is made to this repo, the webhook will send a JSON data packet to the URL we assigned above. The JSON looks something like this, with lots of data about the commit just made. The hook, that we’ll look at next, only cares about the first line which contains ‘refs/heads/master’.
  {
  "ref": "refs/heads/master",
  "before": "1400778161c0b67acad54340823738c0a3a3b4d4",
  "after": "80ac5f30d8888d4d23acb02f24b2590ca86d326c",
  "repository": {
      "id": 93631983,
      "node_id": "MDEwOlJlcG9zaXRvcnk5MzYzMTk4Mw==",
      "name": "scholarslab.org",
      "full_name": "scholarslab/scholarslab.org",
      "private": false,
      "owner": {
      "name": "scholarslab",
      "email": "scholarslab@virginia.edu",
      "login": "scholarslab",
      "id": 274801,
  ...
4-5. The Hook
 (source: https://commons.wikimedia.org/wiki/File:US_Navy_020312-N-7265D-005_F-14.jpg)
The image above shows an F-14 Tomcat making an arresting gear landing on the flight deck. The hook on the end of the jet catches a cable stretched across the landing deck of the carrier and stops the plane faster than it could do on it’s own (see the red circle). A webhook works in a similar way. The server where the website is running (the webhook URL) is like the air craft carrier. If a data packet (the jet) has the right hook to catch the cable, then the server catches it.
This section gives an overview of the Python Flask App, and the specifics of the routing, or the determining if the site needs to be updated or not. Technically, there are four other applications needed to get the webhook working correctly, but I’ll discuss those later. Those programs are Nginx, Gunicorn, Supervisord, and Ruby.
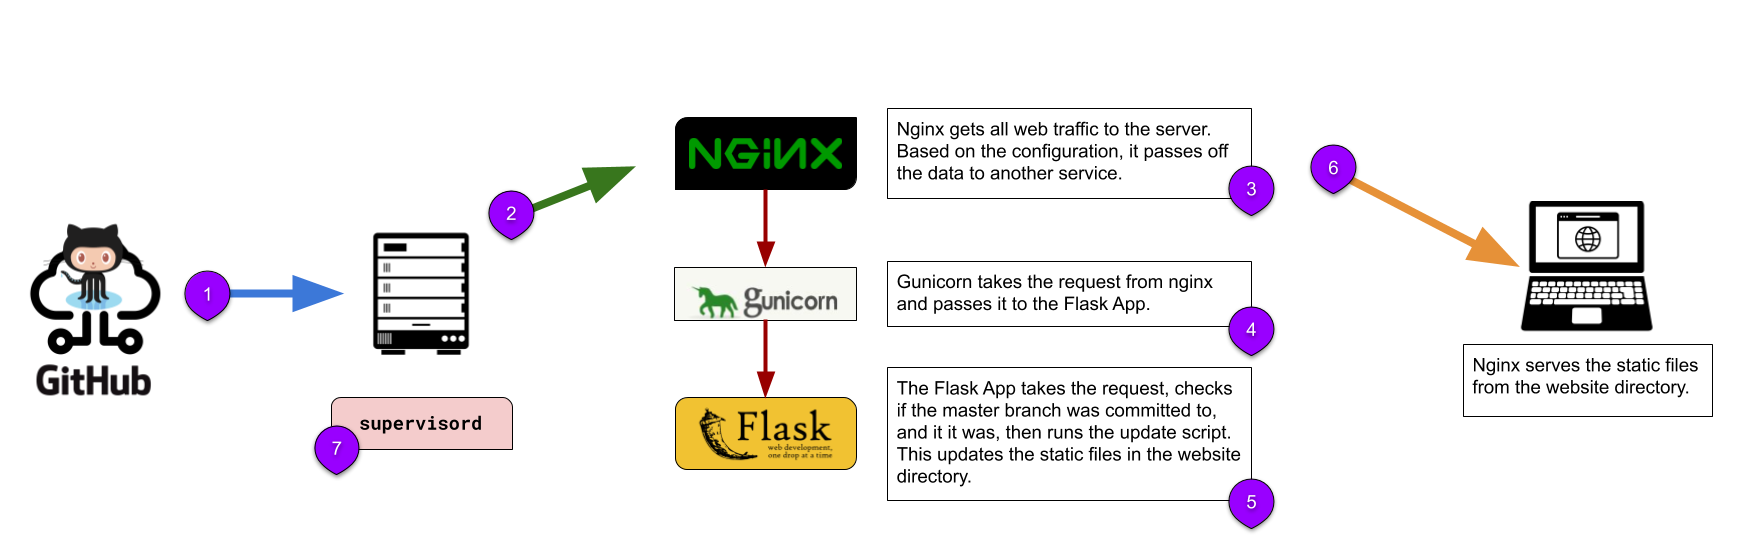 As the image above shows:
- The data is sent from GitHub.
- Nginx is the first point of contact. The data sent from GitHub goes first through Nginx.
- Nginx routes the request to Gunicorn.
- Gunicorn is running the Flask App, so passes the request through to the app.
- The Flask app checks if the commit was to the master branch. If so it runs the update script, which uses Ruby to run the Jekyll rebuild commands.
- Nginx serves the static website files.
- Supervisord is a program that keeps Gunicorn running. Ruby is needed to rebuild the Jekyll site.
Python Flask App
The Flask app is just a URL, really; there are no pages to serve or anything. It just listens for a specific URL, and then if the data matches what it’s looking for, it runs a script which pulls down the latest files from the GitHub repo that was just updated. Then the app runs a Rake command to build the static files.
The Flask app can live anywhere on the server. Convention is to put it in the /var/www/ directory, or where ever you have other websites on the server.
The app consists of three files
Files
webhooks.py: the main application. Listens on the URL and calls the ‘update-scholarslab.sh’ script when needed.requirements.txt: all the modules needed by the app to runupdate-scholarslab.sh: shell script that runs the git and rake commands
Let’s look at each file in detail.
webhooks.py
Here’s the whole Flask app file.
/var/www/webhook.domainname.com/webhooks.py
  import os
  import git
  import subprocess
  from flask import Flask, request, abort

  BRANCH = 'master'

  application = Flask(__name__)

  @application.route('/')
  def index():
  return "Webhooks for Scholars' Lab"


  @application.route('/payload', methods=['POST'])
  def webhooks():
      if request.method == 'POST':
          if request.json['ref'] == 'refs/heads/' + BRANCH:

              subprocess.Popen(["/var/www/webhook.domainname.com/update-scholarslab.sh"])

              return 'Got it!', 202
          else:
              return 'Not the master branch. Not running the update.', 200
      else:
          abort(400)

  if __name__ == '__main__':
      application.run(host='127.0.0.1', port=5050)
This is the Flask app. It listens on a server port and then runs a different script that does the actual site update.
  import os
  import git
  import subprocess
  from flask import Flask, request, abort
The first four lines are just pulling in the needed libraries.
BRANCH = 'master'
The next line just sets a global variable that is used… one other place. But hey, if you ever need to change which branch is checked, then that’s where you do it.
application = Flask(__name__)
This line creates a Flask object named ‘application’. All the magic starts to happen.
  @application.route('/')
  def index():
  return "Webhooks for Scholars' Lab"
This is the default landing page if one were to browse to the URL/domain name in a browser. It just shows some text. No HTML or anything…
  @application.route('/payload', methods=['POST'])
  def webhooks():
      if request.method == 'POST':
          if request.json['ref'] == 'refs/heads/' + BRANCH:

              subprocess.Popen(["/var/www/webhook.domainname.com/update-scholarslab.sh"])

              return 'Got it!', 202
          else:
              return 'Not the master branch. Not running the update.', 200
      else:
          abort(400)
The first line in this code tests for the path ‘payload’ in the URL, coming in as a POST method. If found, it executes the code in the ‘webhooks’ method.
The first if...else statement checks that the method is a POST.
The second if...else statement checks the JSON data that was sent from GitHub and checks that it was a commit from the ‘master’ branch. If it is, then it opens a subshell process to a shell script. It does this so that the webhook is not dependant on the update script completing.
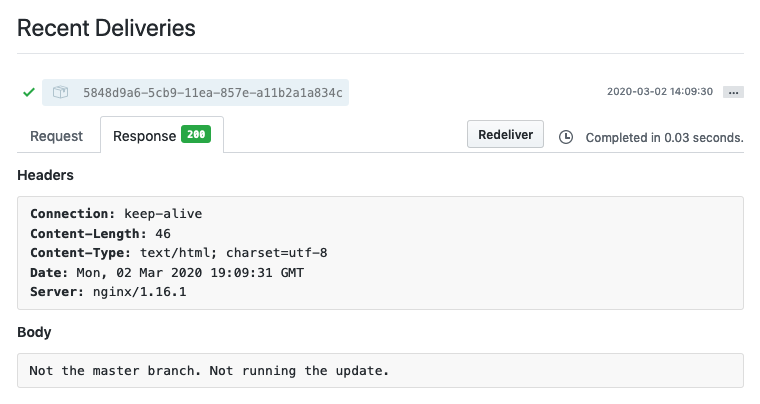
It then returns a 202 code with the message ‘Got it!’. You can see that return message in the GitHub website interface for the webhook (go to the webhook settings page and click on the webhook).
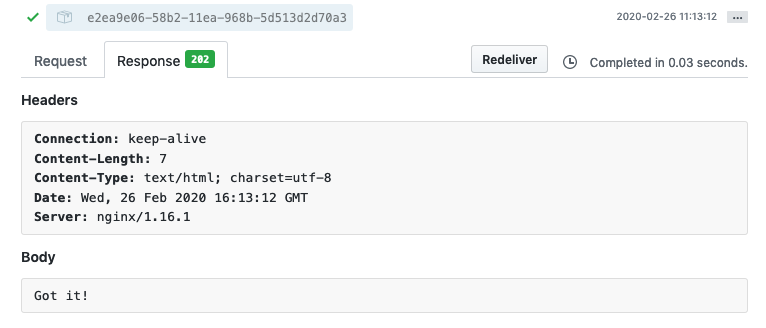
If it was not the master branch, then it returns a 200 code with a message, and if it is not a POST method, then the script is aborted with a 400 code.
  if __name__ == '__main__':
      application.run(host='127.0.0.1', port=5050)
This final bit of code runs the Flask application, specifying that it is running on the localhost (so it is only available on the server - not to the outside world) on port 5050. We’ll use Nginx later to grab requests from the outside world to send to the localhost on port 5050.
6. The Update
This is where we do the actual website updating. The Flask app calls this script when it receives the JSON data from GitHub specifying that there was a commit to the ‘master’ branch.
update-scholarslab.sh
This is the script that does the actual updating.
/var/www/webhook.domainname.com/update-scholarslab.sh
#!/bin/bash

REPO_PATH='/var/www/webhook.domianname.com/repo'
# need the ending forward slash to copy the contents of this directory, and not create it inside the SITE_PATH location
REPO_SITE='/var/www/webhook.domianname.com/repo/_site/'
SITE_PATH='/var/www/webhook.domianname.com/site'

cd $REPO_PATH

echo "Grab the latest from GitHub"
git checkout .
git pull

echo "Run rake task to build the site"
/home/webhookuser/.rvm/gems/ruby-2.4.1/wrappers/bundle install
/home/webhookuser/.rvm/gems/ruby-2.4.1/wrappers/rake publish

echo "Copy newly built files to the live site directory"
rsync -avz --delete --compress --inplace -H -A -X $REPO_SITE $SITE_PATH
Here’s what this does:
#!/bin/bash

REPO_PATH='/var/www/webhook.domainname.com/repo'
# need the ending forward slash to copy the contents of this directory, and not create it inside the SITE_PATH location
REPO_SITE='/var/www/webhook.domainname.com/repo/_site/'
SITE_PATH='/var/www/webhook.domainname.com/site'
The first line signifies that this is a bash script and the location to the bash program that executes the script.
The rest of the lines are variables for specific paths.
cd $REPO_PATH

echo "Grab the latest from GitHub"
git checkout .
git pull
Next the script changes into the directory where the copy of the GitHub repo exists, then it does a git checkout .. Note the period there. It means that git overwrites any changes that have been made; any new files or changes to files are wiped out. Normally, this is not a healthy command to execute, but in our case, there should never be any changes made directly on the server. Any changes directly on the server are going to cause conflicts when pulling down the latest from GitHub. We have this in there from experience. So, overwrite any changes that have happend, and pull down the latest version from GitHub with git pull.
echo "Run rake task to build the site"
/home/webhookuser/.rvm/gems/ruby-2.4.1/wrappers/bundle install
/home/webhookuser/.rvm/gems/ruby-2.4.1/wrappers/rake publish
These lines use Jekyll to build the static website from the brand new version pulled down from GitHub.
echo "Copy newly built files to the live site directory"
rsync -avz --delete --compress --inplace -H -A -X $REPO_SITE $SITE_PATH
This final line copies all of the static files from the _sites directory to the folder where the live website files should live.
7. The Server
Nginx
Nginx is the reverse proxy. It takes the initial request for the domain name, then passes it to Gunicorn (which runs the Flask app, which runs the shell script, which clones the repo and builds the site and syncs the files into the right directory).
Setting up Nginx is a bit out of the scope of this tutorial. You can find some instructions on their documentation page.
config file
/etc/nginx/conf.d/webhook.domainname.com.conf
  server {
  listen 80;

  server_name webhook.domainname.com;
  # path for static files
  root /var/www/webhook.domainname.com;
  index index.html;

  location / {
      # checks for static file, if not found proxy to app
      try_files $uri @proxy_to_app;
  }

  location @proxy_to_app {
      proxy_set_header X-Forwarded-For $proxy_add_x_forwarded_for;
      proxy_set_header X-Forwarded-Proto $scheme;
      proxy_set_header Host $http_host;
      # we don't want nginx trying to do something clever with
      # redirects, we set the Host: header above already.
      proxy_redirect off;
      proxy_pass http://localhost:5050;
      #proxy_set_header X-Real-IP $remote_addr;
  }

  access_log /var/log/nginx/webhook.domainname.com_access.log;
  error_log /var/log/nginx/webhook.domainname.com_error.log;
  }
The config file above tells Nginx to listen on port 80 for the right domain name (webhook.domainname.com in this example), and tells Nginx where to look for the files it should serve.
  location / {
    # checks for static file, if not found proxy to app
    try_files $uri @proxy_to_app;
  }
These lines say, if the plain URL is sent, just ‘webhook.domainname.com’ nothing else, then try for a static file. If a static file is not found, then send the request on.
  location @proxy_to_app {
    proxy_set_header X-Forwarded-For $proxy_add_x_forwarded_for;
    proxy_set_header X-Forwarded-Proto $scheme;
    proxy_set_header Host $http_host;
    # we don't want nginx trying to do something clever with
    # redirects, we set the Host: header above already.
    proxy_redirect off;
    proxy_pass http://localhost:5050;
  }
If the request is sent on, it ends up here. To be honest, I’m not sure what any of these lines really do, but the important one is the ‘proxy pass’ line which sends the request to the localhost on port 5050. This is where Nginx passes the baton to gunicorn, gunicorn passes it to the Flask app, and the Flask app then runs the update script (or not), which pulls down the latest changes from GitHub and rebuilds the site and moves the static images to the live folder.
Mission accomplished.
Extra, Extra, Read all about it
These last three sections detail how to set up the server with a special server user, gunicorn and supervisord.
Server Setup
The following is how to set up a Python webhook app on a CentOS server.
There are three basic components needed to get a Python webhook running on a Linux server.
-
An application that generates the website. In our case, we used a very simple Flask app.
-
A web server gateway interface (WSGI) for interacting between the webserver and the web application. For this we are using the Green Unicorn - gunicorn.
-
A web server. Here we are using Nginx.
There are two other components that we will use. They are not required for a webhook in general, but we use them in our case.
Ruby is used to build the Jekyll site on the server after pulling down all of the latest changes from the GitHub repo.
Supervisord is a server program that monitors other programs and restarts them if they stop. We use it to keep Gunicorn running, even when the server restarts. Other options are systemd, or upstart. For reasons I don’t remember now, I chose Supervisord.
Server User
There’s another quick prerequisite that needs to be done before we look at
the webhook. We’ll also need a system user that is not allowed to login, but
has a shell for setting a path to Ruby 2.x using RVM (or similar environment
controller). The server should be set up with a.bashrc or .bash_profile
or .profile file set to use Ruby 2.4.1+ RVM and Ruby can be installed using
a standard tutorial for setting up RVM for the user,
ex.https://rvm.io/rvm/install. The user
is required by Gunicorn to run the Flask app within a virtual
Python environment. This user will also need to have Jekyll and Python 3 installed.
The user can have it’s home directory in the folder where the Flask app lives (/var/www/webhook.doainname.com or what have you), or in the normal /home/webhookuser location. The update script uses the path to the home directory.
I’ve thrown a lot in here, so let’s recap:
- A server user with no login, but a shell
- The user has RVM installed for a Ruby virtual environment, with Ruby 2.4.x installed in the HOME DIRECTORY (ex.
/home/webhookuser/.rvm). - The user has Virtualenv installed, and Python 3.x, in the WEBSITE DIRECTORY (ex.
/var/www/webhook.domainname.com/.venv).
Gunicorn
Gunicorn is used to provide the layer/connection between the Flask app and Nginx
It starts the Flask app. It is started and maintained (kept running) by supervisord (described below).
Setup
Gunicorn should be installed in the python virtual environment of the special system user set up earlier (in the website directory).
- Follow instructions like this to install python36u from the ius yum repo
- While logged in as the special system user, change to the Flask app directory
- Create a virtual environment in the Flask app directory
python3.6 -m venv .venv(the .venv can be any name)
- Activate the virtual environment
source .venv/bin/activate
- Install modules
pip install -r requirements
Once this is done, you don’t need to be logged in as the special server user anymore.
To trouble shoot the site (if it’s not rebuilding as expected) then you can log in to this user and run the script on the command line:
./update-scholarslab.sh
Supervisord
Supervisord is a service that keeps Gunicorn running, even with system reboots. Other options are available, like systemd or the /etc/init, but supervisord will restart gunicorn if it fails for any reason, not just when the server restarts.
Setup
On the VM with CentOS 6 that we have, yum installs a very outdated and retarded version of supervisord. So, first thing to do is remove it and install the latest version with easy_install
sudo yum remove supervisorsudo easy_install supervisor
Create a config file. This runs a command that creates the config file (echo_supervisord_conf is the command, run as sudo).
sudo echo_supervisord_conf > /etc/supervisord.conf
Create an init.d script for supervisord so it starts when the server starts. This is a pretty standard file, so I won’t explain it line by line.
/etc/init.d/supervisord
  #!/bin/bash
  #
  # server: corgi
  # location: /etc/init.d/supervisord
  #
  # supervisord   This scripts turns supervisord on
  #
  # Copied from here: http://www.alphadevx.com/a/455-Installing-Supervisor-and-Superlance-on-CentOS
  #
  # chkconfig:    - 95 04
  #
  # description:  supervisor is a process control utility.  It has a web based
  #               xmlrpc interface as well as a few other nifty features.
  # processname:  supervisord
  # config: /etc/supervisord.conf
  # pidfile: /var/run/supervisord.pid
  #

  # source function library
  . /etc/init.d/functions

  DAEMON=/usr/local/bin/supervisord
  PIDFILE=/var/run/supervisord.pid

  [ -x "$DAEMON"  ] || exit 0

  start() {
      echo -n "Starting supervisord: "
      if [ -f $PIDFILE  ]; then
          PID=`cat $PIDFILE`
          echo supervisord already running: $PID
          exit 2;
      else
          daemon  $DAEMON --pidfile=$PIDFILE -c /etc/supervisord.conf
          RETVAL=$?
          echo
          [ $RETVAL -eq 0  ] && touch /var/lock/subsys/supervisord
          return $RETVAL
      fi


  }

  stop() {
      echo -n "Shutting down supervisord: "
      echo
      killproc -p $PIDFILE supervisord
      echo
      rm -f /var/lock/subsys/supervisord
      return 0

  }

  case "$1" in
      start)
          start
          ;;
      stop)
          stop
          ;;
      status)
          status supervisord
          ;;
      restart)
          stop
          start
          ;;
      *)
          echo "Usage:  {start|stop|status|restart}"
          exit 1
          ;;
      esac
  exit $?
Create a program config file at /etc/supervisord.d/webhooks.config. This tells supervisord what program to start and what settings to use.
    [program:webhooks]
    directory=/var/www/webhook.domainname.com
    chdir=/var/www/webhook.domainname.com
    command=/var/www/webhook.domainname.com/.venv/bin/gunicorn --log-level debug --bind 127.0.0.1:5050 webhookuser:application --error-logfile '-' --timeout 240 --workers 1
    user=webhookuser
    autostart=true
    autorestart=true
    stderr_logfile=/var/log/supervisor/webhook.domainname.com.err.log
    stdout_logfile=/var/log/supervisor/webhook.domainname.com.out.log
    log_stderr=true
    logfile=/var/log/supervisor/webhook.domainname.com.log
    redirect_sterr=True
This is what runs gunicorn, which in turn is what runs the Flask application. The magic happens on the ‘command’ line where, using the virtual environment that was set up with the ‘webhookuser’ user, we run gunicorn, specifying which application to run.
Attributions
The icons in the overview image are from the Noun Project
- Laptop by Guilherme Silva Soares from the Noun Project
- web by Adrien Coquet from the Noun Project
- Folder by Landan Lloyd from the Noun Project
- Check by iconcheese from the Noun Project
- x mark circle by Andri Graphic from the Noun Project
- Server by jungsang from the Noun Project
- Gear by Wilshon Athena from the Noun Project
- Network by Gajah Mada Studio from the Noun Project