
Photogrammetry Workflow using a DSLR Camera
What is Photogrammetry? Photogrammetry is a photographic process that generates 3D data (measurements) from 2D images (photographs) to create a 3D model with accurate color and texture. Basically, you take a bunch of pictures at different angles of an object, run all the photos through a computer program called Metashape, and you end up with a very cool digital 3D object at the end! The Smithsonian 3D Digitization has a whole collection of 3D models online you can browse from artifacts to structures to in-situ burials.
Light is critical to this process and therefore there are certain objects that are difficult, if not impossible, to model using photogrammetry: objects with reflective or shiny surfaces, clear/transparent objects like glass, very thin objects like tree leaves, very furry or hairy things, things that move (e.g. your pet hamster or your best friend’s head).
In this blog posting I go through the workflow to create a high quality, scaled model using our photogrammetry station in the Robertson Media Center on the third floor of Clemons Library and computer software called Agisoft Metashape (previously Photoscan). If you want to create a quick and less accurate model or you are working in the field or with a collection where you can’t bring the physical object to Clemons, check out my posting on photogrammetry in the field with your smart phone.
Step 1: Equipment choice and setting up your photo station
Equipment
Photogrammetry, at its core, is a photographic project. The goal is to have a set of the clearest photos possible, which means using a camera and lens that have a manual mode where you can adjust the camera’s aperture, focus, white balance, and ISO to fit your lighting environment. This doesn’t mean you can’t do photogrammetry with a point-and-shoot or your phone’s camera, but the quality will be that much better if you use a good DSLR camera. If you plan to use photogrammetry to record quantitative data, a DSLR camera is required. Lenses are measured based on focal length (the number before the mm on your lens). The wider a lens (lower mm number), the more you are able to capture in a photo, however with a 24 mm lens or lower you’ll start to see distortion around at the edges of your frame. Do not use fisheye or wide-angle lenses because they cause too much distortion. Higher numbered lenses have less distortion but are also much more expensive. Prime lenses have a fixed focal length: you cannot zoom. They can produce very high quality photographs because they minimize noise and distortion, resulting in an extra sharp image. If you have a good prime fixed-zoom lens within 24-70mm range, use it! A polarized lens cover will also help to reduce glare if your object has a shiny surface.
- DSLR Camera
- Tripod
- Level
- Color and White Balance cards
- Painter’s tape
- Remote release
- Optional: lint roller (to clean the black backdrop if necessary)
Environment
- White Light box: this will diffuse the light so you don’t get harsh shadows
- Black background and base (ideally photographers black drop cloth, or felt if necessary)
- Turntable
- Lighting: we like photographers LED lights on tripods that you can move around, add light filters etc.
- Scales / Ruler
- Optional: black pedestal for your object
Computers & Software
We will be processing the photos using a program called Agisoft Metashape Pro.
Step 2: Get to know the settings on your camera
For high quality results, you want to take every photo with exactly the same camera settings so the photographs are consistent when you start working with them in Metashape. This means both taking photos of the object from the same position every time (you’ll change the height of the camera at least three times to take 3 circuits of photos) so that the object is consistently framed in the photograph and adjusting the settings on your camera so that the color, focus, capture settings are the same for every photo. It is important to have a general understanding of how different settings on your DSLR camera can impact your photographs. The following steps will help you set up your camera to produce the crispest image possible with accurate color representation.
Basic Camera Settings
All cameras
- Set your camera to shoot in RAW.
- Turn OFF auto-rotate
- Set mode to Manual or (For beginners, try using Aperture priority—AV on a Canon or A on a Nikon)
- Set to never turn off
Some Cameras
- Turn off GPS (you can take some photos with the GPS later if desired)
- Turn off sensor cleaning on power down (if the camera shakes the sensor to remove dust on power down)
- If using zoom lens set the focal distance to one end of the other of the focal length and tape it down with painters’ tape.
- If the lens has ‘image stabilization’ or ‘vibration reduction’ turn it OFF (usually a switch on the lens itself.)
Optional Adjustments
- Set camera from live view to grid view
- Turn off AF beep when using live view (on Canon)
- Set back button for focus (functionality of half shutter press is transferred to back button)
- Set the camera to not shoot if no SD or CF card is present.
Part II: Position your Camera.
It is important to position your camera in the exact environment where you plan on taking photos before you change any of the following settings.
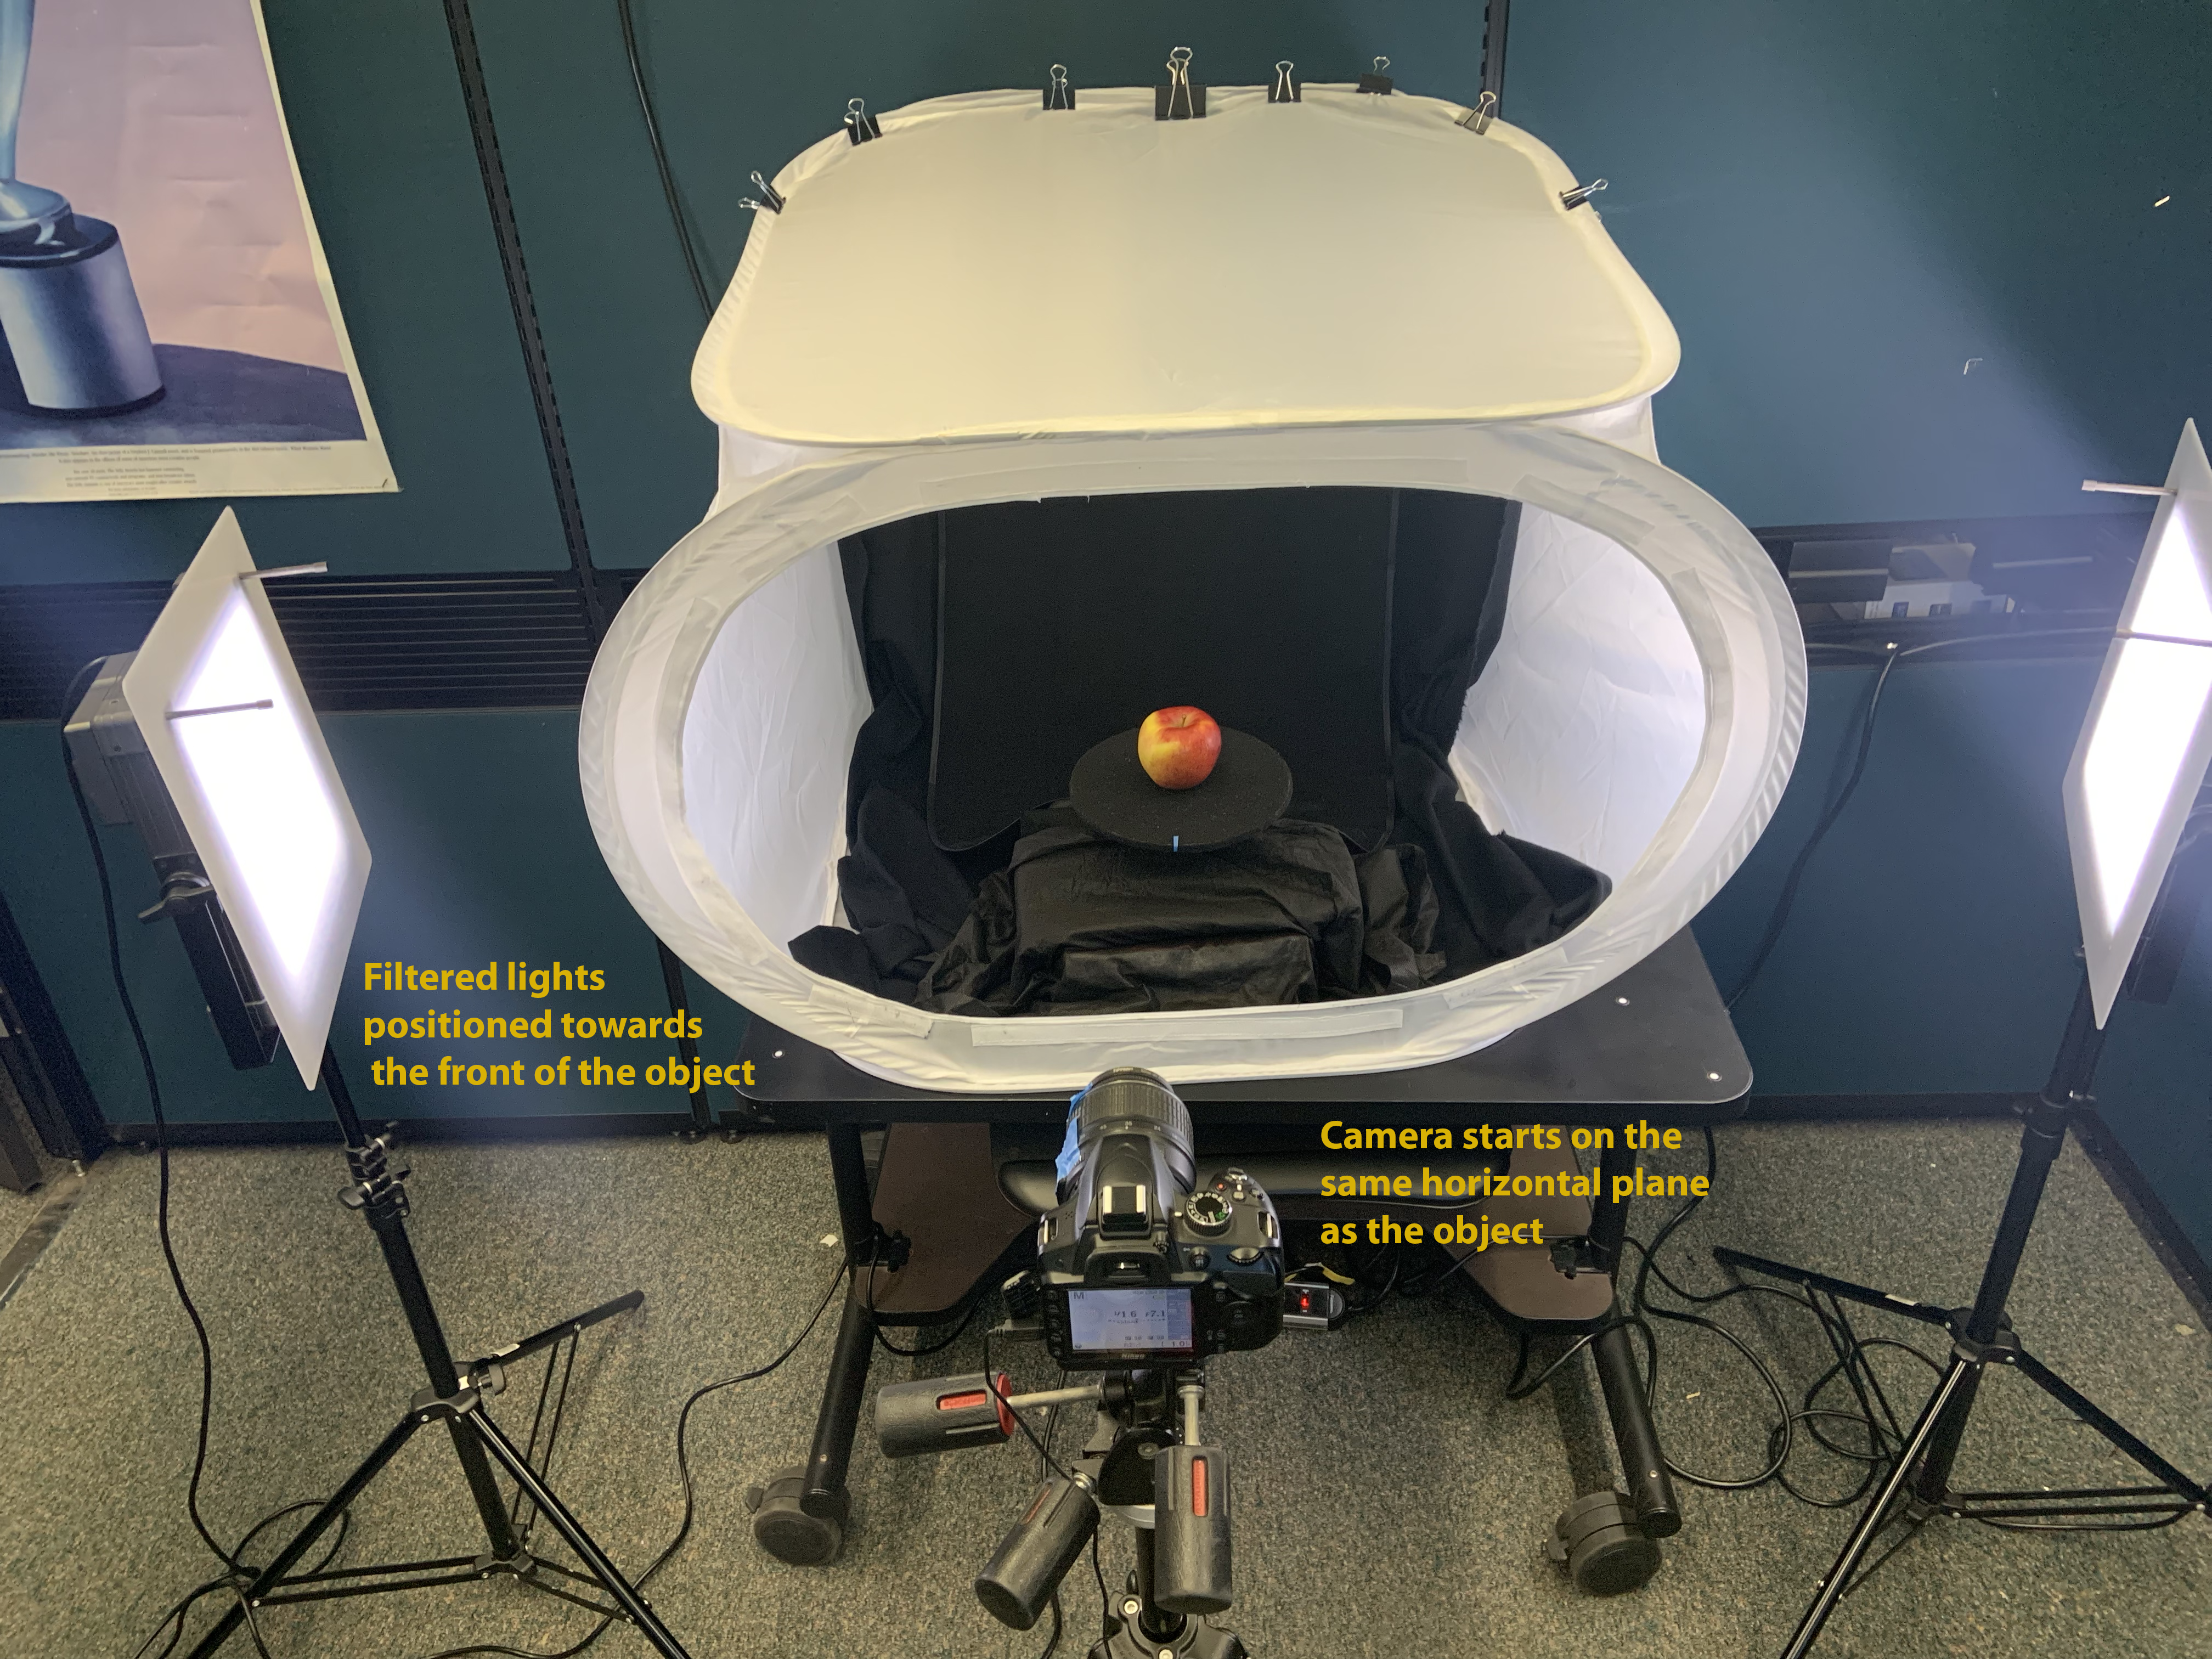
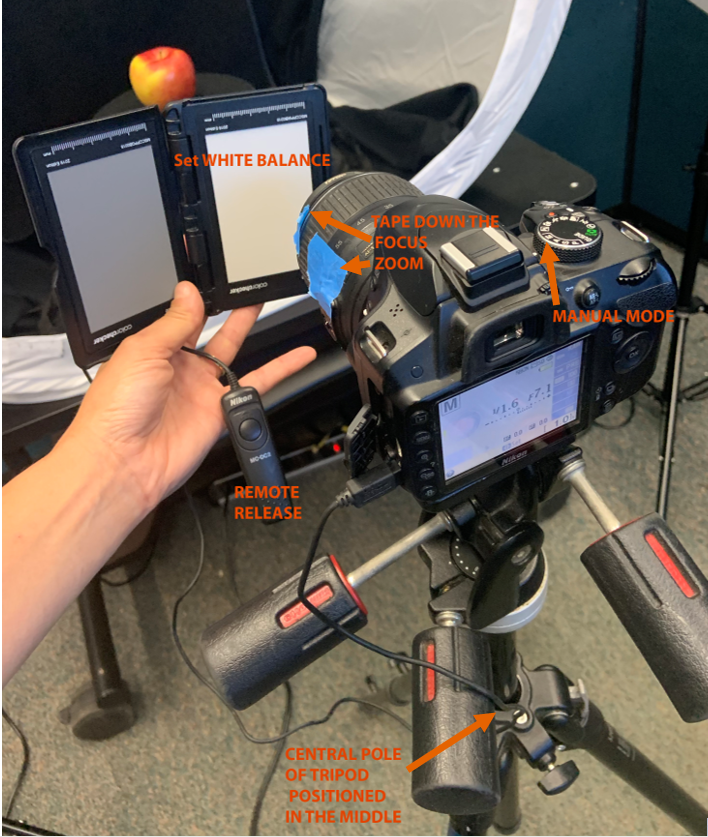
- We suggest starting with your camera and tripod positioned on the same horizontal plane as your object- e.g. your camera should be aligned directly with the center of your object. You’ll move it up and down later. Use a tripod that has an adjustable central pole so that you don’t have to move the feet of the tripod, but just the camera up or down. Make sure you position the central pole in the middle of its height range so that you are able to adjust up or down later.
- Check to make sure your camera base is level.
- Place your object in the center of the turntable and position your camera tripod such that the entire object is visible. Make sure that when you rotate the object it doesn’t move out of the frame! If possible, avoid including the edges of the lightbox or edge of your black background in the photo frame; this will make masking much easier later on.
- Lighting: You want your object to be illuminated with diffused light to minimize shadows. LED lights with tripods and filters are available to check out. Position lights to shine towards the front of the object but still behind the white-box sides.
Camera Adjustments.
There are four critical settings on a DSLR you want to be aware of: ISO, white balance, aperture (f/stop), and shutter speed. All cameras are different and the target numbers will depend on the environment in which you are shooting. All four of these settings are inter-related. It is important to have a sense of how changing one setting will impact the others.
-
Focus and Zoom. Zoom: Set your lens to properly frame the subject and use painters tape to tape down the setting. (If you have a prime lens you can skip this step.) DO NOT ZOOM your lens while shooting the subject. Zoom to one setting and lock it down!
Focus: Set the camera to manual focus OR use auto focus to set the focus distance then switch the camera to manual focus. Tape the focus lens with painter’s tape after setting the focus.
Keeping the same focus and zoom will ensure your photos are consistent. You may need to adjust the focus when you move your camera to different heights. Just make sure you don’t change any of the other settings!
- ISO.
Set your camera to within the 100-200 ISO range.
The ISO setting on your camera allows you to control its sensitivity to light. Typically, you set the ISO based on how bright your setting is-the brighter the environment, the lower the ISO. However, a higher ISO, i.e. more light-sensitive, the more noise you introduce into your photo. For Photogrammetry we want to reduce noise by setting a low ISO. (Note that this will increase exposure time which is OK since the camera is on a tripod.)
- White Balance.
Set your white balance.
This setting helps you balance the quality of light and color. Setting white balance helps whites actually render white in your photo. The light in your environment exists on a spectrum between warmer light (toward the red end of the spectrum) and cooler (towards the blue spectrum). To adjust your white balance you’ll measure the temperature of the light on a gray card (measured in degrees Kelvin) and adjust your camera accordingly. Note that on cheaper DSLR cameras you can’t control for the white balance, but if capturing an accurate representation of the surface color of your object is important to you, then you should find a camera that has this adjustement.
- Aperture.
Set your camera to a low f/stop around f8 to f11.
Aperture, also called f/stop, controls the opening of the lens on your camera. The lower the aperture number, the wider the opening in the lens, which provides less depth-of-field i.e. a blurrier background. The higher the aperture number, the smaller the opening in the lens and therefore the greater the depth of field, and the sharper the background will be. We want to ensure that the entire object is fully within the depth of field. (Note there is an inverse relationship between shutter speed and aperture.)
- Shutter speed.
If you are working in aperture priority (A or AV) mode skip this step! The camera will adjust the shutter speed accordingly. Most likely, you’ll be setting your camera to a 1/80 shutter speed or higher depending on the light quality.
The shutter speed is the amount of time the shutter on your camera is open. Shutter speed is measured in fractions of seconds, so you’ll see on your camera screen a fraction 1/1000 to 1/8 (shown as 0“etc. Since we’re using a tripod here, we avoid some issues with stability and slow shutter speeds resulting in blurry photos. With the tripod we want to set the shutter speed very slow (higher number) to allow for the low amount of light coming in due to the smaller apertures (high fstop) and low ISO settings. Use a quick release while taking photos so as not to shake the camera during shutter release.
Test out your settings!
Take a few sample photos and check them on the view screen.
- Are they in focus?
- Is the depth of field deep enough?
- Is there too much noise? (check for anomalous color patches on the object)
- Check your lighting: Is the object casting any dark shadows?
- Is the lighting creating halos or flares?
- Does the color on the object look accurate? Not too warm (orangey-reddish) not to cool (bluish)?
- Is the image too dark or too light? If too dark, try to slow down the shutter speed (e.g. increase from a 1/3” shutter speed to ½”). If the object is washed out, or details in the background are too visible, try to speed up the shutter speed.
- Is your camera tripod positioned such that the entire object is visible, and the edges of the lightbox aren’t visible in the frame?
- Is the object centered on the turntable so that when you rotate it, it will stay centered in your frame?
- Is there dust or debris on the black background? If so, use the lint roller to get rid of it!
- Write down your ISO, F/stop and shutter speed settings for the first round of photos in case something happens with the settings when you move your camera to a new angle and change the focus.
You’re ready to start shooting!
Step 3: Taking Photos
For the photogrammetry software to work you need redundant subject capture, which mean you want to make sure you have overlapping data of your object. This means following a 2/3rds rule of overlapping images: 2/3rds of the previous image should be visible in each subsequent photo as you rotate the object. The same 2/3rds principle applies to the vertical axis of the object. Take three rows of overlapping images at three different heights.
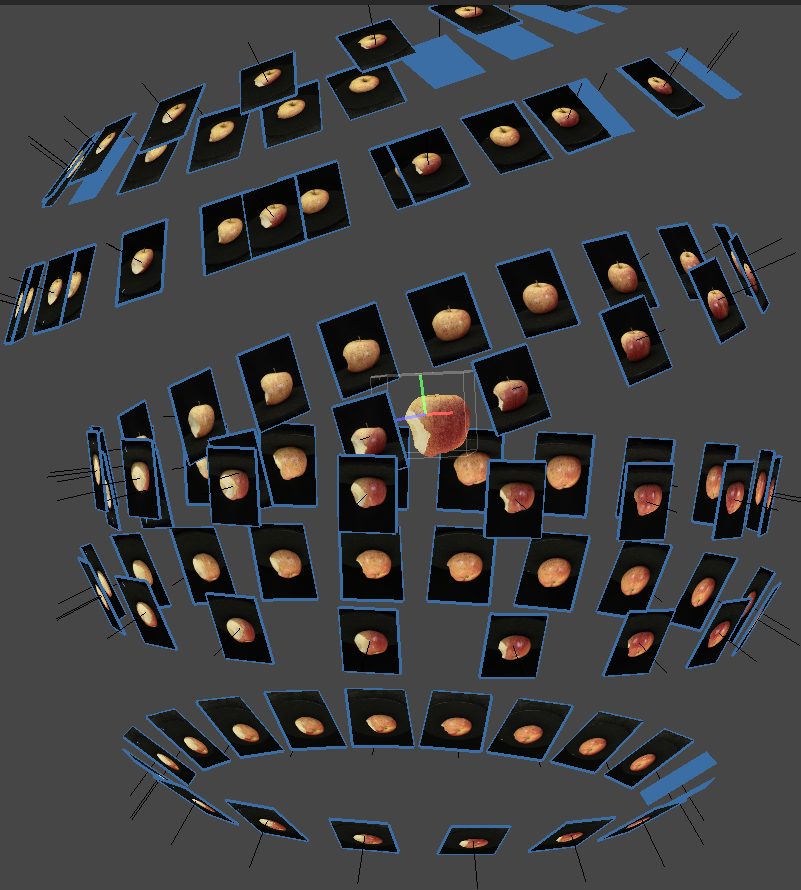
- Central Position. Rotate the turntable on 10 degree increments, taking 36 photos total.
- Lower Position. lower the central pole of the camera on the tripod to change the camera perspective. Do not move the feet. Adjust the angle of the camera to point slightly upwards so your object is still in the center of your frame. Adjust your focus if necessary. Do not change any other settings on your camera. Rotate the turntable on 10 degree increments, taking 36 photos total.
- Upper Position. Raise the camera on the tripod and adjust the angle of the camera to point downwards so your object is still in the center of your frame. Adjust your focus if necessary. Do not change any other settings on your camera. Rotate the turntable on 10 degree increments, taking 36 photos total.
- Take photos with Scale bars.
- Take photos with color bar and/or gray card
- Take a photo of the turntable without the object
- Optional: turn the object upside-down and follow steps 1-3.
You’re ready to process your photographs!
Step 4: Using Agisoft Metashape Professional
Once you have completed your photos you’re ready to process the data. This workflow was written for Agisoft Metashape Professional, but the same general workflow process applies to earlier versions of Agisoft Photoscan.
Preparing Your Photos
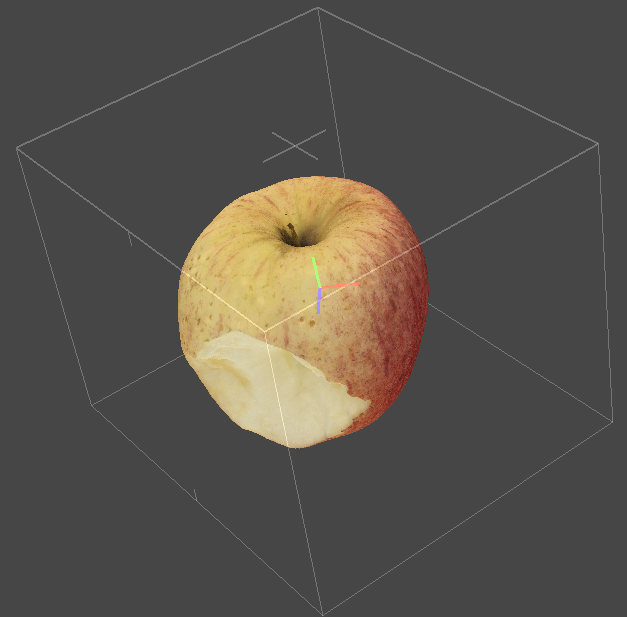
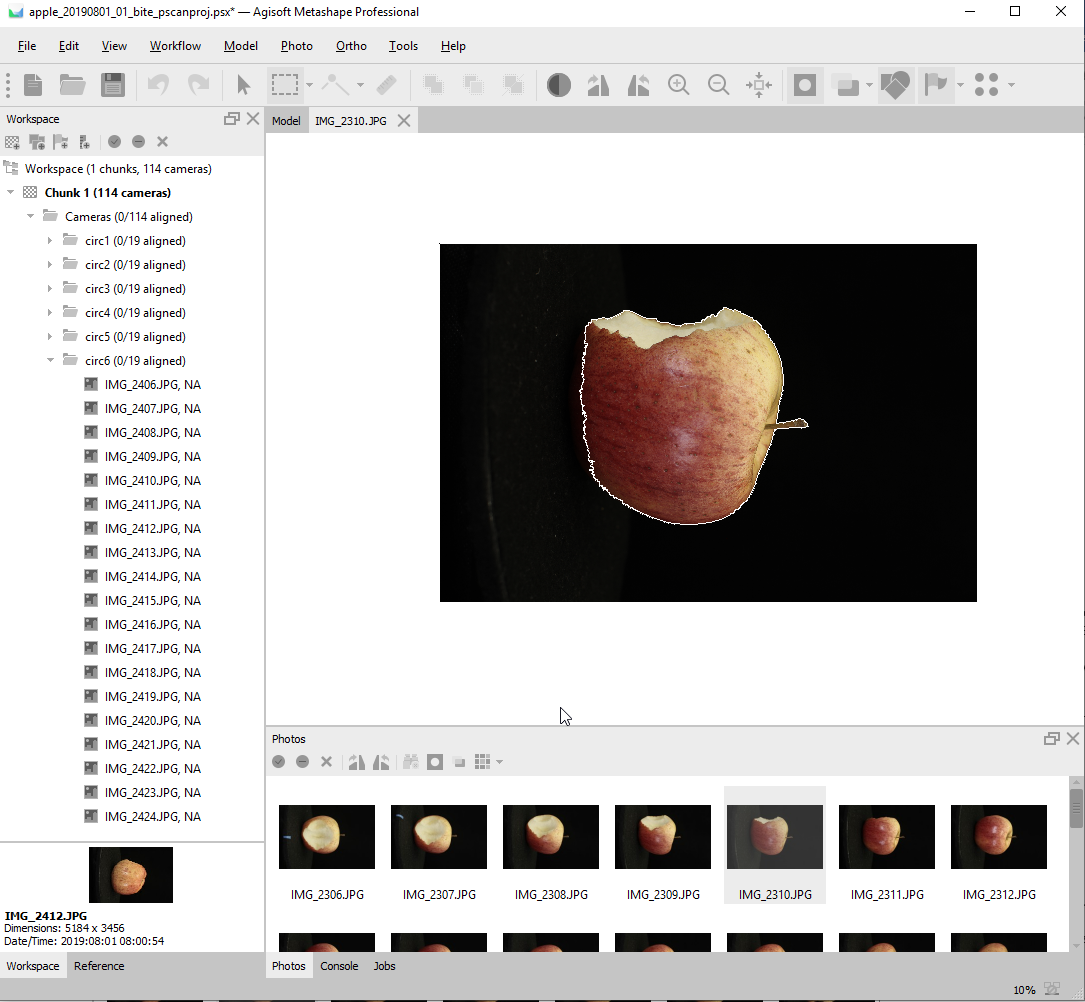
Import your first circuit of images in Metashape by either dragging and dropping them into the Workspace or click  the add photos icon, and navigate to your photo library. The photos will automatically be added to a new “Chunk.”
You want to keep each circuit of photos separate. Click on the arrow to the left of your Chunk 1 to expand the file. Right click on Cameras file and click Add Camera Group. Add each of your image circuits to a new camera group. *rename the groups to keep track! Don’t create new Chunks for each circuit. Use only one Chunk with multiple Camera Groups nested within.
Mask Photos. If your background has dust, bits of tape, or isn’t otherwise perfectly uniform, you’ll need to mask out the background. If you forgot to take a photo of your empty background you can either
- Create a black background by going in to photoshop and rubberstamping the object out of your photo. Proceed with the following steps.
- Skip down to Step 7: OPTIONAL and experiment by masking manually on a few of your photos using the magic wand tool
Using a Background Photo
- In your Workspace, expand the file with the photos in your first circuit folder so you can see the filenames. Select one of your cleanest images so that it appears in the Model pane.
-
Right-click on one of the photos and under Masks click Import Masks… and enter the following parameters in the pop-up box:
  	Method: From Background
  	Operation: Replacement
  	Filename template: leave the default {filename}_mask.jpg
  	Apply to: Selected cameras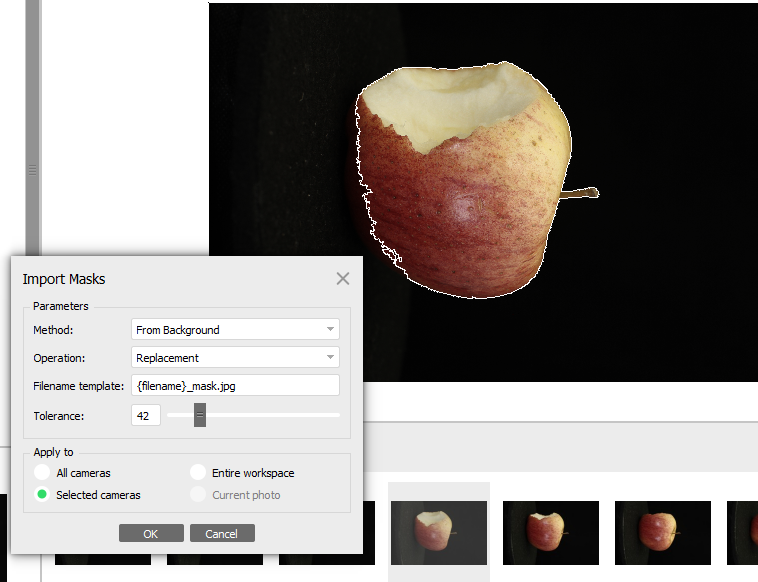
- Start with the default tolerance (10) and click OK. A window will pop up where you can navigate to your background photo.
- If enough of the background isn’t masked out, you’ll need to adjust the tolerance accordingly. Try to strike a balance between having the entire background masked out and cutting too far into your object. You want the number to be as low as possible with all or at least most of the background masked out. The higher the tolerance, the more it will eat into your object.
-
Once you’re satisfied with the mask you’re ready to mask the group. In the Workspace select the entire folder and camera group. Right click on the group folder and under Masks click Import Masks… and keep the same parameters you used on the single file except:
Filename template : file name must match exactly that of your background photo.Copy and paste the name from your folder into the file name template box. Make sure the filename extension is the same also. When you click OK a window will pop-up. Select the FOLDER where the background image file is located.
- You can check the masks by double clicking on photos in the Photos Pane.
-
OPTIONAL: If you still aren’t satisfied with the automatic masking and there are just a handful of unmasked areas in the photos you can do some touch-ups by hand. If you happened to start with an image with any extra objects, the program will continue to mask that area even if it disappears in other images in the circuit. You might want to go back and use a cleaner image to start the process again.
On your toolbar select the dotted rectangle icon tool. Right-click on the photo in the Model Pane. Use the Magic Wand or Rectangle Selection to select area you want to mask, right click again and select Add Selection. If there are parts of your object that are masked that shouldn’t be, you can also select them and click Subtract Selection.

- Repeat the previous masking steps for every circuit
Build and Optimize Your Sparse Point Cloud
From this point forward you’ll primarily be working down the Workflow menu, with some optimization steps between. It is worth saving a new back-up project file or a duplicate chunk within the same project, since most of these tasks cannot be undone or reset. This will allow you to play with some of settings.
-
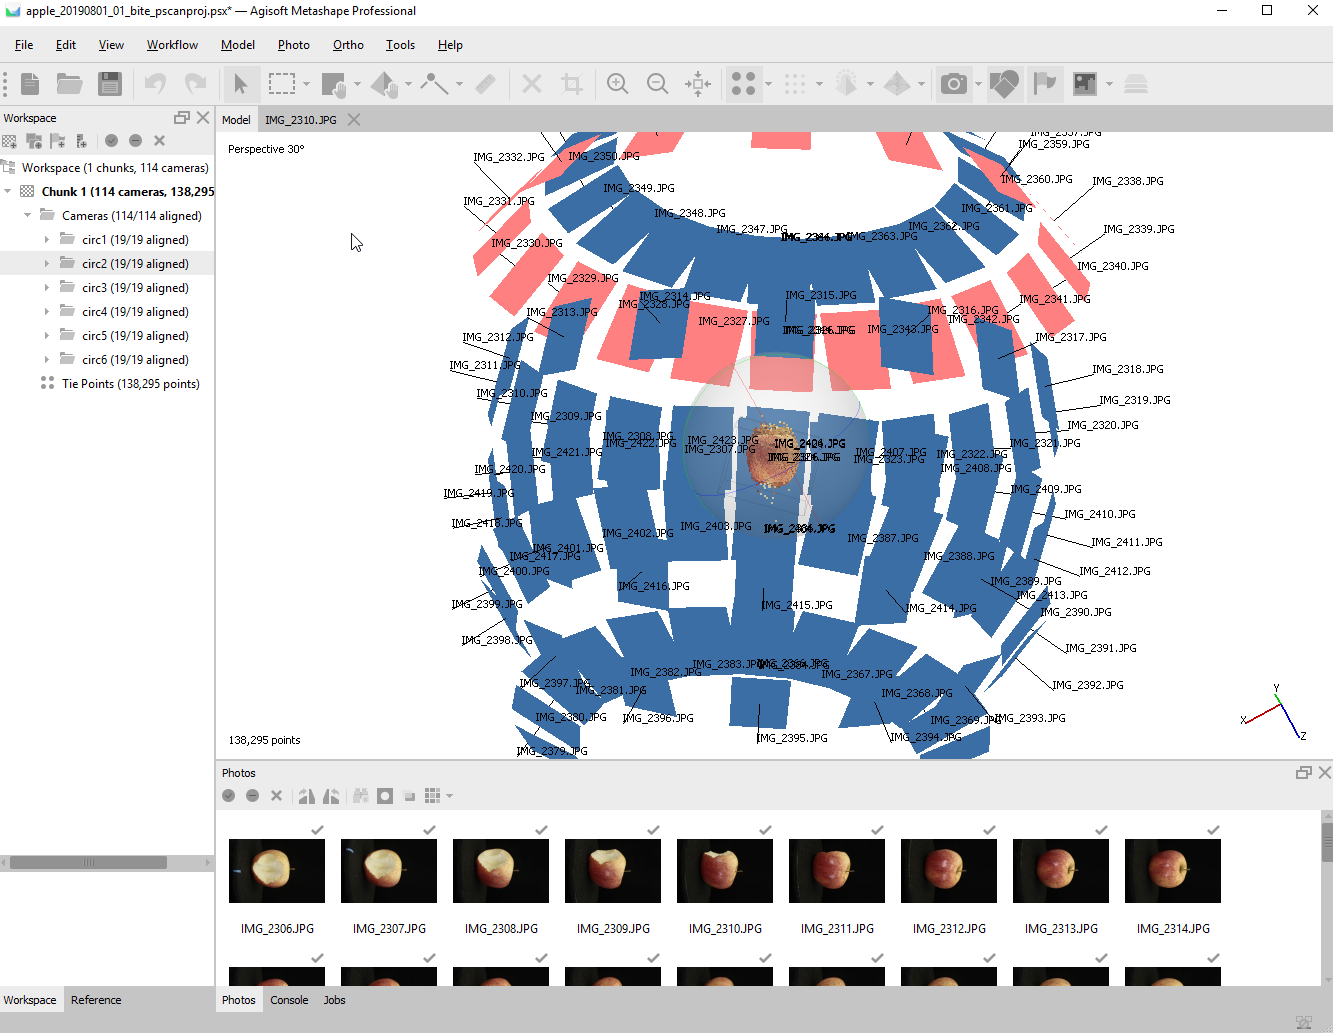
Go to the Workflow menu and click on Align Photos. In the pop-up window select the following:
   General Accuracy : High
   Select √ Generic Preselection

   Advanced Key point limit:  40,000 to 80,000 (points of interest)
   Tie point limit:   0
     (This is the number of key points that are matched on 2 or more photos. If there are too many points with 0, pick a range between 20,000 and 40,000.)
   Apply masks to:  Key Points
   Uncheck Adaptive camera model fitting
This process will take some time depending on how many photos you’ve added. When complete, click on the Tie Points at the bottom of your workspace and you will see your object made of points. Check two things:
- Zoom out and make sure your photos are all positioned correctly. If you completed each circuit evenly, you should see your object encircled by your photos.
- Look at your Workspace and see that all photos are aligned. If there are some that didn’t align you can either:
1. Redo the alignment with a different Tie point limit, making sure that you Select √ Reset current alignment.
2. In Workspace select the photos that didn’t align, right-click and choose Align Selected Photos.
3. If a large number of photos didn’t align, create a new Camera Group in your work space and drag and drop the unaligned photos there. Align the photos in the new Camera Group. Then align all Camera Groups.
-
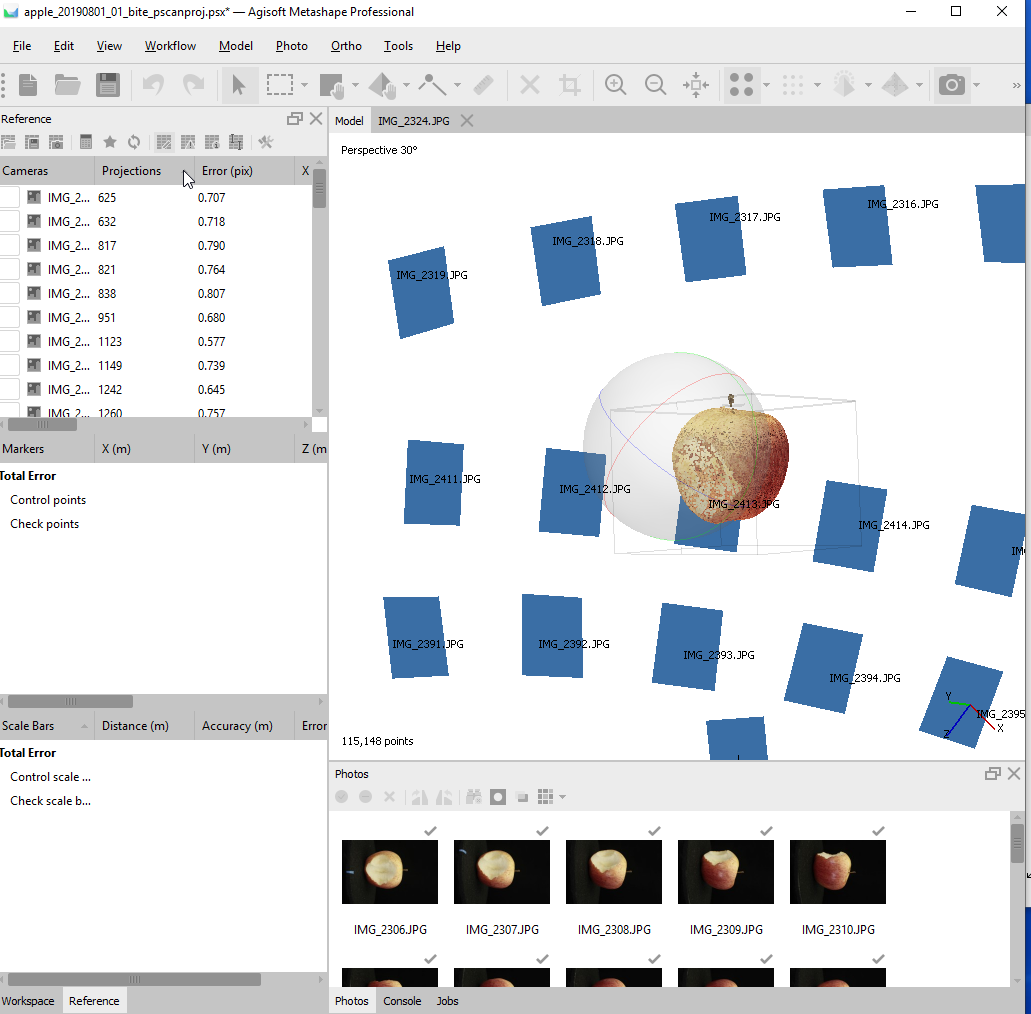
Optimize. Next step is to optimize the photo alignment, removing the worst points in sparse cloud. The goal is to remove error from the project and have a set of very accurate tie points, high quality camera calibration, and image positioning. The goal is NOT to have a huge number of tie points, so do not panic if you see your points quickly disappearing through the optimization process or you need to delete a bunch of photos! Technically, you’re optimizing to achieve a low RMSE value (root mean square error… just some statistics) for the project and have a minimum of 150-200 tie points on each image. As you go through the following steps, check how your photos are doing by switching from the Workspace Pane to the Reference pane. In the top window, sort by projections, (you’ll probably need to expand the window and drag both Projections column and Error column to the left). If any photo goes below 150 you can’t use that photo. You can check that photo by double clicking on it in the Reference pane. If it is blurry, delete it from the project. If there are duplicates, delete one from the project.
- Go to the Tools menu and click on Optimize Cameras. Click OK with default settings.
- Go to Model menu and click on Gradual Selection and make the following selections:
 	Criterion: Reconstruction uncertainty
 	Level: 10
- Go to the Tools menu and click on Optimize Cameras. Click OK with default settings. Check your projections in the Reference pane.
- Go to Model menu and click on Gradual Selection and make the following selections:
 Criterion: Projection accuracy
 Level:  2.5 (between 2 and 3)
This will select points. Go to Edit menu and click Delete Selection. (Again, it might look like A LOT of points are selected. That is OK). Check your Projections numbers in the Reference pane, remembering to re-sort them. Delete any blurry or duplicate images.
- Go to the Tools menu and click on Optimize Cameras. Click OK with default settings. Check your projections in the Reference pane again.
- Repeat the Projection accuracy one more time for a total of 2 times.
OPTIONAL: If you’re using scales, at this point you can set the scale bar accuracy. On the Reference pane, click the
 , to pull up the Reference pane settings menu.
 - Go to Model menu and click on Gradual Selection and make the following selections:
 Criterion : Reconstruction uncertainty
 Level:  10
Go to Edit menu and click Delete Selection.
- Go to the Tools menu and click on Optimize Cameras. Select all of the boxes in General. Don’t worry if some are grayed out.
- At this point, in your Reference pane you want to check your projections and take a look at the Error (pix) column—the root mean square reprojection error. You can also check the overall RMS reprojection error for your project by right-clicking on the chunk and choosing show info. You want the RMS reprojection error to be about 0.1 If any of the Errors are greater than .3, repeat the previous 3 steps—Reconstruction uncertainty and Optimize Cameras—until all pixels above .3 have been removed. These error measure uncertainty, and whether you’re able to hit these low numbers will depend on the quality of your images, camera angles etc.
Build Dense Cloud, Mesh, and Texture
The next three steps typically take a very long time, so it is best to start this process when and where you can leave your computer work unattended, possibly for several hours. One way to streamline the process is to use the Batch Process tool in Workflow, add each of the following three steps to your Process and let it run to completion overnight.
- Go to the Workflow menu and click on Build Dense Cloud. In the pop-up window select the following:
 Quality:  High
 Depth Filtering: Aggressive
When this is done processing, check out your dense cloud (double click on it in Workspace to get it to appear in your Model pane.
- Go to the Workflow menu and click on Build Mesh. In the pop-up window select the following:
 Source data: Dense cloud
 Surface type: Arbitrary (3D)
 Quality:  High
 Face count:  High
Note: The previous parameters may change depend on what you’re planning on doing with your model. For example, if you want to use it in VR, use a lower face count. These values also influence processing time, so plan accordingly. You can always duplicate your chunk and test out different parameters.
- Go to the Workflow menu and click on Build Texture. You can accept the defaults for building the texture, but they should be as follows:
 Mapping mode: Generic
 Blending mode: Mosaic
 Texture size/count: 4096 x 1
Export your model and enjoy!
Agisoft Metashape will export to most 3D formats that are usable in other 3D modeling software. OBJ is a standard format that is commonly used. STL is a format that most 3D printers use though keep in mind it will not include any texture information.
If you are interested in printing your new 3D object please check out the Scholars’ Lab Makerspace! Check out Abhishek’s series of postings on other ways to create 3D content for VR and AR and how to add them to a Steam VR environment.