
A Midlife Crisis Blender Tutorial: Creating and Stabilizing a Time Lapse Video
Smooth Large Series of Pictures of the Same Thing
Going into the new year, I had a folder full of pictures of roughly the same scene that I wanted to turn into a time lapse. I learned early-on that they weren’t as similar as I’d hoped, which wasn’t a complete surprise as it took me some time to fine-tune my shooting spot and the landmarks I’d use in the grid on my phone. And, regardless if I’d done everything perfectly from the start, even the smallest changes that come from not using a tripod make for a pretty jumpy time lapse, so I wanted to find a way to align the images to smooth the end result, even if just a little bit.
Often, the crux of learning how to do a new thing online is proper search terminology. For instance, “smooth large series of pictures of the same thing” was entirely unhelpful, but “align images time lapse” resulted in a bunch of quality links, and ultimately led me to my favorite place for technical smarts, Stack Overflow. I always walk away from a SO sesh feeling smarter while simultaneously feeling like I don’t know anything about anything.
I had options galore, and I tried a few of them. align_image_stack.exe produced weird results, and the lack of graphic interface was frustrating. GIMP and Photoshop were straightforward, but the automated results weren’t great, and I got frustrated in my attempts to manually set target points. I also realized that using image-based tools, I was still going to have to use some sort of video editing software to create the time lapse. In truth, I was always going to use Blender, I just had to make half attempts at and subtly sabotage the other options as a way to convince myself to learn an entirely novel tool.
Blender is the free and open source 3D creation suite. It supports the entirety of the 3D pipeline—modeling, rigging, animation, simulation, rendering, compositing and motion tracking, even video editing and game creation.
Despite “video editing” seemingly being an afterthought in that blurb I pulled from the Blender website, it turns out to be a capable tool that also happens to be free and open source. I was loosely familiar with Blender in the 3D world, so that could be why I was drawn to it. I’m also a bit of a masochists when it comes trying new software. I just couldn’t turn down the opportunity to verbally assault my computer screen because of something I didn’t understand or a version change that completely took a tutorial off the rails. I think it was a good decision.
The Search for Inspirado
On top of the general cruddiness of 2021, it was an especially bad year personally, and the icing on the cake was the fact that my outlet for years, mountain biking, was no longer bringing me joy. See, I’m a pretty antsy person. I’m full of nervous energy that needs an outlet lest I go nuts. It’s it bit of a blessing and a curse. So, as 2022 rolled around and I was staring at my phone, feeling sorry for myself, I happened upon this video on YouTube.
What really struck me was the statement, and I’m paraphrasing, that nothing like the Manitou Incline exists anywhere else. And, I mean, strictly speaking that’s true. That specific trail only exists there. However, things like it exist all over the place. In fact, there’s something like it a few minutes from my house. A trail that takes you straight up the mountain to a rock outcropping and some pretty spectacular views. In my search for inspirado (warning, adult language), I’d stumbled upon something I found exciting, something that got me motivated. I was immediately ready to start hiking.
Now, I had no intention of trying to do it thousands of times like the guy in the video. In fact, initially, my goal was just to hike every day until I got sick of it. Weirdly, that never happened, and I kept going through the year, sometimes multiple times in a day. I wasn’t obsessive about it. We still traveled and took vacations, so I had plenty of days off, but whenever I was able, I did the hike. Now, I know to many, my wife included, the idea of hiking up and down the same trail time and again seems kinda crazy, and I can’t argue with that. I can’t tell you why this clicked, but it did. It was comforting to discover, over the course of the year, that I was not alone in my weirdness.
With each new opportunity to look out at the view beyond my little town, I was moved by the changing scenery as snow accumulated and melted, so into the first month, I found a suitable location and began taking a picture of that view every time I hiked. I knew I wanted to create some sort of time lapse GIF or video to try and capture the changes I was seeing and experiencing. Unfortunately, this idea came to me late enough in the month that I missed out on most of the beautiful snow days, but here are some snowy pics from other viewpoints, and some random shots I just like.
A Blender Tutorial, Brought To You By Somebody Else
It seemed weird for this thing to essentially be a shameless self promotion with a shaky time lapse video tacked to the end, so I thought I’d disguise this post as a tutorial. Fortunately, there are hundreds of good Blender time lapse tutorials out there. So, rather than try and duplicate those efforts, I’m just going to share the work-throughs I found the most useful, and try to provide a little guidance in the places that I needed it.
Creating a Time Lapse Video
Blender stabilization works on the frames of a video, so step one is to create a raw time lapse video of your pictures. I found this tutorial useful, though it assumes a level of Blender experience I did not possess. If you’re like me, the notes below might be helpful.
-
When you first open Blender to make your initial time lapse, choose Video Editing to create a new project.
-
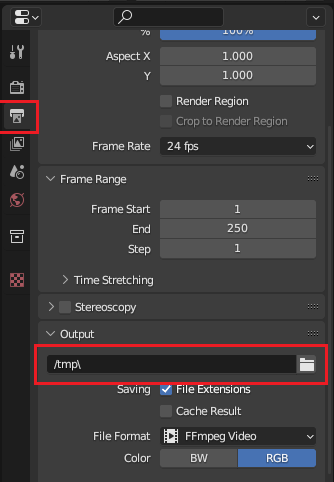
Before rendering your video, set your outputs by selecting the Output Properties panel and setting the output type and location. By default, Blender outputs to the “C:\tmp” folder.
-
To Render, on the main toolbar, click Render > Render Animation.
-
Once your video has rendered, I strongly suggest saving your Blender project and opening a new, separate Video Editing project for the stabilization process.
Video Stabilization
Now that you have a time lapse video, you can work on stabilizing the individual frames. This tutorial by Oliver Villar is excellent and thorough. The biggest obstacles I ran into were version changes (Blender at 3.4.1 looks very different) and some things I’m going to clarify below. For starters, you want to open the Movie Clip Editor to enable the ability to create tracks for stabilization.

In your new Video Editing project, change one of your panels to Movie Clip Editor by clicking the Editor Type pulldown. I like to use the Preview pane because it leaves the Sequencer, which is useful for scanning through your video. You can now Drag/Drop your raw time lapse video into the Movie Clip Editor window.
In the tutorial above, he’s working with a video that was shot over a short span of time (seconds). This means each frame is going to be very similar far as shadowing, color, and exposure, which makes it easy for the software to track a marker through the entire video.
However, if your video is made of pictures shot over different days at different times of day, the differences from image to image make it difficult for the software to track the marker. In my case the solution was to hand-place the marker on each frame. While tedious, it went pretty fast and ultimately made for a much more watchable time lapse. I recommend using the small window on the Track panel to fine-tune your marker placement. There, the track isn’t blocking the image, and it’s easier to make small changes.
![]()
-
In the video, he references the Nodes window. In Blender 3.4.1, you want to open Compositor.
-
As before, set your outputs by selecting the Output Properties panel and setting the output type and location.
-
To Render, on the main toolbar, click Render > Render Animation.
Step 3, Profit!
I had it in my mind that I’d just throw this video up and embed it. However, it’s massive, weirdly so, and sharing with the usual suspects makes for a clunky embed. In the end, I settled for YouTube. While I’m more familiar with YouTube content than I’d care to admit, I’ve always been insistent that I’d never create an account. Well, rule broken. Though, now that I have a channel, I’m assuming the ad bucks will start rolling in. That’s how it works, right?
Short story long, here are the results of my potentially questionable efforts. I’m not completely happy with the results, but I needed to get this post completed, and if I have to place another track marker, I might need to spend another year climbing that mountain. Tip: if it’s pixelated, click the Settings button and force 1080p resolution.